Philadelphia Food Network and Recipes
  • Home
    • Main Website
  • Recipes
  • Meals
    • 30 Minute Meals
    • Beef Meals
    • Breakfast & Pastries
    • Chicken Meals
    • Fish Meals
    • Pork Meals
    • Seafood Meals
    • Turkey Meals
    • Vegan & Vegetarian Meals
    • Other Meals
  • Categories
    • Barbecue
    • Casseroles
    • Cheesesteak
    • Cultural Dishes
    • Desserts & Treats
    • Featured
    • Fresh Baked Breads
    • Grilling
    • Pasta
    • Pizza
    • Popular Recipes
    • Side Dishes
    • Soul Food
    • Soups & Salads
  • About Us
  • Contact Us
  • Submit Your Recipe
Top Posts
Asparagus & Cheese Stuffed Chicken
Asian Cabbage Stir Fry
High Protein Broccoli Cheddar Soup
Homemade Popeyes Cajun Fries
Immune Boosting Vegetable Soup
Creamy Crab Bisque
Garlic Parmesan Pizza
Green Bean Bundles
Cheesy Scalloped Potatoes
Garlic Parmesan Roasted Potatoes
Philadelphia Food Network and Recipes
  • Home
    • Main Website
  • Recipes
  • Meals
    • 30 Minute Meals
    • Beef Meals
    • Breakfast & Pastries
    • Chicken Meals
    • Fish Meals
    • Pork Meals
    • Seafood Meals
    • Turkey Meals
    • Vegan & Vegetarian Meals
    • Other Meals
  • Categories
    • Barbecue
    • Casseroles
    • Cheesesteak
    • Cultural Dishes
    • Desserts & Treats
    • Featured
    • Fresh Baked Breads
    • Grilling
    • Pasta
    • Pizza
    • Popular Recipes
    • Side Dishes
    • Soul Food
    • Soups & Salads
  • About Us
  • Contact Us
  • Submit Your Recipe
Copyright 2021 - All Right Reserved
Featured SidesSide Dishes

Brisket Loaded Twice Baked Potatoes

by myphillyconnection May 23, 2026
written by myphillyconnection

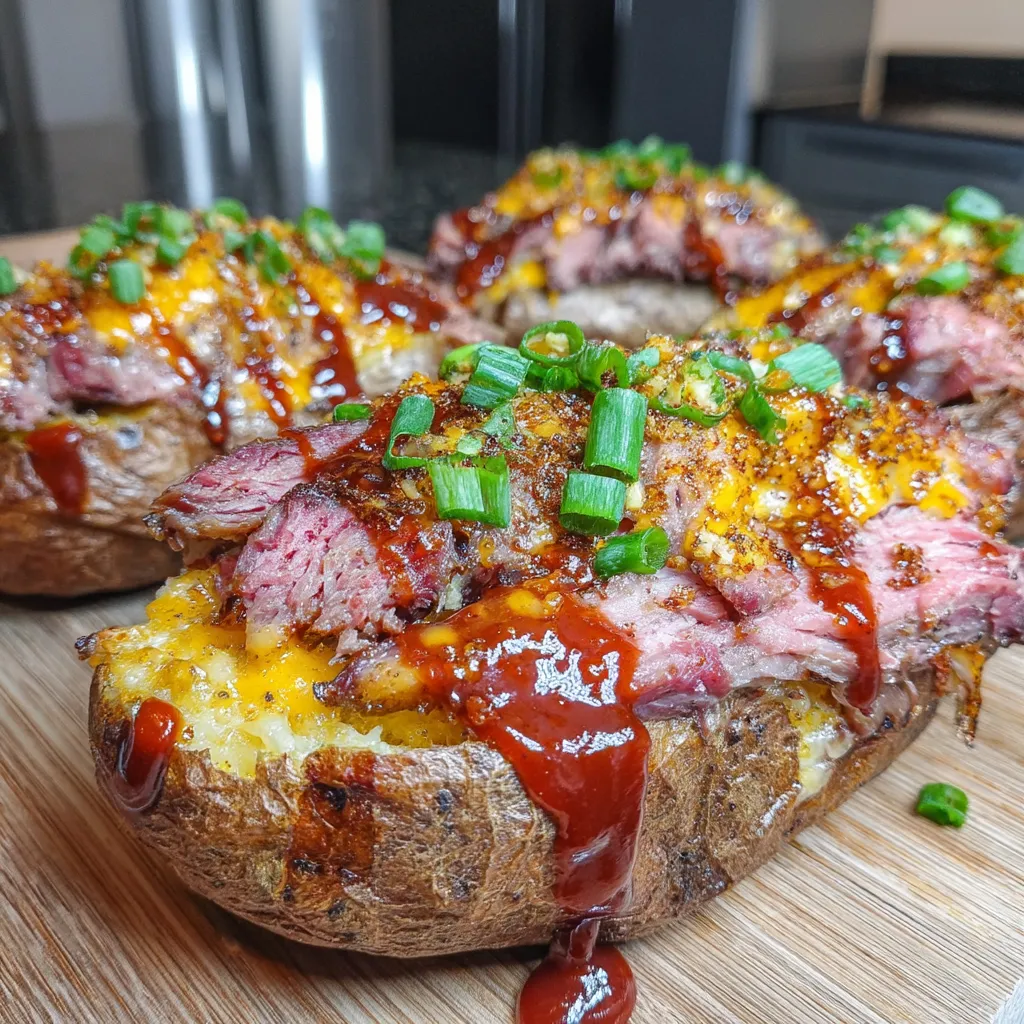
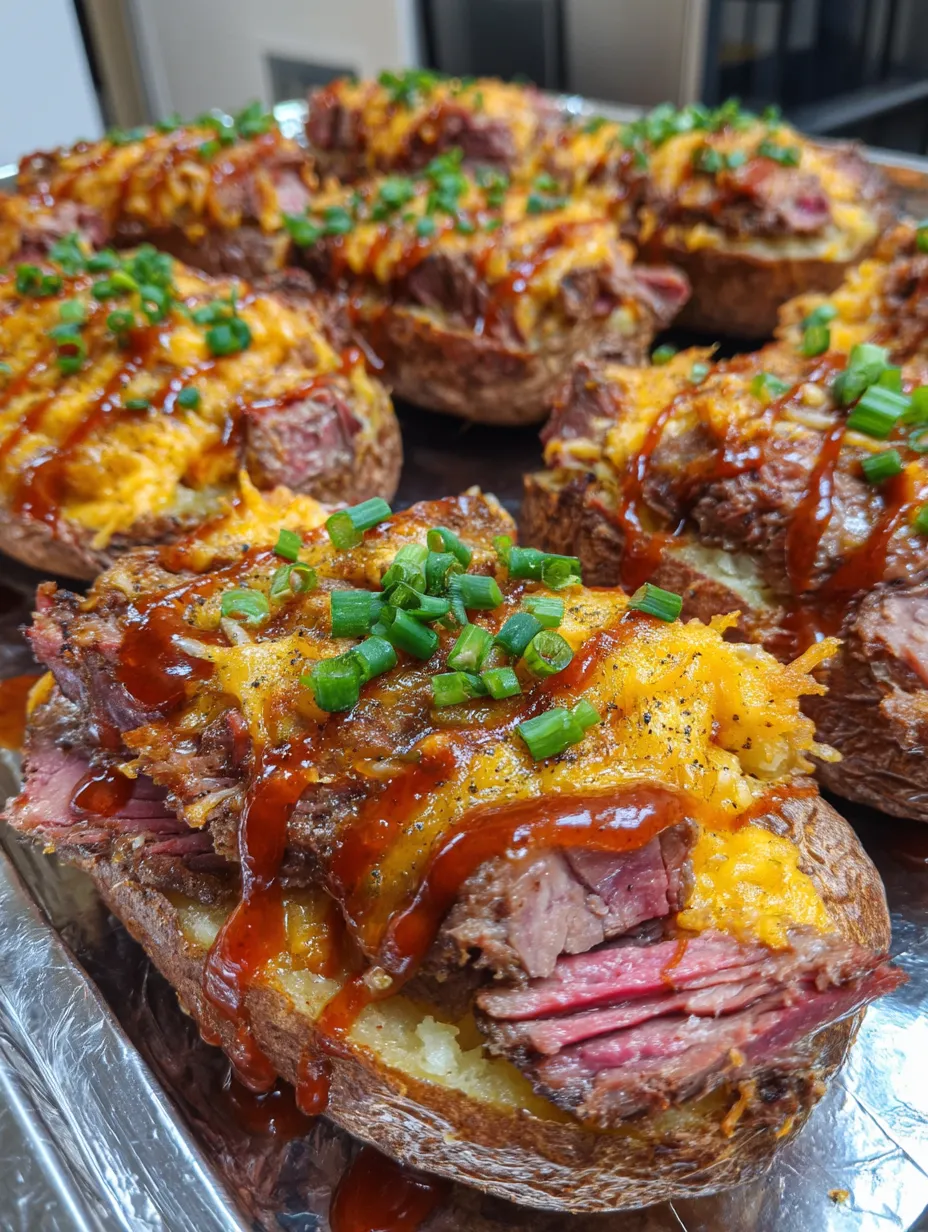
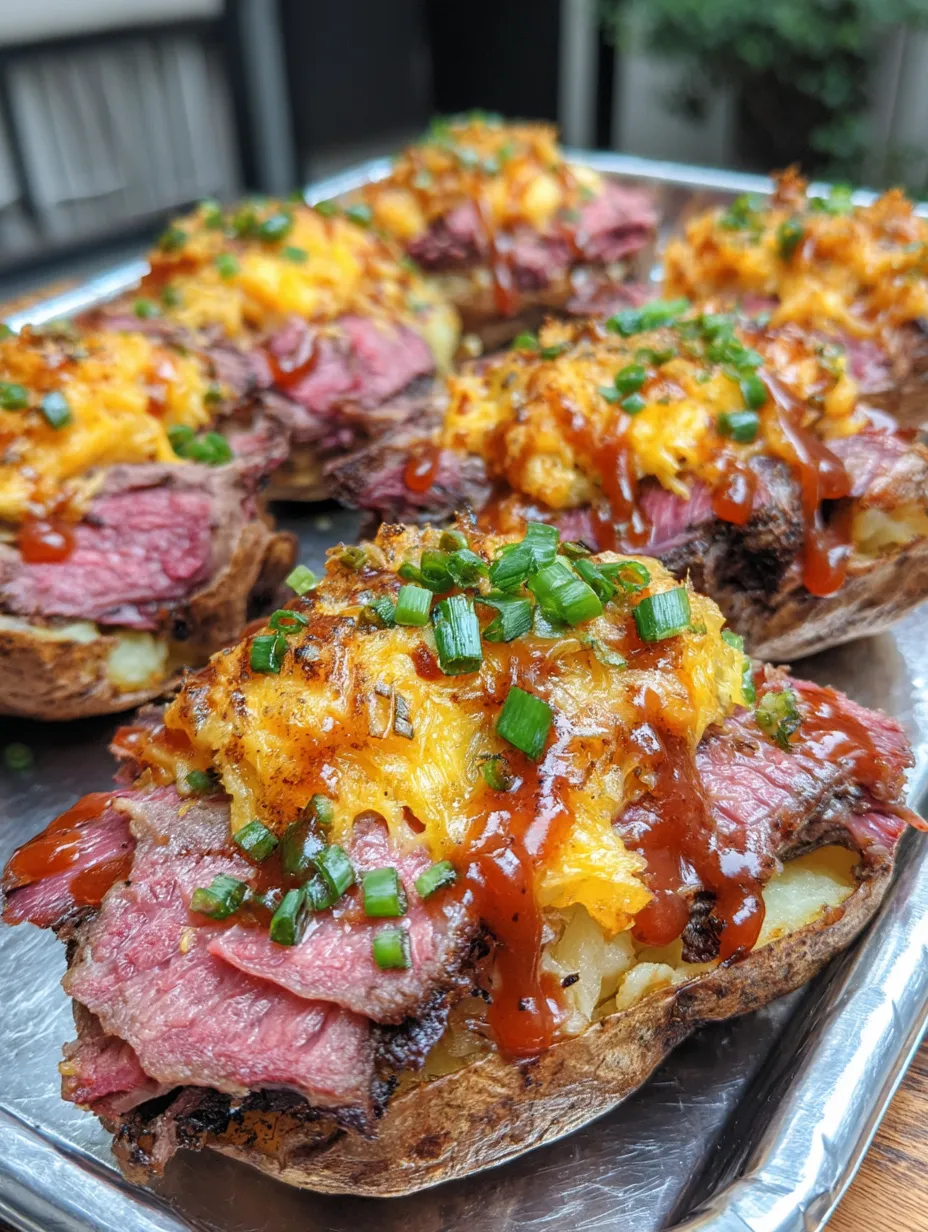
Smoke a brisket overnight. Bake potatoes, scoop out centers and mix with butter, sour cream, cheese and seasonings. Refill and bake again. Top with chopped brisket, BBQ sauce, crispy onions and jalapeños.

Brisket Loaded Twice Baked Potatoes

Got a Sunday family dinner that needs to blow everyone away? These loaded potatoes crammed with choky brisket bits practically scream “I spent all day making this just for you.” Truth is, they take some time but most of it’s hands off while that brisket does its thing in the smoker. I started making these four years ago after my brother in law brought over half a smoked brisket and we couldn’t possibly eat it all. Now the family actually gets more excited about these potatoes than the brisket itself.

Why You’ll Love This Recipe

  • Gets you maximum credit for your smoking efforts with that perfect crispy outside, fluffy inside potato texture
  • Tastes even better the next day when flavors meld together if any actually survive the first round
  • Creates that “I could sell this at a restaurant” moment when you bring them to the table
  • Makes people think you slaved all day when really the smoker did most of the work

Last summer I made these for my neighbor who swore he didn’t like twice baked potatoes. Caught him in my kitchen at midnight raiding the fridge for the last one. His wife texted me the next morning with just an eye roll emoji. Now I make an extra batch whenever I know they’re coming over.

‘Stranger Things’ Star Charlie Heaton Takes on Role as Tommy Shelby’s Son in ‘Peaky Blinders’ Sequel

Magic Ingredients

  • Brisket Point: The fattier end of the brisket gives you those melt in your mouth bits that burst with flavor—don’t even think about using the leaner flat section for this
  • Russets: Their starchy insides whip up fluffy and their sturdy skins hold everything together—those thin skinned varieties just collapse under all this goodness
  • Full Fat Sour Cream: Brings that tangy richness that balances the smoke—no light versions here or you’ll miss that velvety mouthfeel
  • Real Butter: None of that “spread” nonsense—we need the real deal to bring everything together
  • Fresh Jalapeños: The fresh pop of heat cuts through all that richness—sometimes I leave some seeds in when cooking for adults only

My dad taught me about brisket smoking when I was ten, standing beside his ancient offset smoker that leaked smoke from every seam. He’d wake up every hour overnight to check the temperature, something I thought was crazy until I tasted the results. These potatoes are my way of honoring that tradition while making it my own.

Brisket Loaded Twice Baked Potatoes

Step-by-Step Instructions

Overnight Brisket

Slather that whole brisket with yellow mustard—don’t worry, you won’t taste it later, it just helps the seasoning stick. Cover every inch with Thundering Longhorn seasoning, working it into all the crevices. Get your smoker steady at 215°F with a water pan for moisture. Throw the meat on and go to bed. The overnight cooking isn’t just convenience—it’s when all that magical collagen breakdown happens.

Morning Wrap

Checking on the brisket is my favorite morning ritual. When it hits 165°F inside, it’s wrapping time. Lay out butcher paper not foil, spread some beef tallow, add the brisket, then more tallow on top. Wrap it tight but not strangling and back on the smoker it goes at 250°F. The paper lets it breathe while the tallow bastes everything.

Potato Prep

Stab those russets all over with a fork—not just a couple pokes, really go at them. Trust me, exploded potato all over your smoker is a cleaning nightmare I’ve experienced firsthand. Coat them with beef tallow regular oil works but isn’t nearly as good and kosher salt, then wrap in foil. The salted skin gets just crispy enough to hold everything while staying edible.

The Mix

The secret’s in how you mix the filling. Scoop out the potato guts leaving just enough shell for structure. Add butter while it’s still hot so it melts completely. The sour cream goes in next, then cheese, then everything else. Mix it just until combined—overdo it and you’ll get wallpaper paste instead of fluffy potatoes. I learned this the hard way at my first dinner party.

Finishing Touches

That second bake caramelizes the top and makes those crispy bits everyone fights over. Then comes the layering—crispy onions on the bottom they get soggy if you put them on top, chopped brisket next so it nestles into the potato, BBQ sauce drizzled over, then fresh jalapeños. Each layer plays its part in the perfect bite.

You Must Know

  • The brisket needs proper resting time—rushing this step means dry meat
  • Different sized potatoes cook at different rates—match them up for even cooking
  • The filling tastes even better when you make it a day ahead and let the flavors meld

My first attempt at these was a disaster—overcooked potatoes that collapsed when I tried to stuff them and brisket that wasn’t chopped small enough to distribute evenly. We ate it anyway, laughing at the ugly mess on our plates. Four years and countless iterations later, they’ve become the most requested item at family gatherings. My uncle even faked a birthday to get me to make them again.

Perfect Company

These potatoes need little else, but a simple side of tangy coleslaw provides the perfect contrast to cut through the richness. Skip the mayo heavy versions and go with something vinegar based that brings acidity to the party. A cold beer—something dark and malty—completes the picture perfectly. For dessert, keep it simple with fresh seasonal berries topped with just a touch of whipped cream.

Tasty Twists

When brisket isn’t an option, pulled pork makes an incredible substitute—the tangier sauce pairs beautifully with the creamy potatoes. For a quicker version when you’re craving these midweek, rotisserie chicken tossed with a little liquid smoke and BBQ sauce creates a surprising approximation. Vegetarians at your table might enjoy smoked mushrooms instead—portobellos develop an amazing meaty quality when properly smoked.

Keeping Fresh

These potatoes actually reheat beautifully if you do it right. Store them without the toppings, covered in the fridge for up to three days. Reheat in a 350°F oven until hot through the middle—microwaving makes them gummy. Add the toppings fresh after reheating. For meal prep, you can freeze the filled but unbaked potatoes wrapped individually, though the texture isn’t quite as perfect as fresh.

Brisket Loaded Twice Baked Potatoes

Smoke Secrets

  • Wood Choice: Oak gives reliable, medium smoke flavor, but adding a chunk of hickory creates deeper complexity
  • Temperature Truth: Never trust the thermometer built into your smoker—use a separate digital one for accuracy
  • Rest Importance: A proper rest in a cooler isn’t optional—it’s what separates amateur brisket from the stuff people dream about

I’ve made these potatoes for cookouts, football Sundays, and once for a neighborhood potluck where they disappeared faster than anything else on the table. What began as a way to use leftover brisket has become the reason I smoke brisket in the first place. My kids have started requesting them for birthday dinners, bypassing restaurant options for dad’s smoky, loaded potatoes. Sometimes the best family traditions start by accident—a random kitchen experiment that becomes the dish everyone talks about years later.

Frequently Asked Questions

→ Can I use leftover brisket instead of smoking a new one?Absolutely! This recipe is perfect for using leftover brisket. Just warm it slightly before chopping and adding to the potatoes. If you don’t have brisket, other smoked or braised meats like pulled pork or chuck roast work great too.

→ What can I substitute for Thundering Longhorn seasoning?Any good beef rub with salt, pepper, garlic, and some heat will work. Common substitutes include SPG (salt, pepper, garlic), Texas-style rub, or even a simple mix of 2 parts kosher salt, 1 part black pepper, and 1 part garlic powder.

→ Can I make these potatoes ahead of time?Yes! You can prepare the twice-baked potatoes up to the second baking stage, then refrigerate them covered for 1-2 days. When ready to serve, bake them until hot (about 25-30 minutes at 375°F), then add the toppings.

→ Can I cook the potatoes in the oven instead of a smoker? Definitely. Bake the potatoes in a 400°F oven for about 1 hour until tender. For the twice-baking step, use the same temperature. You’ll miss a bit of smoke flavor, but they’ll still be delicious.

→ What’s the best type of potato to use? are ideal for twice-baked potatoes because of their fluffy texture and sturdy skins. Select potatoes of similar size for even cooking, and look for ones without green spots or sprouts.

Brisket Loaded Twice Baked Potatoes

Serves: 6 Prep Time: 15 minutes Cooking Time: 45M 45M
Nutrition facts: 200 calories 20 grams fat
Rating: 5.0/5
( 1 voted )
Pin
Print

Ingredients

→ For the Brisket

 1 whole brisket (12-15 pounds), trimmed
 Yellow mustard (as needed for binder)
 Thundering Longhorn seasoning (or your favorite beef rub)
 Beef tallow for wrapping and potato coating

→ For the Twice Baked Potatoes

 6 large russet potatoes, washed and dried
 2/3 stick (about 5 tablespoons) unsalted butter, softened
 1 cup sour cream
 3 tablespoons hot sauce (like Franks or Tabasco)
 1 cup fresh scallions, chopped
 1 jalapeño, seeded and finely diced
 1 1/2 packages (about 6 cups) shredded cheddar cheese
 Potato Slayer seasoning or your favorite potato seasoning
 Kosher salt for potato skins

→ For the Toppings

 Crispy fried onion chips (store-bought)
 Chopped brisket (from the point section)
 Fresh jalapeños, diced for garnish

→ For the BBQ Sauce (Option 1)

 1 cup ketchup
 1/2 cup brown sugar
 1/2 cup pineapple preserves
 1/4 cup apple cider vinegar
 2 tablespoons Worcestershire sauce
 1 tablespoon molasses
 1 tablespoon honey
 2 teaspoons garlic powder
 2 teaspoons onion powder
 2 teaspoons kosher salt
 1 teaspoon black pepper
 2 teaspoons cayenne pepper (adjust to taste)

→ For the BBQ Sauce (Option 2)

 1 cup ketchup
 1/4 cup apple cider vinegar
 1/4 cup honey
 1/4 cup brown sugar
 2 tablespoons Worcestershire sauce
 2 teaspoons kosher salt
 2 teaspoons onion powder
 2 teaspoons garlic powder
 2 teaspoons smoked paprika
 2 teaspoons red pepper flakes
 1 teaspoon black pepper

Instructions

Start by trimming your brisket if needed. Apply a thin coating of yellow mustard all over as a binder - this helps the seasoning stick and won't leave any mustard flavor. Generously sprinkle Thundering Longhorn seasoning (or your favorite beef rub) over the entire surface, patting it gently to adhere.

Fire up your smoker to 215°F. Place a water pan inside for moisture, then position the brisket on a wire rack or grates above it. Close the lid and let it smoke overnight - this is where the magic happens! The slow cooking process allows the fat to render and the meat to become tender.

In the morning, check your brisket. Once it reaches an internal temperature of 165°F (this usually takes 8-10 hours, depending on size), it's time to wrap. Lay out a large piece of butcher paper and spread some beef tallow on it. Place the brisket on the paper, add more tallow on top, then wrap it tightly. Return it to the smoker and increase the temperature to 250°F. Continue smoking for several more hours until the brisket is probe tender in the thickest part (the point) - it should feel like pushing a knife through warm butter. This usually happens around 200-205°F internal temperature. Once tender, remove it from the smoker, keeping it wrapped. Place it in an aluminum pan, then into a cooler (with no ice). Seal the cooler and let the brisket rest for 2-3 hours - this critical step allows the juices to redistribute.

After the brisket has been resting for an hour, prep your potatoes. Use a fork to poke several holes in each one (this prevents them from exploding). Rub each potato generously with beef tallow, then sprinkle with kosher salt. Wrap each potato in foil and place them in your smoker or oven at 375°F.

Bake the potatoes until they're tender when pierced with a fork or probe thermometer, about 45-60 minutes depending on size. Remove them from the smoker or oven and let them rest for 20 minutes - they'll be too hot to handle immediately. Once potatoes are cool enough to handle, cut them open lengthwise and carefully scoop out the insides, leaving about 1/4 inch of potato attached to the skin to maintain structure. Place the scooped potato flesh in a large bowl. Add the softened butter, sour cream, 3/4 of the shredded cheese, chopped scallions, hot sauce, and Potato Slayer seasoning (or your favorite potato seasoning). Mix until well combined but still fluffy - don't overmix or they'll become gluey.

Spoon the filling back into the potato skins, mounding it slightly. Top each potato with the remaining shredded cheese. Return them to the smoker or oven at 375°F for 15-20 minutes, until the cheese is melted and the tops are slightly golden.

While the potatoes are baking, make your BBQ sauce. Choose one of the sauce recipes and combine all ingredients in a saucepan. Whisk over medium heat for 6-8 minutes until the sauce thickens slightly and all ingredients are well incorporated. Remove from heat and let cool slightly.

Unwrap your rested brisket. Slice the flat portion for other uses and finely chop the point section into small, bite-sized pieces for topping the potatoes. The point has more intramuscular fat, making it juicier and perfect for this application.

Remove the twice-baked potatoes from the smoker. Top each with a generous layer of crispy fried onion chips, then a hearty handful of the chopped brisket point. Drizzle your homemade BBQ sauce over everything, then garnish with fresh diced jalapeños for color and a kick of heat. Serve immediately while everything is hot and delicious.

Notes

  1. This recipe is perfect for using up leftover brisket - if you already have smoked brisket on hand, you can skip straight to the potato preparation steps.
  2. The beef tallow adds incredible flavor to both the brisket and potatoes. If you don't have tallow, you can substitute butter for the potatoes, but the flavor won't be quite the same.
  3. For an extra layer of flavor, try mixing some of the chopped brisket directly into the potato filling before the second bake.
  4. The wrapped brisket can be held in a cooler for up to 6 hours while still maintaining food-safe temperature, which gives you flexibility on timing the potatoes.


0 comments
0 FacebookTwitterPinterestLinkedin
CasserolesFeatured SidesSide Dishes

Southern Baked Mac and Cheese

by myphillyconnection May 23, 2026
written by myphillyconnection
Mind-Blowing Southern Baked Macaroni and Cheese

This Southern baked macaroni and cheese completely changed my understanding of what mac and cheese could be. We’re talking about a creamy, extra-saucy base loaded with five different cheeses, topped with a crispy, golden layer that’s basically cheese heaven. After years of making regular stovetop mac and cheese, I tried this recipe for a family reunion and watched grown adults literally fight over the last scoop. Now it’s become my signature dish that people specifically request whenever there’s a potluck or special occasion.

Why You’ll Love This

  • Five different cheeses – Each one brings something special to create the ultimate flavor combination
  • Extra saucy base – Way more cheese sauce than pasta, which is exactly how it should be
  • Crispy cheese topping – That golden, bubbly top layer is pure magic
  • Feeds a crowd – One pan serves 12 people, perfect for gatherings

My husband’s grandmother, who’s been making mac and cheese for seventy years, took one bite of this and declared it better than hers. Coming from a woman who’s never admitted anyone else’s cooking was superior, that was basically a miracle. Now she asks me to bring this to every family dinner instead of making her own.

‘Stranger Things’ Star Charlie Heaton Takes on Role as Tommy Shelby’s Son in ‘Peaky Blinders’ Sequel

What Makes It Special

  • Medium cheddar: Provides that classic mac and cheese flavor everyone expects
  • Colby Jack and mozzarella: Add creaminess and that perfect stretchy texture
  • Sharp and white cheddar: Bring complexity and depth to the cheese blend
  • Cream cheese: Makes everything incredibly smooth and rich
  • Heavy cream and half-and-half: Create that luxurious, restaurant-quality sauce
  • Secret seasonings: Mustard powder, paprika, and onion powder elevate the whole thing
Mind-Blowing Southern Baked Macaroni and Cheese

Making It Happen

Getting your setup ready

Before you start anything else, shred all your cheeses and set aside 1 cup each of medium cheddar, Colby Jack, and mozzarella for the top layer. Preheat your oven to 425°F and get a 9×13 casserole dish ready. Cook your pasta just slightly less than al dente, it’ll finish cooking in the oven, so you don’t want it mushy.

Creating the sauce base

In a large skillet, melt 5 tablespoons of butter over medium-high heat and sauté the minced garlic for about a minute until it smells amazing. Whisk in the flour and keep stirring until it turns golden, this creates the roux that’ll thicken your sauce. Slowly add the reserved pasta water, heavy cream, and half-and-half while whisking constantly to prevent lumps.

The cheese magic

Turn the heat down to low and start adding your cheeses one handful at a time, whisking constantly until each addition is completely melted before adding more. This takes patience, but it’s what creates that incredibly smooth sauce. Finish by whisking in the cream cheese and all your seasonings until everything’s perfectly combined.

Assembly and baking

Toss your cooked pasta with 2 tablespoons of butter in your casserole dish, then pour that incredible cheese sauce over everything and mix well. Top with your reserved cheeses and bake for 10 minutes. Switch to broil for the last 5 minutes to get that perfect crispy, golden top layer.

You Must Know

  • Shred your own cheese – Pre-shredded cheese has anti-caking agents that prevent smooth melting
  • Add cheese gradually – Rushing this step creates a grainy, broken sauce
  • Don’t overcook the pasta – It continues cooking in the oven, so slightly underdone is perfect
  • Watch the broiling carefully – That crispy top can go from perfect to burnt in seconds

I learned the hard way that using pre-shredded cheese just doesn’t work for this recipe. My first attempt resulted in a grainy, weird texture that was nothing like the smooth, creamy sauce this recipe is supposed to create. Now I always shred fresh cheese and get perfect results every time.

Perfect Serving Ideas

This mac and cheese is rich enough to be a main dish, but it’s incredible alongside barbecue, fried chicken, or any Southern-style meal. A simple green salad or some steamed vegetables help balance out all that richness. For beverages, sweet tea is traditional, but honestly, cold beer or even wine works great too.

Making It Different

You can customize this by adding cooked bacon, ham, or lobster to make it even more special. Sometimes I throw in some jalapeños for heat, or use different cheese combinations based on what I have available. The base recipe is so good that almost any addition works well.

Make-Ahead Tips

This is perfect for entertaining because you can assemble everything up to the point of baking and refrigerate overnight. Just add an extra 10-15 minutes to the baking time if you’re starting from cold. The flavors actually get better after sitting, so it’s ideal for meal planning.

Mind-Blowing Southern Baked Macaroni and Cheese

Success Secrets

  • Room temperature ingredients melt better – Take your cheeses and cream cheese out ahead of time
  • Use a good-sized skillet – You need room to whisk without making a mess
  • Let it rest before serving – A few minutes of cooling helps it set up for cleaner slices

This Southern baked macaroni and cheese has become more than just a recipe in our house – it’s become a tradition. Every time I make it, I’m reminded why some dishes become legendary in families. The combination of multiple cheeses, that perfect creamy-to-crispy ratio, and those special seasonings creates something that’s way more than the sum of its parts. It’s the kind of comfort food that makes people feel loved and taken care of, which is really what good cooking is all about.

Frequently Asked Questions

→ Why do you use five different types of cheese? Each cheese brings something unique – sharp cheddar for tang, mozzarella for stretch, Colby Jack for creaminess. The blend creates incredible depth of flavor.

→ Can I make this ahead of time? You can assemble it and refrigerate for up to 24 hours before baking. Add 10-15 extra minutes to the baking time if starting from cold.

→ What if I don’t have all five types of cheese? You can substitute with similar cheeses, but try to use at least 3-4 different types for the best flavor complexity. Avoid pre-shredded if possible.

→ How do I prevent the cheese sauce from breaking? Keep heat low when adding cheese, add it gradually one handful at a time, and whisk constantly. Room temperature cheese melts more smoothly.

→ Can I freeze leftovers? Yes, but the texture may change slightly. Freeze for up to 3 months and reheat in the oven with a splash of milk to restore creaminess.

Southern Baked Mac and Cheese

Serves: 12 Prep Time: 25 minutes Cooking Time: 15M 15M
Nutrition facts: 200 calories 20 grams fat
Rating: 5.0/5
( 1 voted )
Pin
Print

Ingredients

→ Main ingredients

 1 pound pasta noodles (elbow or rotini preferred)
 7 tablespoons room temperature butter, divided
 4 garlic cloves, minced
 3 tablespoons all-purpose flour
 ½ cup reserved pasta water
 ½ cup heavy cream
 3½ cups half and half
 ¼ cup whipped cream cheese

→ Cheese blend

 12 oz medium cheddar cheese, shredded (reserve 1 cup for topping)
 8 oz Colby Jack cheese, shredded (reserve 1 cup for topping)
 8 oz mozzarella cheese, shredded (reserve 1 cup for topping)
 4 oz sharp cheddar cheese, shredded
 4 oz white cheddar cheese, shredded

→ Seasonings

 ½ teaspoon onion powder
 ½ teaspoon paprika
 ½ teaspoon mustard powder
 Salt to taste
 Black pepper to taste

Instructions

Preheat oven to 425°F. Shred all cheeses and set aside 1 cup each of medium cheddar, Colby Jack, and mozzarella for the crispy topping. Mince garlic and divide butter into portions.

Boil pasta until slightly less than al dente. Reserve ½ cup pasta water before draining. Pour drained pasta into a greased 9x13 casserole dish and toss with 2 tablespoons of butter.

In a large skillet over medium-high heat, melt the remaining 5 tablespoons of butter. Add minced garlic and sauté for 1 minute until fragrant.

Whisk in flour and continue stirring until golden, about 2 minutes. Gradually pour in reserved pasta water, heavy cream, and half and half, whisking constantly until thickened, about 4 minutes.

Reduce heat to low. Add the non-reserved cheeses one handful at a time, whisking until each addition is fully melted before adding more. Whisk in cream cheese, onion powder, paprika, and mustard powder until smooth.

Pour the cheese sauce over the buttered pasta and mix thoroughly. Top evenly with the reserved shredded cheeses for the crispy crust.

Bake for 10 minutes, then switch oven to broil and cook for an additional 5 minutes until the top is golden and crispy.

Remove from oven and let cool for 3-5 minutes before serving. This allows the sauce to set up slightly for easier serving.

Notes

  1. This recipe is perfect for using up leftover brisket - if you already have smoked brisket on hand, you can skip straight to the potato preparation steps.
  2. The beef tallow adds incredible flavor to both the brisket and potatoes. If you don't have tallow, you can substitute butter for the potatoes, but the flavor won't be quite the same.
  3. For an extra layer of flavor, try mixing some of the chopped brisket directly into the potato filling before the second bake.
  4. The wrapped brisket can be held in a cooler for up to 6 hours while still maintaining food-safe temperature, which gives you flexibility on timing the potatoes.

    0 comments
    0 FacebookTwitterPinterestLinkedin
    Featured SidesSide Dishes

    Sweet Potato Casserole with Marshmallows

    by myphillyconnection May 22, 2026
    written by myphillyconnection

    Roast sweet potatoes until tender, mash with butter, maple syrup, and cinnamon, spread in a baking dish, cover with mini marshmallows, and bake until golden.

    Sweet Potato Casserole with Marshmallows
    Sweet Potato Casserole with Marshmallows | recipesbyclare.com

    Sweet potato casserole with marshmallows is one of those holiday dishes that sparks intense debates about whether it’s a side dish or dessert. You roast sweet potatoes until they’re soft, mash them with butter, maple syrup, and cinnamon, spread everything in a baking dish, cover the top with mini marshmallows, and bake until those marshmallows get golden and toasted. The whole thing is ridiculously sweet and probably has no business being called a vegetable side, but it shows up on every Thanksgiving table anyway because tradition demands it.

    Why This Casserole Works

    • **Roasting** the sweet potatoes instead of boiling them concentrates their natural sweetness and prevents them from getting waterlogged.
    • **Maple syrup** adds subtle complexity beyond just plain sugar, making the flavor more sophisticated.
    • **Mini marshmallows** toast more evenly than large ones, ensuring a uniform golden topping.
    • The simple ingredient list means you can throw this together using mostly pantry staples.

    My uncle Jim claims he doesn’t like sweet foods and refuses dessert, but every single Thanksgiving, I watch him go back for seconds of this sweet potato casserole, piling it on his plate next to the turkey like it’s a normal savory side dish. Now it’s become this running joke where we all wait to see how much he’ll eat before someone mentions the sugar content and he pretends to be offended.

    Master Your Ingredients

    • Sweet potatoes: Five to six large ones (Russet variety, do not use yams) for a 9×13 inch baking dish.
    • Maple syrup: A third of a cup adds sweetness and distinctive maple flavor.
    • Butter: One full stick, melted into the mashed sweet potatoes for richness and creamy texture.
    • Ground cinnamon: One tablespoon brings warmth and spice.
    • Mini marshmallows: One 10-ounce bag for the classic toasted topping.
    • Salt: Just a pinch to balance all the sweetness and enhance the potato flavor.
    Sweet Potato Casserole with Marshmallows
    Sweet Potato Casserole with Marshmallows

    Making This Casserole (Holiday Prep)

    Roasting the potatoes: Preheat oven to 400 degrees Fahrenheit. Scrub potatoes, pat dry, and place on a parchment-lined baking sheet (do not peel yet). **Roast for 50 to 75 minutes** until easily pierced with a fork.

    Mashing the filling: Let potatoes cool slightly (10-15 minutes). Peel off the skins and place the flesh in a large mixing bowl. Add maple syrup, melted butter, cinnamon, and salt. Mash to your preferred consistency (smooth or slightly chunky).

    Assembling in dish: Spray a 9×13 inch dish well. Spread the mashed sweet potato mixture into an even, level layer. Scatter mini marshmallows uniformly across the top, covering everything edge to edge. **Gently press down** so they sink slightly into the filling.

    Baking and toasting: Bake at 400 degrees Fahrenheit. **Set a timer for 10 minutes** and begin watching closely. Continue baking for an additional 2 to 10 minutes until the marshmallows are gorgeously golden brown. Remove immediately to prevent burning.

    Resting:Let the casserole rest for about **5 minutes** before serving so it sets up slightly and isn’t molten hot.

    You Must Know

    • Roasting sweet potatoes prevents the filling from becoming watery and runny.
    • **Watching the marshmallows closely** (especially after the 10-minute mark) is crucial; they go from golden to burnt incredibly fast.
    • Letting the casserole **rest** prevents the filling from being soupy when scooped.
    • The **pinch of salt** balances the sweetness and enhances the potato flavor.
    • Mini marshmallows toast more uniformly than large marshmallows.

    I learned about the marshmallow burning situation when I got distracted helping someone in another room during that final baking step. The marshmallows had gone from golden to charcoal in literally no time, and the smell of burnt sugar took hours to leave the house. Now I stand in front of the oven watching those marshmallows like a hawk.

    Different Ways to Make It

    • Add a **pecan streusel topping** instead of or in addition to marshmallows for crunch and nutty flavor.
    • Use **brown sugar** instead of maple syrup for a more traditional molasses sweetness.
    • Mix in some **vanilla extract** for extra warmth and depth.
    • Add **orange zest** to the filling for bright citrus notes.
    • Use **coconut milk** instead of butter for a dairy-free version.

    Keeping and Reheating

    • The casserole keeps in the refrigerator for up to 5 days. The marshmallows will deflate and get sticky.
    • Reheat the whole dish covered with foil in a **350-degree oven** for about 20 minutes.
    • The sweet potato filling can be **made ahead** and stored in the fridge for up to 2 days before assembling and baking.
    • **Do not add the marshmallows until right before baking** or they will dissolve into the filling.
    Sweet Potato Casserole with Marshmallows
    Sweet Potato Casserole with Marshmallows

    Kitchen Secrets

    • **Pierce the sweet potatoes** before roasting to prevent them from exploding in the oven.
    • Don’t skip the butter, as it creates the essential creamy texture.
    • If your marshmallows are browning too fast, cover the dish loosely with foil and continue baking until the casserole is heated through.

    The simplicity is what makes it work—no fancy ingredients or complicated techniques, just sweet potatoes mashed with butter and syrup then topped with marshmallows like people have been doing for generations. The nostalgic factor makes this special beyond just the taste, connecting everyone at the table to holiday memories and family traditions.

    Frequently Asked Questions

    → Can I use canned sweet potatoes instead? You can, but fresh tastes way better. If you do use canned, drain them really well and skip the roasting step. You’ll need about 3-4 cans.

    → Why are my marshmallows burning? Marshmallows toast super fast. Check them every couple minutes after the 10 minute mark. Some ovens run hot and will toast them in 8 minutes.

    → Can I make this ahead of time? Yes! Make the sweet potato mixture up to 2 days ahead and keep it covered in the fridge. Add the marshmallows and bake right before serving.

    → What if I don’t like marshmallows? Try a pecan streusel topping instead. Mix chopped pecans with brown sugar, flour, and melted butter, then sprinkle it on top before baking.

    → Can I use regular sized marshmallows? Sure, but mini marshmallows cover the top more evenly. If using regular ones, cut them in half or just space them out across the top.

    → How do I know when the sweet potatoes are done roasting? They should be really soft when you poke them with a fork. The skin might look wrinkled and some syrup might leak out. That’s perfect.

    Sweet Potato Casserole with Marshmallows

    Serves: 8 Prep Time: 15 minutes Cooking Time: 70M 70M
    Nutrition facts: 200 calories 20 grams fat
    Rating: 5.0/5
    ( 1 voted )
    Pin
    Print

    Ingredients

    → For the Sweet Potato Base

     5 to 6 medium sweet potatoes
     ⅓ cup maple syrup
     1 stick butter, melted (8 tbsp)
     1 tbsp cinnamon
     Pinch of salt

    → For the Topping

     10 oz bag mini marshmallows

    Instructions

    Turn your oven to 400 degrees and let it preheat while you get the sweet potatoes ready.

    Line a baking dish with parchment paper and place your sweet potatoes on it. Slide them into the oven and roast for a full hour until they're soft all the way through.

    Let the potatoes cool down enough to handle, then peel off the skins. Put the potato flesh into a large bowl and add your maple syrup, melted butter, cinnamon, and a pinch of salt. Mash everything together until it's as smooth or chunky as you like it.

    Spray a 9 by 13 inch baking dish with cooking spray. Scoop the sweet potato mixture into the dish and spread it out evenly so the top is nice and flat.

    Pour the entire bag of mini marshmallows over the top. Press them down gently into the sweet potato mixture so they stick.

    Put the dish on the middle rack of your oven and bake for 10 to 20 minutes. Watch it closely because marshmallows can burn fast. You want them golden and toasted, not charred.

    Take it out when the marshmallows look perfect. Let the casserole cool for a few minutes before serving so nobody burns their mouth.

    Notes

    1. Every oven is different with marshmallows, so stay close during that final bake. They can go from perfect to burnt in less than a minute.
    2. You can make the sweet potato base a day ahead and keep it in the fridge. Just add the marshmallows right before baking.
    3. If you like a crunchier topping, some people add chopped pecans along with the marshmallows.
    4. This is a holiday favorite that works great for Thanksgiving dinner.

    0 comments
    0 FacebookTwitterPinterestLinkedin
    30 Minute MealsChicken Meals

    Mexican Chicken With Cheese Sauce

    by myphillyconnection March 24, 2026
    written by myphillyconnection

    A perfectly seasoned chicken breast dripping with homemade cheese sauce changed my weeknight dinner game forever. This Mexican-inspired dish brings restaurant flavor right to your kitchen table, and the best part? It takes less time than scrolling through your delivery apps. The combination of warm spices and creamy cheese sauce creates something truly magical.

    Why You’ll Love This Recipe

    • Creates restaurant-worthy chicken without leaving home
    • Takes just 25 minutes from start to finish
    • Uses spices you probably already have
    • Makes enough sauce to drizzle over everything
    • Perfect for meal prep and leftovers
    • Lets you control the heat level

    Last night, I served this to my neighbor who swears she can’t cook. By the end of dinner, she was taking pictures of my spice blend. There’s something about that cheese sauce that makes everyone reach for seconds.

    The Forgotten Medieval Dessert

    Essential Ingredients

    • Chicken breasts: Should be evenly thin-sliced
    • Fresh spices: Make all the difference
    • Real butter: Creates sauce magic
    • Sharp cheddar: Brings the best flavor
    • Whole milk: Makes the sauce silky
    • Fresh garlic powder: Adds depth
    • Paprika: Brings color and warmth
    • Cumin: Adds that Mexican soul
    Mexican Chicken With Cheese Sauce Recipe
    Mexican Chicken With Cheese Sauce Recipe

    Detailed Instructions

    Seasoning Symphony

    Start by mixing your spice blend – this is where the magic begins. Each spice plays its part in creating layers of flavor that’ll make your taste buds dance.

    Chicken Perfection

    Drizzle those chicken breasts with olive oil, then massage in your spice blend. Don’t be shy – every bite should be fully seasoned. Think of it as giving your chicken a warm, flavorful blanket.

    Sauce Magic

    While your chicken bakes, create that velvety cheese sauce. Start with a butter-flour base, slowly add milk, then watch as your cheese melts into liquid gold. Keep whisking – smooth sauce is your goal.

    Final Touch

    Let your chicken rest briefly before slicing, then drizzle generously with that gorgeous cheese sauce. A sprinkle of fresh herbs makes everything look and taste even better.

    You Must Know

    • Room temperature milk makes smoother sauce
    • Fresh-grated cheese melts better than pre-shredded
    • Don’t overcrowd your baking pan
    • Let the chicken rest before cutting

    My family requests this dish weekly now. The way the spices form a perfect crust on the chicken while the cheese sauce brings everything together – it’s pure comfort food magic.

    Perfect Pairings

    Around here, we love serving this over cilantro-lime rice – it soaks up that cheese sauce beautifully. A side of black beans and corn makes it feel like a real Mexican feast. Sometimes I throw together quick-pickled red onions for brightness, or slice up some avocado when they’re perfectly ripe. On busy nights, warmed tortillas work great for scooping up every last bit of sauce.

    Make It Your Own

    The beauty of this recipe lies in its flexibility. Sometimes I add a pinch more cayenne when I’m craving heat, or swap the cheddar for pepper jack cheese. My sister makes hers with chicken thighs instead of breasts. During summer, I love topping it with fresh pico de gallo. For a lower-carb version, serve it over cauliflower rice or roasted vegetables.

    Keep It Fresh

    This chicken stays juicy in the fridge for about three days. The cheese sauce can be tricky to store – it’s best made fresh, but if you need to save it, reheat gently with a splash of milk while whisking. I often make extra spice blend to keep in a jar – it’s great on roasted potatoes or grilled vegetables too.

    Kitchen Wisdom

    • Thin chicken breasts cook more evenly
    • Don’t walk away from your cheese sauce – it needs constant attention
    • Check chicken temperature at the thickest part
    • Keep whisking that sauce until it’s silky smooth

    The first time I made this, my kitchen smelled like my favorite Mexican restaurant. Now it’s become our Monday night tradition – something to look forward to at the start of each week.

    Spice Level Control

    You’re in charge of the heat here. Start with less cayenne and crushed red pepper if you’re unsure, then adjust next time. My kids prefer it milder, while my husband adds extra hot sauce to his portion. That’s the beauty of cooking at home – everyone gets it just how they like it.

    Easy Mexican Chicken With Cheese Sauce
    Easy Mexican Chicken With Cheese Sauce

    Chef’s Helpful Tips

    • Toast your spices in a dry pan before mixing for extra flavor
    • Use block cheese and grate it yourself – it really makes a difference
    • Let sauce cool slightly before serving – it’ll thicken a bit
    • Keep some extra warm milk nearby while making the sauce

    This recipe reminds me of the first time I tried Mexican food beyond tacos. It taught me that simple ingredients, treated with respect and paired with a great sauce, can create something truly special. Whether you’re cooking for family or entertaining friends, this dish never fails to impress.

    Frequently Asked Questions

    → Why use block cheese instead of pre-shredded? Freshly shredded block cheese melts better as it doesn’t contain anti-caking agents found in pre-shredded cheese.

    → Can I adjust the spice level? Yes, adjust the amount of cayenne and red pepper flakes to control heat.

    → What can I serve this with? Rice, quinoa, or any grain works well. Also great with tortillas or vegetables.

    → Can I make the sauce ahead? Best made fresh, but can be reheated gently with a splash of milk if needed.

    → Can I use chicken thighs? Yes, but cooking time may need to be adjusted for thicker cuts.

    Mexican Chicken With Cheese Sauce

    Serves: 6 Prep Time: 10 minutes Cooking Time: 15 minutes 15 minutes
    Nutrition facts: 200 calories 20 grams fat
    Rating: 5.0/5
    ( 1 voted )
    Pin
    Print

    Ingredients

     For Chicken

     1½ lbs. thin sliced, skinless + boneless chicken breast (about 6 breasts)
     1 teaspoon chili powder
     1 teaspoon garlic powder
     1 teaspoon onion powder
     ½ teaspoon crushed red pepper flakes
     ½ teaspoon dried oregano
     1½ teaspoons paprika
     1½ teaspoons ground cumin
     ¼ teaspoon salt
     ¼ teaspoon black pepper
     Olive oil

    → For Cheese Sauce

     2 tablespoons all purpose flour
     2 tablespoons butter
     1 cup milk
     ¼ teaspoon salt
     ⅛ teaspoon cayenne pepper
     ¼ teaspoon paprika
     1 cup extra sharp cheddar cheese, freshly shredded

    → Garnish

     Fresh chopped parsley or cilantro (optional)

    Instructions

    Preheat oven to 425°. Line a large baking pan with parchment paper or foil.

    Mix together all of your seasonings together for chicken in a small bowl. Place chicken breasts on lined baking sheet. Drizzle some olive oil over each breast, and rub around on each side. Take your mixed seasonings and sprinkle all over chicken breasts, making sure to rub on each sides.

    Bake in preheated oven for 15-18 minutes, or when chicken reaches internal temperature of 165°.

    While chicken is cooking, make your sauce by melting butter over medium heat in a small sauce pan. When butter is melted, add flour and whisk until smooth.

    Add in milk slowly, whisking constantly until nice and smooth. Add in your shredded cheese, and whisk constantly until smooth. Add in paprika and cayenne. Mix until well combined.

    Place chicken over grain of choice, drizzle with cheese sauce and garnish with fresh parsley if desired.

    Notes

    1. Use freshly shredded cheese for better melting.
    2. Can adjust spice levels to taste.
    3. Serve over any grain of choice.

    Tools You'll Need

    • Large baking pan
    • Parchment paper or foil
    • Small saucepan
    • Whisk

    0 comments
    0 FacebookTwitterPinterestLinkedin
    Fresh Baked Breads

    Chocolate Bread

    by myphillyconnection March 22, 2026
    written by myphillyconnection

    A decadent quick bread combining cocoa powder and chocolate chips for double chocolate flavor. Mixed in one bowl for easy cleanup.

    When my sweet tooth kicks in this chocolate bread saves the day. I created this recipe for those moments when you need something chocolatey but don’t want to drag out the mixer. It’s become my go-to recipe when friends pop over unexpectedly.

    A Few Reasons to Love This Recipe

    The texture of this bread gets me every time soft pillowy slices with an intense chocolate flavor. I keep the ingredients simple so I can whip it up whenever the mood strikes. Plus it freezes beautifully which means chocolate happiness is always minutes away.

    Claire Foy Praises Andrew Garfield’s ‘Whimsy’ in Latest Film

    What You’ll Need

    • Cocoa powder: 1/2 cup natural unsweetened or Dutch-processed cocoa powder for a rich flavor.
    • Caster sugar: 3/4 cup, or granulated sugar for sweetness.
    • Brown sugar: 1/2 cup light brown sugar for added moisture and depth.
    • Butter: 1/2 cup melted. Use unsalted, or omit additional salt if using salted butter.
    • Buttermilk: 3/4 cup. Store-bought full-fat is ideal. Alternatively, mix 1/2 cup milk with 1/4 cup Greek yogurt or sour cream.
    • Chocolate chips: 3/4 cup milk, dark, or your favorite variation for bursts of chocolate.

    Kitchen Magic Time

    Prepare Dry Ingredients

    In a large mixing bowl, combine 1 1/2 cups all-purpose flour, cocoa powder, 1 tsp baking powder, 1/2 tsp baking soda, and a pinch of salt. Add sugars and stir briefly.

    Mix Wet Ingredients

    In a medium bowl, whisk together melted butter, 2 large eggs, and 1 tsp vanilla extract. Stir until the eggs are fully broken up.

    Combine Wet and Dry

    Pour the wet mixture into the dry ingredients. Add buttermilk and gently stir until combined. Fold in chocolate chips.

    Prepare for Baking

    Transfer the batter to a greased and lined loaf pan. Sprinkle extra chocolate chips on top for garnish.

    Bake

    Bake in a preheated oven at 350°F (175°C) for 40-45 minutes. Check doneness with a skewer— it should come out clean or with a few moist crumbs.

    A close-up of a sliced piece of rich chocolate cake on a white plate, set against a soft pink background.
    A close-up of a sliced piece of rich chocolate cake on a white plate

    My Kitchen Secrets

    I learned this trick from my mom grab your kitchen scale for perfect measurements. Don’t go crazy with the mixing once everything comes together step away from the bowl. Trust your timer but also trust your nose when it smells like chocolate heaven it’s almost ready.

    From My Kitchen to Yours

    This bread has saved many office parties and family gatherings. I love watching people’s faces light up when they taste it. Sometimes I bring a loaf to new neighbors it’s the perfect way to say welcome to the neighborhood.

    What Makes This Recipe Special

    The magic happens when buttermilk meets melted butter and brown sugar. These ingredients work together to create the most amazing texture while cocoa and chocolate chips bring that deep chocolate flavor we all crave.

    Keep It Fresh

    I store my bread in my grandmother’s old tin container it stays perfect for three days. When I’m planning ahead I slice and freeze portions wrapped in plastic. Ten seconds in the microwave brings them back to life.

    A close-up view of a slice of rich chocolate loaf cake on a pale pink plate.
    A close-up view of a slice of rich chocolate loaf cake

    Make It Your Own

    Sometimes I switch things up with white chocolate chips or throw in some peanut butter chips when I’m feeling fancy. My kids love it when I drizzle warm chocolate over the top just before serving.

    Worth Every Bite

    This chocolate bread never disappoints. It’s my go to recipe when chocolate cravings hit. Whether you’re enjoying it fresh from the oven or as an afternoon pick me up it hits all the right notes.

    A Happy Accident

    This recipe came to life one day when I ran out of bananas for my usual chocolate banana bread. Turns out removing the bananas and tweaking the ingredients created something even more amazing pure chocolate goodness ready whenever you are.

    Simple is Better

    I love that this recipe needs just a bowl and spatula. No fancy equipment required. It’s the kind of baking that feels relaxing and rewarding without any fuss or complicated steps.

    A sliced chocolate loaf cake is displayed on a white plate, showcasing its moist texture and rich color.
    A sliced chocolate loaf cake

    The Secret to Perfect Texture

    Getting that dreamy texture comes down to measuring with care and watching your baking time. Those chocolate chips create little pockets of melty goodness throughout the bread making each slice absolutely irresistible.

    Ways to Enjoy

    Most days I enjoy a slice plain but when friends come over I love serving it with fresh whipped cream or vanilla ice cream. It’s also perfect with my morning coffee when I need something special to start the day.

    Spreading Joy One Slice at a Time

    Baking this bread has become my way of showing love. Nothing beats seeing someone’s face light up when they taste it for the first time. It’s more than just chocolate bread it’s a way to make someone’s day a little sweeter.

    A moist, sliced chocolate loaf cake sits on a white plate, showcasing its rich, dark interior.
    A moist, sliced chocolate loaf cake

    Frequently Asked Questions

    → Can I use regular milk instead of buttermilk?

    Use 1/2 cup milk plus 1/4 cup Greek yogurt, or make buttermilk by adding 1 tablespoon vinegar to 1 cup milk.

    → Why is my bread browning too quickly?

    Cover with foil after 30 minutes if top browns too fast. This protects the top while allowing the center to finish baking.

    → Can I freeze this bread?

    Yes, slice first then wrap individual pieces in plastic wrap. Freeze up to 3 months. Thaw at room temp or microwave briefly.

    → What type of chocolate chips work best?

    Any type works – dark, milk, or even white chocolate chips. Choose based on your sweetness preference.

    Conclusion

    A delightful chocolate bread recipe that combines rich cocoa and chocolate chips, creating a moist and decadent treat. Perfect for breakfast, dessert, or an afternoon snack, this one-bowl recipe is simple to prepare and guaranteed to satisfy chocolate lovers.

    Chocolate Bread

    Serves: 12 Prep Time: 20 minutes Cooking Time: 45 minutes 45 minutes
    Nutrition facts: 250 calories 20 grams fat
    Rating: 5.0/5
    ( 1 voted )
    Pin
    Print

    Ingredients

     1 1/4 cups all-purpose flour.
     1/2 cup cocoa powder.
     1 teaspoon baking soda.
     1 1/2 teaspoons baking powder.
     1/4 teaspoon salt.
     1/2 cup brown sugar.
     1/4 cup granulated sugar.
     1/2 cup unsalted butter, melted.
     1 teaspoon vanilla extract.
     2 large eggs.
     3/4 cup buttermilk.
     3/4 cup chocolate chips.

    Instructions

    Heat oven to 350°F. Line 9x5 loaf pan.

    Combine flour, cocoa, leaveners, salt and sugars.

    Whisk melted butter, vanilla and eggs.

    Add wet ingredients and buttermilk to dry mix. Stir in most chips.

    Top with remaining chips, bake 40-45 minutes until done.

    Notes

    1. Can use any chocolate chips.
    2. Cover with foil if browning too fast.
    3. Freezes well.

    Tools You'll Need

    • 9x5 loaf pan.


    Allergy Information

    Please check ingredients for potential allergens and consult a health professional if in doubt.

    Nutrition Facts (Per Serving)

    It is important to consider this information as approximate and not to use it as definitive health advice.
    • Calories: ~
    • Total Fat: ~
    • Total Carbohydrate: ~
    • Protein: ~

    0 comments
    0 FacebookTwitterPinterestLinkedin
    Fresh Baked Breads

    Bojangles Biscuits

    by myphillyconnection March 22, 2026
    written by myphillyconnection

    Classic Southern buttermilk biscuits made with self-rising flour and brushed with melted butter. Simple ingredients create light, flaky layers.

    You won’t believe how perfectly these copycat Bojangles biscuits turn out. I’ve spent years perfecting this recipe and finally nailed that signature fluffy texture and buttery flavor that made Bojangles famous. Just six simple ingredients and you’ll have hot homemade biscuits that taste just like the real thing.

    The Magic Touch

    Let me tell you the secret to these biscuits extra baking powder for incredible rise. You’ll get that same golden crust and tender middle that made me fall in love with Bojangles in the first place.

    Kathryn Newton Won’t Stop Gatecrashing Interviews

    What You Need

    • Flour: 2 cups all purpose nothing fancy here.
    • Baking Powder: 1 tablespoon this is key.
    • Salt: 1 teaspoon to enhance flavors.
    • Butter: 1/2 cup keep it ice cold.
    • Buttermilk: 3/4 cup real buttermilk please.
    • Shortening: 1/4 cup for greasing.
    A stack of four freshly baked biscuits rests on a light surface with soft natural lighting in the background.
    A stack of four freshly baked biscuits

    Let’s Make Biscuits

    Get ReadyCrank that oven to 450°F and grease your pan.Mix It UpWhisk those dry ingredients then cut in cold butter until crumbly.Add the Good StuffPour in buttermilk stir just until it comes together don’t overwork it.Shape With LovePat it out cut your biscuits straight down no twisting.Bake to GoldenAbout 12 minutes till they’re perfect.

    My Best Tips

    Everything needs to be cold cold cold. Don’t work that dough too much or you’ll lose the fluff. Cut straight down with your biscuit cutter no twisting or you’ll seal those edges.

    Perfect Pairings

    These biscuits shine with fried chicken eggs and bacon or a drizzle of honey. Perfect hot from the oven with butter melting inside.

    A stack of golden, flaky biscuits on a white plate.
    A stack of golden, flaky biscuits on a white plate

    A Southern Legacy

    Over 1000 biscuits per store daily that’s how popular these are. Fresh every 20 minutes is Bojangles’ promise and now you can have that same freshness at home.

    Make Them Your Own

    Try adding cheese herbs or crumbled bacon to the dough. Sometimes I mix in dried cranberries and a touch of sugar for breakfast.

    Keep Them Fresh

    Store in an airtight container 2 days max. Wrap in foil to reheat. Want them anytime? Freeze unbaked biscuits then bake straight from frozen.

    Pure Southern Comfort

    These biscuits bring that true taste of the South right to your kitchen. Serve them any time of day and watch them disappear.

    A close-up of fluffy, golden-brown biscuits stacked on a decorative plate.
    A close-up of fluffy, golden-brown biscuits

    Frequently Asked Questions

    → Why use self-rising flour? Self-rising flour ensures even distribution of leavening agents for consistent rise. It already contains salt and baking powder.

    → Can I make these without buttermilk? Regular milk with a tablespoon of vinegar or lemon juice can substitute for buttermilk. Let it sit 5 minutes before using.

    → Why brush with butter after baking? Brushing with butter adds flavor and keeps the tops soft while giving them a slight shine.

    → How thick should I roll the dough? Roll dough to about 1/2 inch thickness. Too thin and they won’t rise properly, too thick and they may not cook through.

    Bojangles Biscuits

    Serves: 12 Prep Time: 30 minutes Cooking Time: 12 minutes 12 minutes
    Nutrition facts: 100 calories 20 grams fat
    Rating: 5.0/5
    ( 1 voted )
    Pin
    Print

    Ingredients

    3 cups self-rising flour.
     3 teaspoons baking powder.
     2 teaspoons confectioners' sugar.
     1/2 cup shortening.
     1 1/4 cup buttermilk.
     Melted butter for brushing.

    Instructions

    Heat oven to 450°F.

    Combine flour, baking powder and sugar.

    Work shortening into flour until crumbly.

    Stir in buttermilk gently. Knead until smooth.

    Roll and cut biscuits, place 2 inches apart.

    Cook 12 minutes until golden. Brush with butter.

    Notes

    1. Classic Southern biscuit recipe.
    2. Best served warm.

    Tools You'll Need

    • Baking sheet.
    • Biscuit cutter.
    • Rolling pin.


    Allergy Information

    Please check ingredients for potential allergens and consult a health professional if in doubt.

    Nutrition Facts (Per Serving)

    It is important to consider this information as approximate and not to use it as definitive health advice.
    • Calories: ~
    • Total Fat: ~
    • Total Carbohydrate: ~
    • Protein: ~

    0 comments
    1 FacebookTwitterPinterestLinkedin
    Breakfast & PastriesVegetarian

    Braided Cherry Danish

    by myphillyconnection March 21, 2026
    written by myphillyconnection

    This stunning braided pastry uses puff pastry dough filled with almond-flavored cream cheese and cherry filling. The braid looks fancy but it’s actually pretty simple to make.

    The cherry danish braid is the ultimate “secret weapon” for anyone who wants to serve a stunning, bakery-quality breakfast with minimal stress. This recipe transforms frozen puff pastry into a golden, multi-layered masterpiece filled with a silky almond-infused cream cheese and vibrant cherry filling. The intricate-looking braid is a simple architectural trick that creates a beautiful presentation, making it the perfect centerpiece for holiday brunches or special family mornings. It is a high-reward pastry that delivers a sophisticated balance of buttery crunch, creamy richness, and sweet fruit in every bite.

    Why You’ll Adore This

    • Visual Wow-Factor: The braided technique creates a professional aesthetic that rivals high-end European patisseries.
    • Flaky Texture: Using puff pastry ensures hundreds of delicate, buttery layers that shatter perfectly when sliced.
    • The Almond Secret: A touch of almond extract in the cream cheese filling provides that unmistakable “authentic bakery” aroma and flavor.
    • Efficient Preparation: One box of pastry yields two full braids, making it easy to feed a large group or stock your freezer.
    • Balanced Palette: The tangy cream cheese prevents the sweet cherry filling from feeling heavy, creating a light yet indulgent experience.

    I first debuted this braid at a Mother’s Day brunch, and it was so photogenic my mom insisted on a full photo shoot before we could even slice it. My neighbor Tom was so convinced I’d hired a pastry chef that I had to invite him over just to prove how easy it actually is. Watching the skepticism turn into amazement as the dough is pleated and baked is almost as satisfying as the first bite. It’s a reliable showstopper that makes everyone feel like they’re at a five-star brunch.

    Kathryn Newton Won’t Stop Gatecrashing Interviews

    Foundation Ingredients

    • Puff Pastry Sheets: One box (two sheets). These must be thawed for 40 minutes but kept cold to ensure the butter inside creates maximum lift and flakiness
    • Softened Cream Cheese: 8oz at room temperature. A smooth, lump-free filling is essential for an even bake and professional mouthfeel
    • Cherry Pie Filling: Provides a stable, glossy fruit center that stays in place while the pastry puffs around it
    • Almond Extract: The secret ingredient. It enhances the cherry flavor and provides a sophisticated, professional aroma
    • Turbinado Sugar: Coarse golden crystals that add a sparkly crunch and visual appeal to the finished braid
    • Egg Wash: One egg beaten with water. This provides the signature mahogany shine seen in bakery display cases
    • Powdered Sugar & Milk: Whisked into a thin glaze for the final white-streak drizzle that completes the look
    Cherry Danish
    Cherry Danish

    Creating Your Braid

    Preparing the Center:Beat the cream cheese with sugar, vanilla, and almond extract until silky. Unfold your puff pastry onto floured parchment. Roll slightly to smooth the folds, then mark a 4-inch center lane. Spread the cream cheese mixture and then the cherry filling down this center lane, leaving the sides bare for cutting.The Strips and Pleats:Cut diagonal strips (about 1 inch wide) along both sides of the pastry, angling down from the edge toward the filling. Fold the top and bottom ends over the filling to seal. Then, alternate crossing the left strip over the right, creating a neat, overlapping braid that completely encloses the fruit.The Essential Chill:Refrigerate the assembled braid for 30 minutes before baking. This firms up the butter in the pastry layers, which is the only way to get a dramatic, sky-high puff. Skipping this step often results in a flat pastry with a leaky filling.Glazing to Finish:Brush only the top surfaces of the braid with egg wash (avoiding the cut edges), sprinkle with turbinado sugar, and bake at 375°F for 28-30 minutes. Once completely cool, drizzle with the powdered sugar glaze in a decorative zigzag.

    You Must Know

    • Avoid the Cut Edges: Keep egg wash away from the visible layers on the side of the strips; egg wash can act as “glue” and prevent the pastry from expanding upward.
    • Cold is Key: If the pastry starts feeling soft or sticky while you are braiding, pause and put it back in the fridge for 10 minutes.
    • Pizza Cutter Hack: Use a pizza wheel to cut your pastry strips for much cleaner, more precise lines than a traditional knife.
    • Cool Completely: Drizzling glaze over a warm braid will cause it to melt and turn clear rather than forming those pretty white bakery lines.

    I learned the hard way that rushing the chill time is a mistake. My first braid looked like a bit of a “bloomed” mess because the butter was too warm when it hit the oven. Now, I consider the 30-minute fridge rest mandatory. I also discovered that a thin layer of egg wash provides a much better shine than a thick coat, which can sometimes make the pastry taste slightly like an omelet. A light touch is everything!

    Delicious Variations

    Try an ‘Apple Cinnamon’ version by swapping the cherries for apple pie filling and adding a dash of cinnamon to the cream cheese. For a summer twist, use blueberry filling with a teaspoon of lemon zest. If you’re a chocolate fan, a layer of Nutella beneath the cherries creates a decadent ‘Black Forest’ flavor profile that is absolutely irresistible.

    Storage and Freshness

    This pastry is best the day it is made when the layers are at their crispest. However, you can store leftovers in an airtight container in the fridge for up to 4 days. To regain that fresh-baked crunch, warm slices in a 300°F oven for 5 minutes. You can also assemble and freeze the unbaked braids for up to a month—just bake them directly from the freezer with an extra 5 minutes on the timer.

    Cherry Danish
    Cherry Danish

    Chef’s Wisdom

    • Roll your pastry on the parchment paper you intend to bake on so you don’t have to move the delicate braid later.
    • If you have extra cherry filling left in the can, serve it in a small bowl on the side for those who want an extra fruit boost.
    • Use a serrated bread knife to slice the braid; it will saw through the flaky layers without crushing them.

    The cherry danish braid proves that impressive baking doesn’t have to be intimidating. It is a celebration of texture and classic flavors that brings a touch of luxury to your breakfast table. Once you see those golden, flaky layers and the bright red cherries peeking through, you’ll understand why this has become my signature recipe for bringing people together.

    Frequently Asked Questions

    → Why do I need to chill the pastry before baking?Cold puff pastry puffs up better in the oven. If it goes in warm, the butter melts too fast and you lose those flaky layers.→ Can I use a different fruit filling?Absolutely. Apple, blueberry, strawberry, or peach all work well. Just use the same amount as the cherry filling.→ What if I don’t have almond extract?You can leave it out or use extra vanilla instead. The almond extract adds a nice flavor that goes well with cherries, but it’s not essential.→ How far ahead can I make this?You can assemble the braids the night before, cover them tightly, and keep them in the fridge. Bake them fresh in the morning for best results.→ Why shouldn’t the egg wash touch the edges?Egg wash on the cut edges can seal the layers together and prevent the pastry from puffing up properly. Keep it on the top surface only.→ Can I freeze these after baking?Yes, freeze them without the glaze. Wrap well and freeze for up to 2 months. Thaw and add fresh glaze when you’re ready to serve.

    Braided Cherry Danish

    Serves: 2 Prep Time: 30 minutes Cooking Time: 28 minutes 28 minutes
    Nutrition facts: 275 calories 20 grams fat
    Rating: 5.0/5
    ( 1 voted )
    Pin
    Print

    Ingredients

    1 box puff pastry (2 sheets)
     8 ounces cream cheese, softened
     1/4 cup granulated sugar
     1/2 teaspoon vanilla extract
     1/2 teaspoon almond extract
     1 can (21 ounce) cherry fruit filling
     1 large egg
     2-3 tablespoons turbinado sugar

    → Glaze

     1 cup powdered sugar
     4-5 teaspoons milk

    Instructions

    Take the puff pastry and cream cheese out of the fridge. Let them sit on the counter for 40 minutes to soften up.

    Beat the cream cheese, granulated sugar, vanilla, and almond extract in a small bowl until the mixture is smooth and creamy.

    Unfold both puff pastry sheets and remove any paper inside. Put each one on a lightly floured piece of parchment paper and gently roll them out with a rolling pin to smooth any creases.

    Using a knife or pizza cutter, make small notches at both ends of each pastry sheet. Then cut diagonal strips on both sides, leaving about 4 inches uncut down the middle. Transfer the parchment paper with the pastry to two baking sheets.

    Spread the cream cheese mixture evenly down the center strip of both pastries. Spoon the cherry filling on top of the cream cheese layer, spreading it out evenly.

    Fold the notched ends up first, then start braiding by alternating strips from each side, overlapping them across the filling. Put both pans in the refrigerator for 30 minutes to chill.

    Heat your oven to 375°F. Mix the egg with 1 tablespoon of water. Very carefully brush this egg wash on top of the braided strips, avoiding the cut edges. Sprinkle turbinado sugar over the top.

    Keep one pan in the fridge and bake the other for 28-30 minutes until it's puffed up and golden brown. Remove and let the oven heat back up, then bake the second one.

    Once both pastries have cooled down completely, whisk the powdered sugar and milk together. Drizzle this glaze over the tops and let it set.

    Notes

    1. Always chill the assembled pastry before baking. Cold puff pastry puffs up much better in the oven.
    2. If the pastry gets too soft while you're working with it, pop it back in the fridge to firm up.
    3. A pizza cutter works great for making clean diagonal cuts in the dough.
    4. Keep egg wash off the cut edges. The pastry layers puff up better when the edges are clean.
    5. No puff pastry? Crescent rolls or crescent sheets work as a substitute.
    6. Try different fruit fillings like apple, strawberry, peach, or blueberry for variety.
    7. Skip the glaze if you prefer and just dust with powdered sugar instead.

    Tools You'll Need

    • Two baking sheets
    • Parchment paper
    • Rolling pin
    • Pizza cutter or sharp knife
    • Mixing bowl
    • Electric mixer or whisk
    • Pastry brush


    Allergy Information

    Please check ingredients for potential allergens and consult a health professional if in doubt.

    Nutrition Facts (Per Serving)

    It is important to consider this information as approximate and not to use it as definitive health advice.
    • Calories: ~
    • Total Fat: ~
    • Total Carbohydrate: ~
    • Protein: ~

    0 comments
    1 FacebookTwitterPinterestLinkedin
    Breakfast & Pastries

    Strawberry Pop Tarts

    by myphillyconnection March 21, 2026
    written by myphillyconnection

    These homemade pop tarts use refrigerated pie crust for an easy shortcut. Fill them with strawberry preserves, seal the edges, bake until golden, and top with frosting and sprinkles.

    Making homemade strawberry pop tarts transforms a childhood staple into a gourmet breakfast experience. By utilizing refrigerated pie crust as a high-quality shortcut, you achieve a level of flakiness and buttery flavor that far surpasses anything found in a foil wrapper. These hand-held pastries are filled with real strawberry preserves, sealed with a classic fork-crimped edge, and finished with a sweet vanilla glaze and a festive shower of sprinkles. It is a 35-minute recipe that delivers pure nostalgia while tasting remarkably fresh, making it the perfect activity for Saturday mornings with the family.

    What Makes These Irresistible

    • Childhood Nostalgia, Elevated: Captures the fun of a toaster pastry but replaces processed flavors with real fruit preserves and buttery pastry.
    • Flaky Layer Shortcut: Using refrigerated pie crust provides a consistent, crisp texture without the labor-intensive process of making dough from scratch.
    • Triple-Seal Integrity: The combination of egg wash, finger pressure, and fork crimping ensures the filling stays inside the pastry instead of leaking onto the pan.
    • Interactive Decorating: The simple glaze and sprinkle topping make this an ideal recipe for involving children in the kitchen.
    • Versatile Treat: Equally appropriate as a special breakfast, a lunchbox surprise, or a warm dessert with a scoop of ice cream.

    I first debuted these at a neighborhood coffee morning, and they were an instant hit. My daughter now invites her friends over specifically for “pop tart mornings,” where the kitchen becomes a flurry of icing and rainbow sprinkles. My best friend Jessica started making them with her twins, and it has quickly become their favorite weekend tradition. There is something deeply satisfying about making a “fancy” version of a familiar treat that looks like it came from a boutique bakery but only took minutes to prepare.

    Kathryn Newton Won’t Stop Gatecrashing Interviews

    Key Pastry Elements

    • Refrigerated Pie Crusts: Two standard crusts. Let them reach room temperature for 10 minutes before unrolling to prevent cracking and ensure easy cutting
    • Strawberry Preserves: Thicker and fruitier than standard jam, preserves provide a more intense strawberry flavor and stay contained during the bake
    • Egg Wash: One egg whisked with a splash of water. This serves as the “glue” for the edges and creates the professional golden-brown shine on the crust
    • Powdered Sugar Glaze: A simple blend of sugar, milk, and vanilla that sets into a soft matte finish, providing that iconic pop tart look
    • Rainbow Sprinkles: Added while the glaze is wet to provide a pop of color and a satisfying textural crunch
    Strawberry Pop Tarts
    Strawberry Pop Tarts

    Creating Your Pop Tarts

    Preparing the Pastry:

    Unroll the pie crusts and roll them slightly thinner with a rolling pin. Cut the dough into 3×4 inch rectangles. You should aim for 16 rectangles total (8 tops and 8 bottoms) by gathering and re-rolling the scraps only once to maintain tenderness.

    Filling and Sealing:

    Place a tablespoon of preserves in the center of 8 rectangles, leaving a half-inch border. Brush the border with egg wash, place the top rectangle on, and press the edges with your fingers. Use a fork to firmly crimp the edges for a secure, professional-looking seal.

    Baking for Crunch:

    Poke steam vents in the top with a fork and brush with more egg wash. Bake at 400°F for 15 minutes. Look for a deep golden brown color; this ensures the pastry is crisp enough to hold the glaze without becoming soggy.

    The Finishing Touch:

    Cool the pastries completely on a wire rack. Whisk the glaze until it is thick but pourable. Spread generously over the center of each pop tart and immediately shower with sprinkles before the icing sets.

    You Must Know

    • Avoid Overfilling: More than a tablespoon of preserves will likely bubble out and ruin the seal during baking.
    • The Steam Vent: Poking holes in the top is functional; it prevents the pastry from puffing up and exploding in the oven.
    • Deep Golden Bake: Don’t pull them out too early; a well-baked crust provides the necessary structural support for the icing.
    • Cool Completely: If the pop tart is even slightly warm, the glaze will melt into the crust rather than sitting on top.

    Through dozens of batches, I’ve found that using a pizza cutter is much faster and cleaner than a knife for getting those perfect rectangles. I also learned that if you re-roll the scraps more than once, the dough starts to get tough. If you find your preserves are a bit too thin, stir in a teaspoon of cornstarch before filling to help them set during the bake.

    Flavor Adventures

    Once you master the strawberry version, try ‘Brown Sugar Cinnamon’ by filling with a mix of brown sugar, cinnamon, and a tiny bit of butter. For a more decadent treat, use Nutella or a high-quality chocolate hazelnut spread. Blueberry preserves or apple butter also make fantastic seasonal variations that pair perfectly with a morning coffee.

    Storage and Refreshing

    These stay delicious at room temperature for up to 3 days in an airtight container. To bring back the original “just baked” crunch, pop an un-iced pop tart into a 300°F oven for 5 minutes. You can also freeze the unbaked, assembled pastries for up to 2 months; simply bake them directly from the freezer, adding 2-3 extra minutes to the timer.

    Strawberry Pop Tarts
    Strawberry Pop Tarts

    Chef’s Wisdom

    • Use a ruler for the 3×4 inch cuts if you want them to look exactly like the ones in the grocery store.
    • Sift your powdered sugar before making the glaze to ensure there are no lumps in your topping.
    • If the preserves are very chunky, give them a quick pulse in a blender for an easier, smoother spread.

    Ultimately, homemade strawberry pop tarts are about bringing a little bit of magic to the breakfast table. They prove that you can create something nostalgic and fun without sacrificing quality or taste. Once you take that first bite of flaky pastry and sweet fruit, you’ll see why these have become a permanent Saturday morning tradition in our home.

    Frequently Asked Questions

    → Can I use homemade pie crust instead? Yes, homemade crust works great. It’ll be thinner and flakier than store-bought. You might need to adjust the baking time by a minute or two.

    → What other fillings can I use? Any thick jam or preserves works. Try raspberry, blueberry, apple butter, or even Nutella. Just keep the amount to about a tablespoon per tart.

    → Why do I need to poke holes in the top? The holes let steam escape while baking. Without them, the pop tarts can puff up too much or even burst open.

    → How do I keep the filling from leaking out? Don’t overfill them, leave that half-inch border, and make sure to seal the edges well with egg wash and crimping. Those three steps prevent most leaks.

    → Can I freeze these?Yes, freeze them without frosting. Wrap each one individually and freeze for up to 3 months. Toast them straight from frozen and add fresh frosting.

    → How long do they stay fresh? Store them in an airtight container at room temperature for 2-3 days. The crust will soften a bit over time but they’ll still taste good.

    Serves: 8 Prep Time: 20 minutes Cooking Time: 15 minutes 15 minutes
    Nutrition facts: 200 calories 20 grams fat
    Rating: 5.0/5
    ( 1 voted )
    Pin
    Print

    Ingredients

    → Pop Tarts

     1 box refrigerated pie crusts (2 crusts)
     3/4 cup strawberry preserves
     1 large egg
     1 tablespoon water

    → Glaze

     1 cup powdered sugar
     1 tablespoon milk
     sprinkles, for topping

    Instructions

    Heat your oven to 400°F. Line a large baking sheet with parchment paper or a silicone mat. Mix the egg and water in a small bowl and set it aside.

    Unroll one pie crust and roll it a bit thinner with a rolling pin. Using a ruler, cut out six rectangles that are 3 inches by 4 inches. Gather the scraps, roll them out again, and cut two more rectangles. Do the same with the second crust. You should end up with 16 rectangles total.

    Spread strawberry preserves on 8 of the rectangles, leaving a half-inch border around all the edges. Brush the edges with the egg wash you made earlier.

    Place the remaining 8 rectangles on top of the filled ones. Gently press the edges together with your fingers, then use a fork to crimp all around the sides.

    Carefully move the pop tarts to your baking sheet. Poke a few holes in the top of each one with a fork. Brush the tops lightly with egg wash.

    Bake for 15 minutes or until they turn golden brown. Let them cool on the pan for a few minutes, then transfer to a wire rack to cool completely.

    Whisk the powdered sugar and milk together in a bowl. Once the pop tarts are completely cool, spread the glaze over the tops using an angled spatula. Add sprinkles right away before the glaze sets.

    Notes

    1. Use a ruler to measure the dough rectangles. Exact measurements help them bake evenly and look uniform.
    2. Brushing egg wash on the edges helps seal the two layers together and prevents the filling from leaking out.
    3. Press the edges with your fingers first, then crimp with a fork for a good seal. The egg wash on top adds extra insurance.
    4. Don't overfill them. About a tablespoon of preserves per pop tart is plenty. Too much filling will ooze out while baking.
    5. Wait until they're completely cool before adding frosting. Warm pop tarts will melt the glaze right off.
    6. Store-bought pie crust is thicker than homemade pastry. Bake until golden brown for the best crispy texture.

    Tools You'll Need

    • Baking sheet
    • Parchment paper or silicone baking mat
    • Rolling pin
    • Ruler or measuring tape
    • Knife or pizza cutter
    • Fork
    • Pastry brush
    • Wire cooling rack
    • Angled spatula


    Allergy Information

    Please check ingredients for potential allergens and consult a health professional if in doubt.

    Nutrition Facts (Per Serving)

    It is important to consider this information as approximate and not to use it as definitive health advice.
    • Calories: ~
    • Total Fat: ~
    • Total Carbohydrate: ~
    • Protein: ~
    0 comments
    1 FacebookTwitterPinterestLinkedin
    30 Minute MealsChicken MealsPasta

    Creamy Cajun Chicken Pasta

    by myphillyconnection March 10, 2026
    written by myphillyconnection

    Sometimes the best recipes come from those nights when you’re craving restaurant flavors but don’t want to leave home. This creamy Cajun chicken pasta was born on one such evening, and it’s become my go-to when I want to add a little Louisiana flair to dinner time. The sauce is silky smooth, the chicken perfectly seasoned, and it all comes together faster than delivery.

    Why You’ll Love This Recipe

    • Creates restaurant quality pasta in your own kitchen
    • Lets you control the heat level for picky eaters
    • Takes just about 30 minutes from start to finish
    • Makes enough for leftovers (if you’re lucky)
    • Uses simple ingredients you probably have right now

    Last weekend, I made this for my friend who claims she ‘doesn’t do spicy.’ By the end of dinner, she was asking for the recipe. The creamy sauce balances the Cajun spices perfectly, making it approachable for everyone.

    The Most Heisted Food Is…

    Essential Ingredients

    • Chicken breasts: Need to be fresh and evenly pounded
    • Heavy cream: Creates that silky sauce
    • Fresh garlic: Adds depth and warmth
    • Parmesan cheese: Must be freshly grated
    • Pasta: Any shape works, but fettuccine is classic
    • Butter: Adds richness to the sauce
    • All-purpose flour: Helps thicken things up
    • Cajun seasoning: Brings the soul
    Creamy Cajun Chicken Pasta Recipe
    Creamy Cajun Chicken Pasta Recipe

    Detailed Instructions

    Pasta PerfectionGet your pasta water boiling first – salt it well, like the sea. While that’s happening, you can focus on the chicken. Time everything right, and your pasta will be ready just as the sauce comes together.Chicken MagicPound those breasts thin and season them generously. They’ll cook quickly and evenly this way, staying juicy inside while getting a nice crust outside.Sauce CreationThis is where the magic happens. Starting with butter and garlic, adding flour, then slowly streaming in cream while whisking. Watch it transform into silky smoothness before your eyes.Final AssemblyToss that perfectly cooked pasta in your cream sauce, top with the sliced chicken, and finish with a shower of fresh parsley.

    You Must Know

    • Room temperature cream makes a smoother sauce
    • Don’t overcook the garlic or it’ll turn bitter
    • Fresh parmesan melts better than pre-grated
    • Let the chicken rest before slicing

    My family used to beg for restaurant pasta, but now they request this version instead. The secret? Taking time with each step and not rushing the sauce.

    Perfect Pairings

    Nothing beats a chunk of crusty bread for soaking up that creamy sauce. I usually toss together a quick side salad with mixed greens and a light vinaigrette to cut through the richness. On lazy nights, some steamed broccoli works perfectly – those little florets catch the sauce just like the pasta does. And yes, a glass of white wine while cooking makes the whole experience even better.

    Make It Your Own

    Some nights I swap in shrimp for the chicken when I’m feeling fancy. Other times, I add mushrooms or bell peppers for extra color and flavor. My spice-loving son adds extra cayenne to his portion, while my daughter prefers it milder. During summer, I love throwing in some fresh cherry tomatoes right at the end – they burst in your mouth with every bite.

    Keep It Fresh

    Store any leftovers in an airtight container for up to three days. When reheating, add a splash of cream or milk to bring the sauce back to life. The microwave works, but gentle stovetop reheating gives the best results. I wouldn’t recommend freezing this one – cream sauces can get a bit funky when thawed.

    Kitchen Wisdom

    • Let your cream come to room temperature before starting
    • Season your pasta water generously – it’s your only chance to flavor the pasta
    • Keep an eye on that garlic – it can go from perfect to burnt in seconds
    • Taste and adjust seasonings before serving

    The first time I nailed this recipe, my kitchen smelled like a New Orleans restaurant. Now it’s our Friday night tradition – something special to end the week but easy enough that I’m not stressed about making it.

    Quick Tips

    • Always pound the chicken to even thickness
    • Reserve some pasta water before draining
    • Grate the parmesan fresh for best melting
    • Don’t rush the sauce – it’s worth the extra minutes

    Mastering this dish reminds me of learning to cook from my grandmother. She always said, ‘Take your time with the sauce, and everything else will follow.’ When the family gathers around the table, fighting over the last drops of sauce with pieces of bread, I know she was right. It’s not just about the food – it’s about creating those moments that bring everyone together.

    Creamy Cajun Chicken Pasta Homemade
    Creamy Cajun Chicken Pasta Homemade

    Chef’s Helpful Tips

    • Check your chicken temperature with a meat thermometer – 165°F is perfect
    • Toast your garlic in the butter just until fragrant
    • Keep the sauce moving constantly while it thickens
    • Let the chicken rest for 5 minutes before slicing

    After years of making this dish, I’ve learned that great Cajun pasta is all about balance – between spicy and creamy, between getting dinner on the table quickly and taking the time to do things right. Every time I make this, whether it’s for a quiet family dinner or when friends drop by unexpectedly, it reminds me that good cooking doesn’t have to be complicated. Sometimes the simplest combinations – like spicy chicken, creamy sauce, and perfectly cooked pasta – create the most memorable meals.

    The magic really lies in those little details – watching for that moment when the garlic becomes fragrant but not burnt, waiting for the sauce to hit just the right thickness, seeing the chicken get that perfect golden crust. It’s become more than just a recipe in my kitchen – it’s become one of those dishes that makes any night feel special.

    Frequently Asked Questions

    → Can I adjust the spice level? Yes, adjust the amount of Cajun seasoning to control the heat level.

    → What can I substitute for half and half? Use equal parts heavy cream and milk, or just heavy cream for a richer sauce.→ Can I use different pasta? Yes, any medium pasta shape works well with this sauce.

    → Can I add vegetables?Bell peppers, onions, or mushrooms would be great additions to this dish.

    → How do I store leftovers? Store in an airtight container in the fridge for up to 3 days. Reheat gently with a splash of cream.

    Creamy Cajun Chicken Pasta

    Serves: 4 Prep Time: 5 minutes Cooking Time: 16 minutes 16 minutes
    Nutrition facts: 200 calories 20 grams fat
    Rating: 5.0/5
    ( 1 voted )
    Pin
    Print

    Ingredients

    → Main Ingredients

     8 oz penne pasta
     2 boneless skinless chicken breasts, pounded thin

    → Sauce Ingredients

     2 tablespoons extra virgin olive oil
     2 tablespoons unsalted butter
     2 cloves garlic, minced
     1 tablespoon all purpose flour
     1½ cups half and half
     ⅓ cup grated parmesan, plus more for topping
     1½ tablespoons Cajun seasoning, divided

    → Garnish

     1 tomato, diced
     Fresh parsley, chopped
     Salt and pepper to taste

    Instructions

    Cook penne pasta according to package instructions.

    Heat the extra virgin olive oil in a large skillet over medium heat. Season the chicken on both sides with 1 tablespoon Cajun seasoning. Add to the skillet. Cook for about three minutes on each side or until the chicken reaches an internal temperature of 165 degrees.

    Remove the chicken from the skillet, clean it, and return it to the medium heat.

    Melt the butter, add the garlic and sautée for about 30 seconds. Whisk in the flour and cook it for another 30 seconds. Very slowly add the half and half, initially about a tablespoon at a time, so the sauce thickens. Add more quickly after you have added about half a cup.

    Stir in the parmesan cheese and allow it melt completely. Add the remaining ½ tablespoon Cajun seasoning and season with salt and pepper to taste.

    Add the penne to the sauce, top with tomatoes, parsley, parmesan cheese, and the sliced cooked chicken. Enjoy immediately!

    Notes

    1. Adjust Cajun seasoning to control spice level.
    2. Best served immediately while sauce is creamy.


    Tools You'll Need

    • Large skillet
    • Pasta pot
    • Whisk
    • Meat thermometer

    Allergy Information

    Please check ingredients for potential allergens and consult a health professional if in doubt.

    Nutrition Facts (Per Serving)

    It is important to consider this information as approximate and not to use it as definitive health advice.
    • Calories: ~
    • Total Fat: ~
    • Total Carbohydrate: ~
    • Protein: ~
    0 comments
    1 FacebookTwitterPinterestLinkedin
    Breakfast & Pastries

    Sausage & Egg Burritos

    by myphillyconnection March 9, 2026
    written by myphillyconnection

    Egg burritos perfection represents the ultimate weekday morning victory: a hot, protein-packed breakfast that requires exactly two minutes of effort before you head out the door. By dedicating one Sunday afternoon to batch-cooking, you can transform chaotic mornings into a calm routine. These burritos combine fluffy scrambled eggs, crispy hash browns, savory breakfast meats, and melted cheddar, all tucked into a high-fiber tortilla that stays soft even after weeks in the freezer. It’s a balanced, grab-and-go meal that eliminates decision fatigue and keeps you fueled until lunch.

    Why This Works Brilliantly

    • Batch-Cooking Efficiency: One hour of weekend prep provides eight complete breakfasts, saving you nearly 40 minutes of cumulative morning cooking time each week.
    • Balanced Macro-Nutrition: The mix of protein (eggs/meat), complex carbs (hash browns), and fiber ensures long-lasting energy without the mid-morning sugar crash.
    • Freezer-Stable Texture: Unlike many frozen meals, these are engineered to stay fluffy and soft through a specific cooling and wrapping process.
    • Complete Portability: Designed to be handheld, these are the perfect solution for commuters and students who eat breakfast on the move.

    I perfected this method during a month so overwhelming that breakfast had become an afterthought of cold cereal and stress. My neighbor Jessica was a total skeptic—she thought all freezer burritos were destined to be soggy. After trying one of mine, she was converted by the fluffy eggs and seared tortilla. Now, we have ‘burrito-making days’ together. It’s not just about the food; it’s about reclaiming your morning sanity.

    Master Your Ingredients

    • Large Eggs (10): The foundation. Whisking them until no streaks remain ensures a uniform, fluffy scramble that reheats beautifully
    • Shredded Hash Browns: Must be thawed completely before cooking. This ensures they crisp up on the griddle rather than steaming into a mushy interior
    • Ground Sausage & Bacon: A double-meat approach provides a complex savory profile. Ensure the sausage is well-drained to prevent a greasy tortilla
    • Sharp Cheddar Cheese: Provides the “glue” for the filling. Sharp varieties hold their flavor better after being frozen and reheated than mild cheeses
    • High-Fiber Tortillas: Use sturdy wraps like Extreme Wellness. They remain pliable after freezing and won’t turn into cardboard in the microwave
    • Red Bell Peppers: Add a pop of sweetness and Vitamin C. Dicing them small ensures they distribute evenly in every bite
    Egg Burritos
    Egg Burritos

    Creating Your Freezer Stash

    The Fluffy Scramble:

    Cook the eggs over medium heat until they are just set but still look slightly wet. This is crucial because they will cook further during the searing phase and again during reheating. Overcooking them now will result in rubbery eggs later.

    The Savory Filling:

    Sauté the peppers, onions, and hash browns until the potatoes are golden and crispy. Stir in the cooked meats and minced garlic. Fold the eggs and cheese in gently at the very end to keep the curds intact and the cheese perfectly melded.

    The Assembly and Seal:

    Warm the tortillas so they don’t crack. Place a generous cup of filling in each, fold the sides, and roll tightly. 

    Pro Tip: 

    Sear the finished burritos seam-side down in a hot, dry skillet for 30 seconds. This “welds” the tortilla shut and adds a gourmet crunch.

    You Must Know

    • Condensation is the Enemy: You must let the burritos cool to room temperature before bagging them. Trapped steam creates ice crystals that lead to sogginess.
    • Flash Freeze: Freeze them on a baking sheet for one hour before putting them in a bag so they don’t stick together.
    • The Damp Paper Towel: When reheating, always wrap the burrito in a damp paper towel. This creates a steam-room effect that keeps the tortilla soft.
    • Thaw the Spuds: If your hash browns are frozen when they hit the pan, they will release too much water and make the filling soupy.

    Through trial and error, I found that seasoning the eggs while they are still liquid is better than seasoning the whole mixture. It ensures the flavor is locked into the protein. I also learned that if you don’t sear the seam, the burrito almost always unrolls in the microwave, leaving you with a plate of loose eggs instead of a handheld meal.

    Creative Variations

    For a ‘Southwestern’ kick, use Pepper Jack cheese and add a small can of diced green chiles to the egg mix. If you want a vegetarian version, swap the meat for black beans and sautéed mushrooms. For a healthier ‘Denver’ style, use diced ham, extra bell peppers, and egg whites to reduce the calorie count without losing the classic flavor.

    Storage and Reheating

    Frozen burritos maintain peak quality for up to 3 months. To reheat from frozen, microwave in a damp paper towel for 1-2 minutes. If you have time to move them to the fridge the night before, they only need about 60 seconds. Label your bags with the date and filling type—especially if you’ve made a few spicy versions for the adults!

    Egg Burritos
    Egg Burritos

    Chef’s Wisdom

    • Press down with a spatula during the searing phase to ensure the heat penetrates and melts the cheese “seal.”
    • Season the filling slightly more than you think you need; cold storage can slightly dull the salt and spice perception.
    • If you’re out of paper towels, a clean, damp kitchen cloth works just as well for the microwave steam trick.

    Ultimately, egg burrito perfection is about taking control of your time. It proves that a little organization on Sunday can buy you peace of mind all week long. Once you have a freezer full of these golden, seared packages, you’ll never settle for a mediocre drive-through breakfast again.

    Frequently Asked Questions

    → How long do these last in the freezer? They’ll keep in the freezer for up to 3 months if stored properly in freezer bags. Label them with the date so you know when you made them.

    → Can I make these vegetarian? Absolutely! Skip the sausage and bacon and add more veggies like mushrooms, spinach, or black beans. You could also use plant-based sausage.

    → Why do I need to sear them in the pan? Searing seals the tortilla closed so it doesn’t unroll while you’re eating. It also adds a nice crispy texture to the outside.

    → Can I use a different type of tortilla? Sure! Regular flour tortillas, whole wheat, or even large low-carb wraps all work. Just make sure they’re big enough to hold all the filling.

    → Do I have to freeze them on a baking sheet first? Yes! Flash freezing them individually first prevents them from sticking together in the bag. Once frozen solid, they won’t stick.

    → Can I reheat these in the oven instead of microwave? You can! Wrap in foil and bake at 350°F for about 20-25 minutes from frozen. The microwave is just faster for busy mornings.

    Sausage and Egg Burrito

    Serves: 8 Prep Time: 15 minutes Cooking Time: 15 minutes 15 minutes
    Nutrition facts: 200 calories 20 grams fat
    Rating: 5.0/5
    ( 1 voted )
    Pin
    Print

    Ingredients

    → For the Filling

     10 large eggs
     ½ tbsp olive oil
     ½ cup onion, diced
     1 cup shredded hash brown potatoes, thawed
     1 cup red bell peppers, diced
     1 tbsp minced garlic
     1 cup cooked ground sausage
     ½ cup cooked bacon, crumbled
     1¼ cups shredded cheddar cheese
     Salt and pepper to taste

    → For Assembly

     8 large flour tortillas (8-inch, such as Extreme Wellness wraps)

    Instructions

    Scramble the eggs in a large skillet over medium heat, seasoning them well with salt and pepper as they cook. Once they're done, transfer them to a covered bowl and set aside.

    In the same skillet, heat the olive oil over medium-high heat. Add the diced onion, thawed hash browns, and diced red peppers. Sauté for 2 to 3 minutes until the potatoes are cooked through and everything is tender.

    Stir in the minced garlic, cooked sausage, crumbled bacon, scrambled eggs, and shredded cheese. Mix everything together really well. Taste and add more salt and pepper if needed.

    Warm your tortillas slightly in the microwave or skillet so they're pliable. Divide the egg mixture evenly among the 8 tortillas - don't overstuff them or they'll be hard to roll. Fold in the sides, then roll each one up tightly.

    Place two burritos at a time seam side down in a hot skillet. Cook for 30 to 60 seconds on each side until they're lightly browned and sealed. You can also use a panini press if you have one.

    If eating right away, serve hot. If meal prepping, let the burritos cool to room temperature, then place them seam side down on a parchment-lined baking sheet and freeze for 1 hour.

    Once frozen solid, transfer the burritos to gallon-sized freezer bags. Label them with the date and return to the freezer for up to 3 months.

    To reheat, wrap one burrito in a damp paper towel and microwave for 1 to 2 minutes until heated all the way through. The damp towel keeps the tortilla from getting tough.

    Notes

    1. Season the eggs really well while scrambling - don't be shy with the salt, pepper, and any other seasonings you like.
    2. Warming the tortillas before filling makes them way easier to roll without tearing.
    3. Don't overstuff the burritos or they'll be impossible to roll neatly.
    4. Searing them in a hot pan seals the tortilla so it doesn't fall apart when you eat it.
    5. Let the burritos cool completely before wrapping and freezing or they'll get soggy from condensation.
    6. Always label and date your freezer bags so you know how long they're good for.
    7. These are perfect for busy mornings - just grab and microwave.
    8. You can customize the fillings with whatever you like - ham, different cheeses, jalapeños, etc.


    Tools You'll Need

    • Large skillet
    • Spatula
    • Baking sheet
    • Parchment paper
    • Gallon-sized freezer bags
    • Microwave

    Allergy Information

    Please check ingredients for potential allergens and consult a health professional if in doubt.

    Nutrition Facts (Per Serving)

    It is important to consider this information as approximate and not to use it as definitive health advice.
    • Calories: ~
    • Total Fat: ~
    • Total Carbohydrate: ~
    • Protein: ~

    0 comments
    1 FacebookTwitterPinterestLinkedin
    • 1
    • 2
    • 3
    • 4
    • …
    • 11

    Search

    Follow Us

    facebook
    twitter
    instagram
    pinterest

    Recent Posts

    • Asparagus & Cheese Stuffed Chicken

      May 29, 2026
    • Asian Cabbage Stir Fry

      May 29, 2026
    • High Protein Broccoli Cheddar Soup

      May 29, 2026
    • Homemade Popeyes Cajun Fries

      May 28, 2026
    • Immune Boosting Vegetable Soup

      May 25, 2026
    • Creamy Crab Bisque

      May 25, 2026
    • Garlic Parmesan Pizza

      May 25, 2026

    Categories

    • 30 Minute Meals (38)
    • Barbecue (2)
    • Beef Meals (11)
    • Breakfast & Pastries (15)
    • Casseroles (11)
    • Cheesesteak (2)
    • Chicken Meals (20)
    • Cultural Dishes (13)
    • Featured (8)
    • Featured Sides (5)
    • Fish Meals (6)
    • Fresh Baked Breads (2)
    • Main Dishes (7)
    • Other Meals (2)
    • Pasta (21)
    • Pizza (5)
    • Popular Recipes (9)
    • Pork Meals (8)
    • Seafood Meals (19)
    • Side Dishes (6)
    • Soups & Salads (15)
    • Turkey Meals (7)
    • Vegetarian (22)

    Popular Posts

    • 1

      Creamy Tomato and Spinach Pasta

      February 15, 2026
    • 2

      Buddha Bowl with Tofu

      October 22, 2024
    • 3

      Chicken Garlic Parmesan Pasta

      February 16, 2026
    • 4

      Classic Spicy Barbecued Ribs

      October 20, 2021
    • 5

      Easy Creamy Garlic Shrimp

      February 15, 2026

    About Me

    At MyPhillyConnection, we specialize in recipes for Philly favorites and lots of other popular dishes and cuisines.

    Phone: (215) 554-7326
    Email: info@myphillyconnection.com

    Useful Links

    • Beef Meals
    • Chicken Meals
    • Fish Meals
    • Recipes
    • Recipe Submission

    Breakfast Recipes

    • Asparagus & Cheese Stuffed Chicken

      May 29, 2026
    • Asian Cabbage Stir Fry

      May 29, 2026

    Recent Posts

    • Asparagus & Cheese Stuffed Chicken

      May 29, 2026
    • Asian Cabbage Stir Fry

      May 29, 2026
    • Facebook
    • Twitter
    • Instagram
    • Pinterest
    • Linkedin
    • Tiktok

    Copyright © 2026 - MyPhillyConnection / All Rights Reserved.

    Philadelphia Food Network and Recipes
    • Home
      • Main Website
    • Recipes
    • Meals
      • 30 Minute Meals
      • Beef Meals
      • Breakfast & Pastries
      • Chicken Meals
      • Fish Meals
      • Pork Meals
      • Seafood Meals
      • Turkey Meals
      • Vegan & Vegetarian Meals
      • Other Meals
    • Categories
      • Barbecue
      • Casseroles
      • Cheesesteak
      • Cultural Dishes
      • Desserts & Treats
      • Featured
      • Fresh Baked Breads
      • Grilling
      • Pasta
      • Pizza
      • Popular Recipes
      • Side Dishes
      • Soul Food
      • Soups & Salads
    • About Us
    • Contact Us
    • Submit Your Recipe
    Sign In
    or
    Login with HostGator

    Keep me signed in until I sign out

    Forgot your password?

    Do not have an account ? Register here

    Password Recovery

    A new password will be emailed to you.

    Have received a new password? Login here

    Register New Account

    I Agree to the Terms of Service and Privacy Policy

    Have an account? Login here