Philadelphia Food Network and Recipes
  • Home
    • Main Website
  • Recipes
  • Meals
    • 30 Minute Meals
    • Beef Meals
    • Breakfast & Pastries
    • Chicken Meals
    • Fish Meals
    • Pork Meals
    • Seafood Meals
    • Turkey Meals
    • Vegan & Vegetarian Meals
    • Other Meals
  • Categories
    • Barbecue
    • Casseroles
    • Cheesesteak
    • Cultural Dishes
    • Desserts & Treats
    • Featured
    • Fresh Baked Breads
    • Grilling
    • Pasta
    • Pizza
    • Popular Recipes
    • Side Dishes
    • Soul Food
    • Soups & Salads
  • About Us
  • Contact Us
  • Submit Your Recipe
Top Posts
Mexican Chicken With Cheese Sauce
Chocolate Bread
Bojangles Biscuits
Braided Cherry Danish
Strawberry Pop Tarts
Creamy Cajun Chicken Pasta
Sausage & Egg Burritos
Strawberry Cream Cheese Muffins
Blueberry Sausage Pancake Bake
School Breakfast Pizza
Philadelphia Food Network and Recipes
  • Home
    • Main Website
  • Recipes
  • Meals
    • 30 Minute Meals
    • Beef Meals
    • Breakfast & Pastries
    • Chicken Meals
    • Fish Meals
    • Pork Meals
    • Seafood Meals
    • Turkey Meals
    • Vegan & Vegetarian Meals
    • Other Meals
  • Categories
    • Barbecue
    • Casseroles
    • Cheesesteak
    • Cultural Dishes
    • Desserts & Treats
    • Featured
    • Fresh Baked Breads
    • Grilling
    • Pasta
    • Pizza
    • Popular Recipes
    • Side Dishes
    • Soul Food
    • Soups & Salads
  • About Us
  • Contact Us
  • Submit Your Recipe
Copyright 2021 - All Right Reserved
30 Minute MealsPastaSeafood Meals

Easy Shrimp Alfredo

by myphillyconnection February 23, 2026
written by myphillyconnection

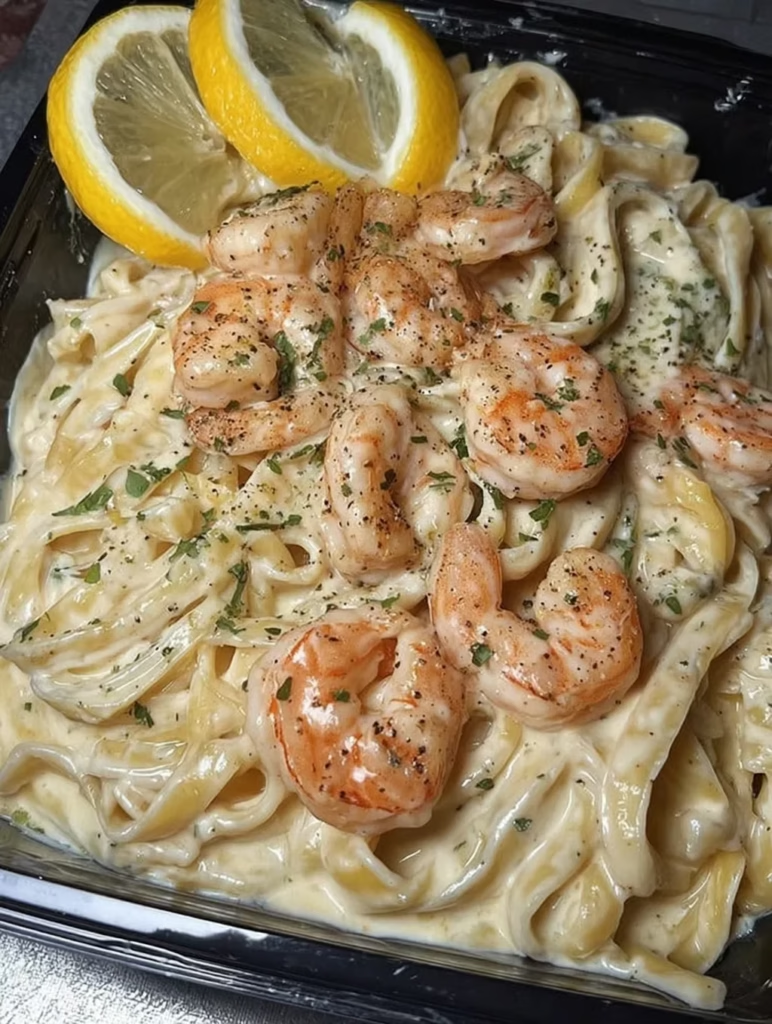
This shrimp Alfredo pasta proves that restaurant-quality Italian-American cooking can happen in your own kitchen on a busy weeknight, combining tender sautéed shrimp with fettuccine in a luxuriously creamy garlic Parmesan sauce that comes together in just 30 minutes. The secret to this sauce’s incredible richness lies in using cream cheese alongside heavy cream, creating a velvety texture that clings to every strand of pasta without the risk of breaking or becoming greasy. What makes this dish so perfect for both casual weeknights and impressing guests is how the simple technique produces results that taste like you spent hours in the kitchen, when in reality the sauce simmers while you boil the pasta. Whether you’re craving indulgent comfort or cooking a romantic dinner for two, this creamy, shrimp-laden pasta satisfies on every level.

Why You’ll Love This Recipe
The cream cheese
creates a foolproof sauce that stays emulsified rather than breaking into greasy pools
Thirty minutes from start to finish makes restaurant-quality pasta achievable on busy weeknights
The sauce comes together in one skillet while the pasta boils, meaning minimal dishes and maximum efficiency
Simple pantry ingredients and one pound of shrimp feed a family of four generously
Garlic infuses directly into the simmering sauce, creating deep, aromatic flavor throughout


I developed this recipe after years of frustration with traditional Alfredo sauces that required constant attention and still managed to separate. The addition of cream cheese was a happy accident during a night when I ran out of butter. It created the most stable, consistently creamy sauce I’d ever made. Now, I serve this to company with complete confidence, knowing it will stay perfect from stove to table without any nervous hovering.

Master Your Ingredients
Shrimp:
Use uncooked 31-40 count shrimp. They are large enough to be satisfying but cook quickly. Ensure they are peeled, deveined, and patted completely dry
Fettuccine: The classic wide, flat noodle that provides the perfect surface area for the thick Alfredo sauce to cling to


Cream Cheese: Use half a standard block (4 oz), softened. This acts as the secret stabilizer that prevents the sauce from breaking


Heavy Cream: Provides the luxurious, velvety richness that defines a true Alfredo sauce
Parmesan Cheese: Freshly grated from a block is essential. Pre-grated varieties contain anti-caking agents that can make your sauce grainy


Garlic: Two large cloves, minced, provide the pungent aromatic depth that balances the rich dairy components


Easy Shrimp Alfredo Pasta
Preparing the Pasta:
Boil your fettuccine in generously salted water until al dente. Crucially, reserve about half a cup of the starchy pasta water before draining—this is your insurance policy for adjusting the sauce consistency later.

Building the Foolproof Sauce:
In a large skillet over medium heat, combine the butter, softened cream cheese pieces, heavy cream, chicken broth, and garlic. Stir and press the cream cheese against the pan until it melts into a smooth, uniform liquid. Let it bubble gently for five minutes to reduce and thicken.

The Final Assembly:
Stir in the Parmesan until the sauce is glossy and thick. Add the shrimp directly into the sauce and simmer for 5–6 minutes until pink and opaque. Toss in the cooked fettuccine, adding a splash of the reserved pasta water if the sauce needs thinning, and serve immediately.

You Must Know
The cream cheese must be softened before adding to avoid lumps that won’t melt smoothly
Overcooking shrimp for more than six minutes will result in a rubbery, tough texture
Pasta water is starchy and seasoned; it’s better for thinning the sauce than plain tap water
Freshly grated Parmesan is the difference between a gritty sauce and a velvety one
Alfredo thickens rapidly as it cools, so have your diners ready at the table!
I’ve learned that many professional kitchens use similar ‘shortcuts’ to ensure consistency under pressure. Using cream cheese isn’t cheating—it’s smart cooking. It provides a built-in emulsifier that keeps your dinner looking perfect even if someone is a few minutes late to the table.

Creative Variations
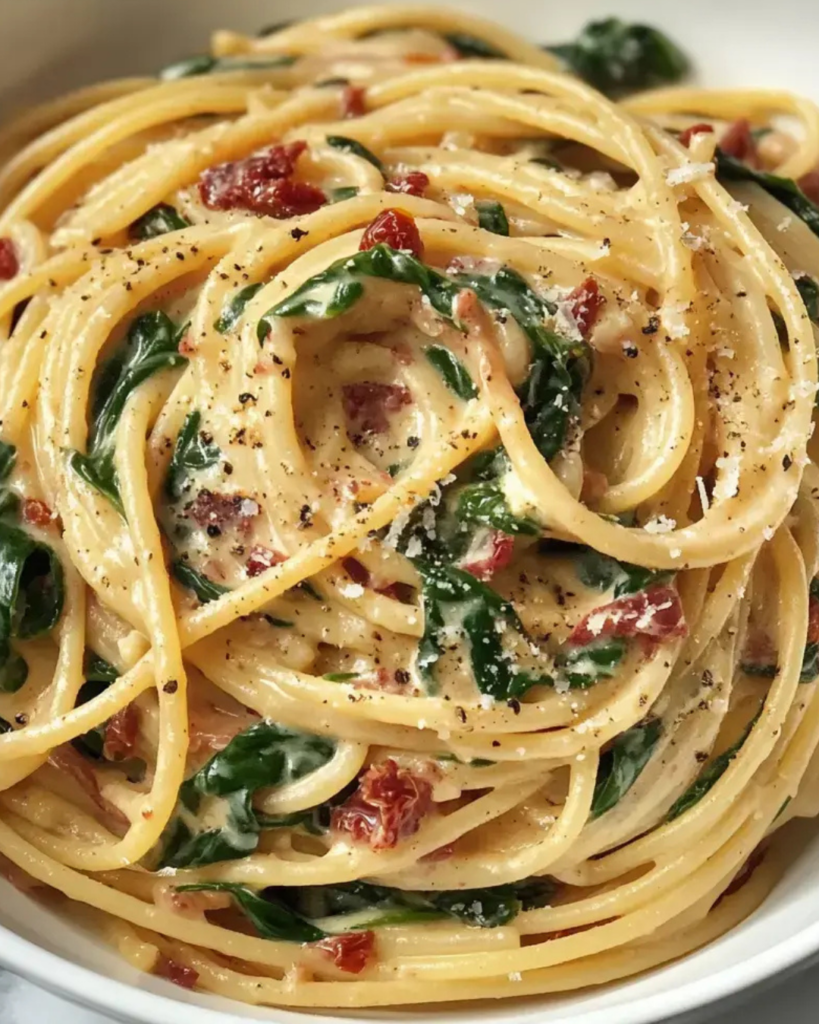
To brighten the dish, add sun-dried tomatoes or a handful of fresh baby spinach at the end. For a kick, stir in a teaspoon of Cajun seasoning or red pepper flakes. You can also add crispy pancetta for a smoky, salty depth that pairs beautifully with the sweet shrimp.

Storage and Reheating
Store leftovers in an airtight container for up to two days. To reheat, use the stovetop over low heat with a splash of milk or cream to loosen the sauce. Avoid high heat in the microwave, as it will likely overcook the shrimp and cause the sauce to separate.


Pat shrimp dry with paper towels to prevent excess water from thinning your sauce
Warm your serving bowls in the oven to keep the sauce fluid for longer
A squeeze of fresh lemon juice just before serving enhances the natural sweetness of the shrimp
This shrimp Alfredo has earned a permanent spot in my rotation because it delivers maximum satisfaction with minimum stress. It’s the perfect example of how a small ingredient swap can transform a temperamental classic into a reliable weeknight hero. Every batch reminds me why I love sharing simple, delicious meals with the people I care about.

Frequently Asked Questions
→ Can I use frozen shrimp?
Yes! Just thaw them by running cool water over them in a colander. It only takes a few minutes and they’re ready to cook.
→ What if I don’t have cream cheese?
You can make a traditional Alfredo with just butter, heavy cream, and Parmesan, but the cream cheese makes the sauce extra thick and creamy. It’s worth having on hand!
→ Can I use a different pasta?
Absolutely! Linguine, penne, or even spaghetti would work great. Just cook according to package directions.
→ Why is my sauce too thick?
Thin it out with a bit of the hot pasta water, adding just a tablespoon or two at a time until you get the consistency you want.
→ Can I make this ahead of time?
Alfredo sauce is best fresh, but you can make it a few hours ahead and gently reheat, adding a splash of cream or pasta water to loosen it up.
→ How do I know when the shrimp are done?
Shrimp cook fast – they’re done when they turn pink and opaque, usually 5-6 minutes. Don’t overcook or they’ll get rubbery!

Easy Shrimp Alfredo

Serves: 4 Prep Time: 10 minutes Cooking Time: 20 minutes 20 minutes
Nutrition facts: 200 calories 20 grams fat
Rating: 5.0/5
( 1 voted )
Pin
Print

Ingredients

→ For the Pasta and Shrimp

 1 lb uncooked shrimp (31-40 count), thawed, peeled (tails optional)
 8 oz uncooked fettuccine

→ For the Alfredo Sauce

 2 tablespoons butter
 4 oz cream cheese, softened and cut into smaller pieces
 3/4 cup heavy whipping cream
 1/4 cup chicken broth
 2 large cloves garlic, minced
 1 cup freshly grated Parmesan cheese
 Salt and pepper to taste

Instructions

If your shrimp are frozen, put them in a colander and run cool water over them until they're thawed. Start boiling a large pot of salted water for the fettuccine. Cook the pasta al dente according to the package directions.

While the pasta is cooking, add the butter, cream cheese, heavy cream, chicken broth, and minced garlic to a large skillet over medium heat. Once the butter has melted and the pan is heated up, use a spoon to help the cream cheese melt into the sauce. This will take a couple minutes.

When the cream cheese is completely incorporated into the sauce, let it gently bubble for 5 minutes until the sauce has reduced a bit. Give it an occasional stir. This is a good time to grate the Parmesan if you haven't already.

Stir the grated Parmesan into the sauce and let it cook for about a minute until it's melted and creamy.

Add the shrimp to the pan and cook for 5 to 6 minutes, stirring occasionally, until they're pink and cooked through.

Season with salt and pepper as needed. Drain the pasta and toss it with the creamy shrimp sauce. Serve immediately while it's hot!

Notes

  1. If you forget to soften the cream cheese, microwave it for 20-30 second intervals until soft.
  2. If the sauce gets too thick, thin it out with a bit of the hot pasta water.
  3. Use freshly grated Parmesan for the best flavor and creamiest sauce.
  4. This comes together in 30 minutes, making it perfect for a quick weeknight dinner!


Tools You'll Need

  • Large pot for pasta
  • Large skillet
  • Colander
  • Grater for Parmesan

Nutrition Facts (Per Serving)

It is important to consider this information as approximate and not to use it as definitive health advice.
  • Calories: ~
  • Total Fat: ~
  • Total Carbohydrate: ~
  • Protein: ~
0 comments
0 FacebookTwitterPinterestPocketEmail
Fish MealsSeafood Meals

Smoked Crab Stuffed Salmon

by myphillyconnection February 22, 2026
written by myphillyconnection

This smoked crab stuffed salmon elevates two of the ocean’s finest offerings into one spectacular dish, featuring rich, creamy lump crab stuffing nestled inside tender salmon fillets that absorb gorgeous smoky flavor during the low-and-slow cooking process. The stuffing combines premium crab meat with cream cheese, Dijon mustard, and Creole seasoning to create a luxurious filling that stays moist and flavorful throughout the smoking time while the salmon develops that beautiful pink, flaky texture everyone loves. What makes this smoked crab stuffed salmon so impressive for entertaining is how the presentation rivals fine dining restaurants while the preparation remains surprisingly approachable for anyone comfortable with basic smoker operation. Whether you’re celebrating a special anniversary, hosting a summer dinner party that calls for something memorable, or simply wanting to create a weekend meal that makes you feel like a culinary genius, this showstopping dish delivers elegance and incredible flavor that leaves guests talking about your cooking long after the last bite disappears.

Why You’ll Love This Recipe

  • The low-temperature smoking process produces incredibly moist, flaky salmon with delicate smoky undertones that complement rather than overpower the delicate seafood flavors
  • Lump crab meat stuffing transforms a simple salmon fillet into restaurant-quality presentation that impresses guests before they even take their first bite
  • The optional garlic lemon butter sauce adds a rich, citrusy finish that ties all the flavors together beautifully
  • Six servings from four generously stuffed fillets feeds a dinner party elegantly without requiring multiple cooking vessels
  • The easy difficulty level means even smoking novices can achieve impressive results that look and taste like they came from years of experience

I created this smoked crab stuffed salmon for my parents’ 40th wedding anniversary dinner when I wanted to serve something appropriately special without spending the entire celebration in the kitchen. The smoker did most of the work while I mingled, and when I brought the platter to the table, my mother actually teared up at how beautiful they looked. My father declared it the best salmon he’d ever eaten. Now this recipe appears at every major celebration in our family.

Salmon and Stuffing Components

  • Salmon: 4 skin-on fillets (6–8 oz each), boneless.
  • Crab: 1 pound lump crab meat (fresh or properly thawed frozen).
  • Binder: 1/2 cup cream cheese (softened), 1/4 cup mayonnaise, and 1/4 cup bread crumbs.
  • Seasoning & Aromatics: 2 tbsp Dijon mustard, 2 tbsp green onions (finely chopped), 1 tbsp Creole seasoning, 1 tbsp Worcestershire sauce, and juice of 1/2 lemon.
  • Freshness: Fresh parsley and garlic powder to taste.

Garlic Lemon Butter Sauce

  • Base: 1 stick (1/2 cup) melted butter and 1/3 cup heavy cream.
  • Flavor: 2 tsp garlic paste and 2 tsp lemon zest.
  • Seasoning: A pinch of Creole seasoning.
Smoked Crab Stuffed Salmon

Smoking Method Detailed

Preparing the Salmon Pockets

Using a sharp knife held horizontally, slice a deep pocket into the thickest part of each fillet. Do not cut all the way through; leave about half an inch at the ends to act as a seal for the stuffing. Brush with olive oil and season with salt and pepper.

Mixing the Crab Stuffing

Gently fold the crab meat with the cream cheese, mayo, mustard, bread crumbs, green onions, and spices. Aim for a cohesive mixture without breaking up the large crab lumps.

Stuffing and Prep

Divide the crab mixture among the four pockets, pressing gently to fill the cavity. Arrange on a tray while you prepare the smoker.

The Smoking Process

Preheat your smoker to 225°F using mild wood like applewood or alder. Place fillets skin-side down on the rack. Smoke for approximately 45 minutes until the internal temperature reaches 145°F.

Basting and Saucing

Brush with butter in the last 10 minutes for a glossy finish. Prepare the garlic lemon butter sauce by whisking the ingredients over low heat until silky.Rest and ServeLet the fish rest for 3–5 minutes before drizzling with warm sauce and serving with fresh lemon wedges.

You Must Know

  • Wood choice is critical: mild woods like applewood or alder enhance the fish, while hickory or mesquite are too aggressive for delicate seafood
  • The low-and-slow 225°F temperature is the secret to salmon that stays moist and doesn’t “seize” or become tough
  • Always use an instant-read thermometer; because fillets vary in thickness, temperature is a much safer guide than time
  • Keep the skin on during the smoke; it acts as a thermal shield and keeps the delicate meat from sticking to the grates
  • Avoid over-mixing the stuffing; those big chunks of lump crab meat are what make the dish feel premium

Smoking seafood requires a gentler approach than smoking ribs or brisket. My early experiments taught me that the goal is enhancing rather than masking the natural flavors of the beautiful seafood.

Expert Tips for Success

The Temperature Trick: Bring your salmon fillets to room temperature for 20 minutes before smoking to ensure they cook evenly. Smoke Color: Look for thin, blue smoke; if the smoke is thick and white, it can leave a bitter, ashy taste on the delicate crab. Sauce Consistency: If your sauce separates, whisk in a teaspoon of warm water to bring the emulsion back together.

Storing and Reheating

Leftovers should be stored in an airtight container for up to three days. To reheat without drying out the fish, place it in a 275°F oven covered with foil for about 15 minutes. This gentle warmth protects the cream cheese in the stuffing and the flakes of the salmon.

Smoked Crab Stuffed Salmon

Pro Tips or Helpful Tips

  • Use a small amount of mozzarella in the stuffing for an extra-gooey cheese pull
  • Old Bay is a fantastic substitute for Creole seasoning if you want a classic coastal flavor
  • Garnish with fresh dill or microgreens to elevate the restaurant-style presentation
  • If your salmon fillets are thin, you can ‘sandwich‘ the stuffing between two fillets and tie them with kitchen twine
  • Pair with a crisp Sauvignon Blanc or a light Pinot Noir to complement the smoky, rich flavors

This smoked crab stuffed salmon is a showstopper that proves fine dining is achievable right in your backyard. Whether it’s an anniversary or a fancy Saturday night, this dish is guaranteed to impress. Enjoy your culinary masterpiece!

Frequently Asked Questions

→ Can I bake this instead of smoking it? Yes! Bake at 375 degrees for 20-25 minutes until the salmon reaches 145 degrees internally. You won’t get the smoky flavor, but it’ll still be delicious.

→ What if I can’t find lump crab meat? Regular crab meat works fine, just try to get the best quality you can. You could even use imitation crab in a pinch, though the flavor won’t be quite as good.’

→ How do I know when the salmon is done? Use a meat thermometer – the internal temperature should reach 145 degrees. The salmon should also flake easily with a fork and be opaque throughout.

→ Can I prep this ahead of time? Yes! You can stuff the salmon up to a few hours ahead and keep it covered in the fridge until you’re ready to smoke it.

→ What wood chips work best? Applewood or alder are best for seafood – they give a mild, sweet smoke that doesn’t overpower the delicate fish. Avoid strong woods like hickory or mesquite.

→ Do I need the garlic lemon sauce? It’s optional but highly recommended! It adds richness and brightness that really complements the smoky salmon and creamy crab filling.

Smoked Crab Stuffed Salmon

Serves: 4 Prep Time: 15 minutes Cooking Time: 45 minutes 45 minutes
Nutrition facts: 20 calories 20 grams fat
Rating: 5.0/5
( 1 voted )
Pin
Print

Ingredients

→ For the Salmon

 4 salmon fillets, skin-on, boneless, about 6 to 8 oz each
 Olive oil for brushing
 Salt and pepper to taste
 Lemon wedges for serving

→ For the Crab Stuffing

 1 lb lump crab meat (fresh or thawed if frozen)
 1/2 cup cream cheese, softened
 1/4 cup bread crumbs
 1/4 cup mayonnaise
 1/4 cup shredded mozzarella cheese (optional)
 2 tablespoons Dijon mustard
 1 tablespoon Worcestershire sauce
 2 tablespoons finely chopped green onions
 1 tablespoon fresh parsley (or 1 teaspoon dried)
 1 teaspoon garlic powder
 1 tablespoon Tony's Creole seasoning (or preferred seafood seasoning)
 Juice of 1/2 lemon

→ For the Garlic Lemon Sauce (Optional)

 1 stick butter
 1/3 cup heavy cream
 2 teaspoons garlic paste
 2 teaspoons lemon zest
 1 to 2 teaspoons Tony's Creole seasoning

Instructions

Use a sharp knife to cut a deep pocket into each salmon fillet - cut lengthwise but don't slice all the way through. You want to create a pocket that opens like a book. Lightly brush the outside with olive oil and season with salt and pepper. Set aside.

In a bowl, mix together the crab meat, softened cream cheese, bread crumbs, mayonnaise, mozzarella (if using), Dijon mustard, Worcestershire sauce, chopped green onions, parsley, garlic powder, Tony's Creole seasoning, and lemon juice. Gently combine everything while trying to keep the crab lumps intact. Taste and adjust the seasoning if needed.

Fill each salmon pocket with a generous amount of the crab mixture - really pack it in there! Gently press the edges together to keep the stuffing in place.

Preheat your smoker to 225 degrees. Use applewood or alder wood chips for a mild, sweet smokiness that won't overpower the delicate seafood.

Place the stuffed salmon fillets skin-side down on the smoker rack. Smoke for 45 minutes to 1 hour, until the salmon reaches an internal temperature of 145 degrees. Brush with a little olive oil or melted butter during the last 10 minutes of cooking to keep it moist.

While the salmon is smoking, make the sauce. In a heat-safe dish or small saucepan, melt the butter with the heavy cream, garlic paste, lemon zest, and Tony's Creole seasoning. Stir until everything is combined and smooth.

Remove the salmon from the smoker and let it rest for a few minutes. Serve with fresh lemon wedges and drizzle with the garlic lemon sauce if you made it. This is fancy enough for company but easy enough for any night!

Notes

  1. Applewood or alder wood chips give the best mild, sweet smoke flavor for seafood.
  2. Don't cut the pocket all the way through the salmon - you want it to open like a book.
  3. Be gentle when mixing the crab stuffing to keep the lump crab meat intact.
  4. If you don't have a smoker, you can bake this at 375 degrees for about 20-25 minutes.
  5. The garlic lemon sauce is optional but really takes this dish over the top!

Tools You'll Need

  • Smoker
  • Applewood or alder wood chips
  • Sharp knife
  • Mixing bowls
  • Meat thermometer
  • Small saucepan (for sauce)
0 comments
0 FacebookTwitterPinterestPocketEmail
Seafood MealsSoups & Salads

Rich Seafood Bisque Bowl

by myphillyconnection February 22, 2026
written by myphillyconnection

This restaurant-style seafood bisque combines three premium seafoods in a velvety cream broth. Seasoned with Old Bay and finished with white wine, it’s pure comfort in a bowl.

Get ready to experience the ocean’s finest treasures in my creamy seafood bisque. I’ve combined sweet lobster tender shrimp and delicate crab in a rich velvety broth that’ll warm your soul. This elegant soup is perfect for special dinners or anytime you want to treat yourself to something extraordinary.

Pure Comfort

This bisque brings pure luxury to your bowl. The blend of three premium seafoods with aromatic Old Bay seasoning creates magic in every spoonful. It’s become my go-to recipe when I want to really wow dinner guests or make a regular evening feel special.

Your Shopping List

  • Shrimp: 1/2 lb fresh pink beauties peeled and cleaned
  • Crab Meat: 1/2 lb fresh is best but canned works too
  • Lobster Meat: 1/2 lb cooked and chunked fresh or frozen
  • Butter: 3 tablespoons unsalted
  • Aromatics: 1 small onion 2 garlic cloves 1 celery stalk 1 carrot
  • Flour: 2 tablespoons for thickening
  • Seafood Broth: 2 cups for deep flavor
  • Heavy Cream: 1 cup makes it silky smooth
  • White Wine: 1/2 cup optional but lovely
  • Seasonings: Old Bay cayenne salt and pepper
  • Fresh Parsley: 1 tablespoon for garnish
  • Lemon Wedges: Adds brightness

Let’s Cook

Start with ShrimpMelt butter and cook shrimp until pink set asideBuild the BaseSauté onion garlic celery and carrot in butter until softCreate RichnessStir in flour then slowly add broth no lumpsMake it CreamyPour in cream wine and seasonings simmer until thickAdd Your TreasuresFold in all that gorgeous seafood warm throughTime to ServeGarnish with parsley serve with lemon perfect

A bowl of creamy seafood soup topped with lobster claws and shrimp, garnished with parsley.
A bowl of creamy seafood soup topped with lobster claws and shrimp

My Kitchen Secrets

Take your time letting flavors develop while simmering. Want it extra rich? Add a splash more cream. Make it ahead and refrigerate up to 2 days. Crusty bread on the side makes it even better.

Keeping it Fresh

Keeps in the fridge for 2 days. For longer storage freeze the base without seafood up to 3 months. Add fresh seafood when reheating for the best texture.

Frequently Asked Questions

→ What kind of crab meat works best?

Lump crab meat gives the best texture and flavor, but you can use any fresh crab meat. Avoid imitation crab as it won’t provide the same rich taste.

→ Can I make this ahead of time?

You can make the base up to a day ahead, but add the seafood just before serving to keep it tender. Reheat gently to avoid overcooking.

→ What can I substitute for the wine?

You can skip the wine or replace it with extra seafood stock. A splash of lemon juice adds nice acidity instead.

→ Is there a lighter version possible?

You can use half-and-half instead of heavy cream, but the bisque won’t be as rich. Avoid low-fat milk as it may curdle.

→ Can I use frozen seafood?

Yes, just thaw completely and pat dry before using. Fresh seafood gives best results, but quality frozen seafood works well too.

Rich Seafood Bisque Bowl

Serves: 4 Prep Time: 20 minutes Cooking Time: 25 minutes 25 minutes
Nutrition facts: 30 calories 15 fat
Rating: 5.0/5
( 1 voted )
Pin
Print

Ingredients

 1/2 lb shrimp, peeled and deveined.
 1/2 lb crab meat.
 1/2 lb cooked lobster meat, chopped.
 3 tablespoons butter.
 1 small onion, diced.
 2 cloves garlic, minced.
 1 celery stalk, diced.
 1 carrot, diced.
 2 tablespoons all-purpose flour.
 2 cups seafood broth or fish stock.
 1 cup heavy cream.
 1/2 cup dry white wine (optional).
 1 teaspoon Old Bay seasoning.
 1/4 teaspoon cayenne pepper (optional).
 Salt and pepper to taste.
 1 tablespoon fresh parsley, chopped.
 Lemon wedges for serving.

Instructions

Melt 2 tablespoons butter over medium heat. Cook shrimp 2-3 minutes until pink. Remove and set aside.

Add remaining butter and cook onion, garlic, celery, and carrot 4-5 minutes until soft.

Sprinkle flour over vegetables. Cook 1-2 minutes to make roux.

Slowly whisk in seafood broth until smooth.

Add cream, wine, Old Bay, cayenne, salt, and pepper. Simmer 10-15 minutes until thickened.

Fold in crab, lobster, and shrimp. Simmer 5 minutes more.

Garnish with parsley and serve with lemon wedges.

Notes

  1. Can skip wine and use extra broth.
  2. Best served immediately.
  3. Don't overcook seafood.
  4. Use fresh seafood when possible.
  5. Garnish with extra parsley if desired.

Tools You'll Need

  • Large pot.
  • Whisk.
  • Measuring cups and spoons.
0 comments
0 FacebookTwitterPinterestPocketEmail
Barbecue

BBQ Chicken Grilled Cheese Sandwich

by Clare Greco February 17, 2026
written by Clare Greco

This BBQ Chicken Grilled Cheese Sandwich takes comfort food to the next level with its combination of smoky BBQ chicken, creamy Havarti cheese, and buttery garlic bread. It’s a satisfying meal option that’s perfect for any time of the day. Quick to prepare and packed with bold flavors, this sandwich pairs wonderfully with sides like chips, coleslaw, or a fresh salad.

The BBQ Chicken Grilled Cheese Sandwich combines the smoky richness of BBQ chicken with creamy Havarti cheese, all tucked between buttery garlic bread. It’s the ultimate fusion of savory and cheesy, making it an ideal choice for lunch, dinner, or even as a hearty snack. This recipe is easy to prepare and perfect for satisfying your comfort food cravings.INGREDIENTS

  • Olive oil: 2 tbsp, for sautéing the onions and garlic.
  • Red onion: 1 small, thinly sliced, for a touch of sweetness and texture.
  • Garlic: 3 cloves, minced, to enhance the BBQ chicken flavor.
  • Shredded roasted chicken: 2 ½ cups, for a smoky, savory filling.
  • Paprika: ½ tsp, for added smoky depth.
  • Worcestershire sauce: 1 tsp, to enhance the BBQ sauce.
  • BBQ sauce: 1 cup, for bold, tangy flavor.
  • Havarti cheese: 12 slices, for creamy, melt-in-your-mouth cheesiness.
  • Butter: ¼ cup, melted, to create the garlic butter spread.
  • Garlic: 2 cloves, minced, to mix into the butter for flavor.
  • Parsley: 2 tsp, minced, to add a fresh, herby note to the butter.
  • Sourdough bread: 12 slices, or any sturdy white bread for structure and flavor.

INSTRUCTIONS

Step 1: Heat olive oil in a skillet over medium heat. Sauté the red onion until softened, about 2 minutes. Add garlic and cook until fragrant, about 30 seconds.

Step 2: Stir in the shredded chicken, paprika, Worcestershire sauce, and BBQ sauce. Cook until the mixture is heated through, about 2–3 minutes. Remove from heat and set aside.

Step 3: In a small bowl, melt the butter and mix in minced garlic and parsley to create garlic butter.

Step 4: Lay out 12 slices of bread. Spread the garlic butter mixture on one side of each slice. Flip the slices over, so the non-buttered side is facing up.

Step 5: Place a slice of Havarti cheese on 6 bread slices (non-buttered side). Add a portion of the BBQ chicken mixture, top with another slice of Havarti cheese, and finish with the remaining bread slices (buttered side up).

Step 6: Heat a non-stick skillet over medium heat. Place the sandwiches in the skillet and cook until the bread is golden brown on one side, about 3–5 minutes.

Step 7: Flip the sandwiches, reduce the heat to medium-low, and cook until the cheese melts and the other side browns, about 3–5 minutes.Step 8:Serve the sandwiches warm with your favorite sides, like chips, coleslaw, or a fresh salad.Serving and Storage Tips

  • Serve the sandwiches immediately for the best texture and flavor.
  • Store leftovers in the refrigerator for up to 2 days. Reheat in a skillet or oven to maintain crispiness.

Helpful Notes

  • For a smoky twist, use smoked Havarti or smoked gouda cheese.
  • Experiment with different BBQ sauce flavors, such as honey or spicy BBQ, to customize the taste.

Tips from Well-Known Chefs

  • Press the sandwiches gently with a spatula while grilling for even browning and melted cheese.
  • For extra flavor, toast the bread lightly before assembling the sandwiches.

BBQ Chicken Grilled Cheese Sandwich

Serves: 6 Prep Time: 15 minutes Cooking Time: 10 minutes 10 minutes
Nutrition facts: 260 calories 25 fat
Rating: 5.0/5
( 1 voted )
Pin
Print

Ingredients

2 tbsp olive oil.
 1 small red onion, thinly sliced.
 3 cloves garlic, minced.
 2 ½ cups shredded roasted chicken.
 ½ tsp paprika.
 1 tsp Worcestershire sauce.
 1 cup BBQ sauce.
 12 slices Havarti cheese.
 ¼ cup butter.
 2 cloves garlic, minced (for garlic butter).
 2 tsp parsley, minced.
 12 slices sourdough bread or sturdy white bread.

Instructions

Heat olive oil in a skillet over medium heat. Sauté onions until soft, about 2 minutes. Add garlic and cook until fragrant, about 30 seconds.

Add shredded chicken, paprika, Worcestershire sauce, and BBQ sauce. Stir and cook until the mixture is heated through, about 2–3 minutes.

Melt butter in a bowl and mix with minced garlic and parsley to create garlic butter.

Lay out 12 slices of bread. Spread garlic butter on one side of each slice. Flip the slices over so the non-buttered side is facing up.

Place a slice of Havarti cheese on 6 bread slices (non-buttered side). Add a portion of the BBQ chicken mixture, another slice of Havarti cheese, and top with the remaining bread slices (buttered side up).

Heat a non-stick skillet over medium heat. Place sandwiches in the skillet and cook until golden brown on one side, about 3–5 minutes.

Flip the sandwiches, reduce the heat to medium-low, and cook until the cheese melts and the other side browns, about 3–5 minutes.

Serve the sandwiches warm with your favorite side, such as chips or coleslaw.

Notes

  1. This BBQ Chicken Grilled Cheese Sandwich combines smoky, savory BBQ chicken with creamy Havarti cheese and buttery garlic bread for an irresistible meal.
  2. Perfect for lunch, dinner, or a quick snack that’s both satisfying and flavorful.


Nutrition Facts (Per Serving)

It is important to consider this information as approximate and not to use it as definitive health advice.
  • Calories: ~
  • Total Fat: ~
  • Total Carbohydrate: ~
  • Protein: ~
0 comments
0 FacebookTwitterPinterestPocketEmail
Soups & Salads

Country French Garlic Soup

by Clare Greco February 17, 2026
written by Clare Greco

A comforting French soup combining garlic-infused broth with eggs and parmesan for richness. Perfect with crusty bread.

This French Country Garlic Soup brings me back to cooking with my grandmother. The way the garlic and sage meld together creates something truly magical.

Pure Comfort

What makes this soup special is how simple ingredients transform into luxury. The garlic becomes sweet while the sage adds earthiness.

What You Need

  • Fresh Garlic: A whole head.
  • Good Stock: Homemade if possible.
  • Fresh Sage: Never dried.
  • Quality Oil: Your best olive oil.
  • Fresh Eggs: For silky mayo.

Making the Base

Let that stock simmer gently with garlic and sage. The aroma will fill your kitchen with pure comfort.

Time to Serve

Ladle into bowls and top with crusty croutons. A drizzle of olive oil makes it shine.

Keep It Fresh

Stores well for three days. Just reheat gently no boiling needed.

Perfect Pairings

A glass of white wine and crusty bread make it complete. Simple but perfect.

Mix It Up

Try adding thyme or a splash of wine. Some truffle oil on top makes it fancy.

Plant Based Option

Use veggie stock and vegan mayo. Still delicious just different.

French Classic

This soup tells the story of French countryside cooking. Simple ingredients maximum flavor.

Roasted Garlic Twist

Roast the garlic first for extra sweetness. Worth the extra time.

Good For You

Garlic and herbs pack nutrition into every bowl. Pure comfort that’s good for you.

Old World Charm

This recipe comes from generations of French home cooks. Pure tradition in every spoonful.

Kid Friendly

Blend it smooth and top with cheese croutons. Even picky eaters love it.

Season to Season

Add root veggies in winter light herbs in summer. Always perfect.

Perfect for Groups

Double the recipe for gatherings easy to serve and always impresses.

Layer Those Flavors

Each ingredient adds something special. The mayo makes it silky smooth.

Make Extra

Freezes beautifully for quick dinners later. Just warm gently when needed.

Any Occasion

Perfect for casual lunches or fancy dinners. It’s that versatile.

Chef’s Secret

Top quality olive oil makes all the difference. Splurge on the good stuff.

Rustic Elegance

Simple ingredients fancy results. That’s French cooking at its best.

Garlic Love

The garlic mellows as it cooks becoming sweet and gentle.

Pure Comfort

Nothing better on a cold day. Warms you from the inside out.

Kitchen Essentials

Good pots and an immersion blender make it easier. Worth the investment.

Extra Uses

Use leftovers as pasta sauce or risotto base. So versatile.

Health Benefits

Garlic boosts immunity makes you feel good too.

Family Love

This recipe gets passed down generations. Pure tradition.

Serve with Style

Rustic bowls fresh herbs on top. Simple but beautiful.

Budget Friendly

Simple ingredients big flavor. Doesn’t break the bank.

Always In Style

This soup never goes out of fashion. Classic for good reason.

Frequently Asked Questions

→ How do I prevent the eggs from curdling? Temper the eggs by slowly whisking hot soup into them before adding back to pot. Keep heat low and stir continuously.

→ Can I freeze this soup? Freeze before adding egg mixture only. Do not freeze after eggs are incorporated as it will affect texture.

→ What bread works best with this? Crusty French bread or baguette work best for dipping and soaking up the flavorful broth.

→ Can I make this vegetarian? Yes, simply substitute vegetable broth for chicken broth. Keep all other ingredients the same.

Conclusion

A traditional French soup that combines simple ingredients to create a rich and comforting meal. Whole garlic cloves are simmered in a flavorful broth, then enriched with eggs and parmesan cheese for a creamy, satisfying dish.

Country French Garlic Soup

Serves: 6 Prep Time: 15 Minutes Cooking Time: 45 Minutes 45 Minutes
Nutrition facts: 200 calories 20 grams fat
Rating: 5.0/5
( 1 voted )
Pin
Print

Ingredients

2 heads garlic, peeled.
 1 tablespoon olive oil.
 1 onion, chopped.
 2 tablespoons butter.
 6 cups chicken or vegetable broth.
 2 sprigs fresh thyme.
 2 bay leaves.
 4 egg yolks.
 1/2 cup grated Parmesan cheese.
 Salt and pepper to taste.
 Fresh parsley for garnish.

Instructions

Heat oil and butter, cook onion until soft, about 5 minutes. Add garlic, cook 2-3 minutes.

Add broth, thyme, bay leaves. Boil, then simmer 30 minutes. Remove herbs.

Add salt and pepper to taste.

Whisk egg yolks and Parmesan. Temper with hot soup, return to pot. Simmer 5 minutes until thickened.

Notes

  1. Temper eggs carefully to prevent curdling.
  2. Freeze before adding eggs only.
  3. Can use vegetable broth for vegetarian version.

Tools You'll Need

  • Large pot.
  • Small bowl.
  • Whisk.

Nutrition Facts (Per Serving)

It is important to consider this information as approximate and not to use it as definitive health advice.
  • Calories: ~
  • Total Fat: ~
  • Total Carbohydrate: ~
  • Protein: ~
0 comments
0 FacebookTwitterPinterestPocketEmail
Breakfast & PastriesPork Meals

Breakfast Sliders

by Clare Greco February 17, 2026
written by Clare Greco

These Breakfast Sliders combine the best morning flavors in one satisfying bite! Juicy sausage patties, scrambled eggs, and melty cheese are layered inside soft Hawaiian buns, all topped with a sweet maple-butter glaze. Baked to perfection, these sliders are perfect for breakfast gatherings or brunch.

Breakfast Sliders are an irresistible combination of savory sausage, fluffy eggs, and gooey cheese, all packed into soft Hawaiian buns. These sliders are perfect for breakfast or brunch and are sure to be a hit with the whole family. The addition of a sweet maple-butter glaze on top makes them even more delicious, adding a touch of sweetness to the savory flavors.

INGREDIENTS

  • Ground Pork Sausage: 24 oz (2 breakfast sausage rolls), shaped into patties for a savory base
  • Hawaiian Buns: 12 slider-sized buns, sliced horizontally and kept connected for easy assembly
  • Large Eggs: 8, scrambled, for a soft and fluffy layer
  • Pepper Jack Cheese: 6 slices, for a hint of spice
  • American Cheese: 8 slices, for extra meltiness
  • Butter: 1/2 cup, melted, for the sweet glaze
  • Maple Syrup: 1/4 cup, mixed with butter for the glaze

INSTRUCTIONS

Step 1: Preheat the oven to 350°F (175°C).

Step 2: Shape the ground sausage into 12 round patties, slightly larger than the buns. Cook the patties in a skillet over medium heat until fully cooked.

Step 3: Slice the Hawaiian buns in half horizontally, keeping them connected. Place the bottom halves in a 7×10 or 9×13 baking dish.

Step 4: Spread the scrambled eggs over the bottom halves of the buns, then layer with slices of pepper jack cheese.

Step 5: Place the cooked sausage patties over the pepper jack cheese layer, then top with slices of American cheese.

Step 6: Place the top halves of the buns over the cheese layer.

Step 7: In a small bowl, mix the melted butter and maple syrup. Brush the mixture over the tops of the buns, letting it seep down the sides.

Step 8: Bake the sliders in the oven for 15-20 minutes, or until the cheese is melted and bubbly.

Step 9: Let the sliders cool slightly before serving. Enjoy!Serving and Storage Tips

  • Serve the sliders warm for the best flavor and texture.
  • To reheat, place sliders in the oven at 350°F for 5-7 minutes, or until warmed through.

Helpful Notes

  • Feel free to add your favorite toppings, such as sautéed onions or sliced jalapeños, for extra flavor.
  • Use a combination of cheeses, like cheddar or Swiss, for a different twist.

Tips from Well-Known Chefs

  • Chef Mark suggests adding a drizzle of hot sauce to the eggs for a spicy kick.
  • Chef Linda recommends using fresh, soft buns for the best texture and taste.

How to Make the Best Breakfast Sliders

To make the best breakfast sliders, start with high-quality sausage and cheese. Be sure to scramble the eggs until just set for the fluffiest results. Brush the buns generously with the maple-butter glaze for that signature sweet and savory flavor.Variations of Breakfast Sliders

For a healthier twist, use turkey sausage and whole wheat buns. You can also try adding sautéed spinach or sliced avocado for extra nutrients.FAQs

Can I make these sliders ahead of time?

Yes, you can assemble the sliders and refrigerate them overnight. Brush with the glaze and bake just before serving.

Can I use other types of cheese?

Yes, feel free to use your favorite cheese varieties, like cheddar, Swiss, or mozzarella.

How can I make the sliders less sweet?

Reduce the amount of maple syrup in the glaze or use unsweetened butter instead.

Can I freeze these sliders?

Yes, you can freeze the sliders after baking. Wrap tightly and reheat in the oven when ready to serve.

Conclusion

Breakfast Sliders are a delicious way to start the day! Made with savory sausage patties, fluffy scrambled eggs, and two kinds of cheese—pepper jack for a bit of spice and American cheese for extra meltiness—these sliders are sandwiched between soft Hawaiian buns. The sweet and savory maple-butter glaze brushed over the top brings everything together. They’re baked until the cheese is perfectly melted and the buns are golden brown. This easy, crowd-pleasing recipe is ideal for breakfast, brunch, or even a breakfast-for-dinner option. Serve warm, and watch these sliders disappear fast!

Breakfast Sliders

Serves: 12 Prep Time: 20 Minutes Cooking Time: 20 Minutes 20 Minutes
Nutrition facts: 200 calories 20 grams fat
Rating: 5.0/5
( 1 voted )
Pin
Print

Ingredients

 24 oz ground pork sausage (2 breakfast sausage rolls).
 12 Hawaiian buns (or other slider buns).
 8 large eggs, scrambled.
 6 slices pepper jack cheese.
 8 slices American cheese.
 1/2 cup butter, melted.
 1/4 cup maple syrup.

Instructions

Preheat the oven to 350°F (175°C).

Shape the ground sausage into 12 round patties, slightly larger than the buns. Cook in a skillet over medium heat until fully cooked.

Slice the Hawaiian buns in half horizontally, keeping them connected. Place the bottom halves in a 7×10 or 9×13 baking dish.

Spread scrambled eggs over the bottom halves, then layer with the slices of pepper jack cheese.

Place cooked sausage patties over the pepper jack cheese layer, then top with slices of American cheese.

Place the top halves of the buns over the cheese layer.

In a small bowl, mix the melted butter and maple syrup. Brush over the tops of the buns, letting it seep down the sides.

Bake in the oven for 15-20 minutes, or until the cheese is melted and bubbly.

Let cool slightly before serving. Enjoy!.

Notes

  1. These sliders are perfect for breakfast or brunch gatherings.
  2. You can use any type of cheese or buns you prefer for a customized version.


Nutrition Facts (Per Serving)

It is important to consider this information as approximate and not to use it as definitive health advice.
  • Calories: ~
  • Total Fat: ~
  • Total Carbohydrate: ~
  • Protein: ~
0 comments
0 FacebookTwitterPinterestPocketEmail
30 Minute MealsPastaVegetarian

Spaghetti with Spinach & Sun-Dried Tomato Cream Sauce

by Clare Greco February 17, 2026
written by Clare Greco

This Spaghetti with Spinach & Sun-Dried Tomato Cream Sauce is a comforting Italian-inspired dish that’s both creamy and packed with fresh flavors. The recipe starts by boiling whole-wheat spaghetti, which is then drained over fresh spinach to wilt it. The sauce is made by sautéing red onion and sun-dried tomatoes in reserved oil, followed by garlic and crushed red pepper flakes for a bit of heat. The addition of vegetable or chicken broth helps to create a rich base, which is finished with sour cream, Parmesan cheese, and butter for ultimate creaminess. Serve hot with extra cheese and optional lemon juice or herbs for added flavor!

Spaghetti with Spinach & Sun-Dried Tomato Cream Sauce is a perfect blend of creamy, tangy, and fresh flavors that make for an irresistible dinner. This Italian-inspired pasta dish is a favorite among vegetarians and pasta lovers alike, offering a satisfying meal that’s quick to prepare. It starts with boiling whole-wheat spaghetti, which is drained over fresh spinach to wilt it effortlessly. The sauce is built by sautéing red onion and sun-dried tomatoes, adding layers of flavor before being enriched with garlic, red pepper flakes, and a creamy combination of sour cream and Parmesan cheese.

INGREDIENTS

  • Fresh spinach leaves: 4 cups, wilted by draining hot pasta over them
  • Whole-wheat spaghetti: 8 oz, cooked to al dente
  • Sun-dried tomatoes: 1/2 cup, chopped, for a tangy flavor
  • Red onion: 1 small, finely chopped, to add sweetness
  • Garlic: 2 cloves, minced, for an aromatic touch
  • Crushed red pepper flakes: 1/2 tsp, for a hint of spice
  • Salt and pepper: to taste, for seasoning
  • Low-sodium vegetable or chicken broth: 1 cup, to create the sauce base
  • Sour cream: 1/2 cup, for creaminess
  • Grated Parmesan cheese: 1/2 cup, to add cheesy richness
  • Butter: 2 tbsp, to enrich the sauce

INSTRUCTIONS

Step 1: Place 4 cups of spinach in a colander.

Step 2: Boil 8 oz of whole-wheat spaghetti until al dente (8-10 minutes). Drain over the spinach to wilt it.

Step 3: Heat 1 tbsp reserved oil from the sun-dried tomatoes in a skillet. Add finely chopped red onion and chopped sun-dried tomatoes; sauté for 3 minutes.

Step 4: Stir in minced garlic, crushed red pepper flakes, salt, and pepper. Cook for 1 more minute.

Step 5: Add broth to the skillet and simmer until reduced by half.

Step 6: Stir in sour cream, grated Parmesan, and butter until the sauce is creamy.

Step 7: Add the cooked spaghetti and wilted spinach to the skillet, tossing to coat evenly with the sauce.

Step 8: Serve hot, garnished with extra Parmesan and optional lemon juice or herbs.Serving and Storage Tips

  • Serve with a side of garlic bread or a simple green salad for a complete meal.
  • Store leftovers in an airtight container in the refrigerator for up to 3 days. Reheat gently on the stove with a splash of broth or water to prevent drying.

Helpful Notes

  • For a vegan version, use dairy-free sour cream and vegan Parmesan cheese.
  • Feel free to add grilled chicken or shrimp for added protein.

Tips from Well-Known Chefs

  • Chef Mario suggests adding a squeeze of fresh lemon juice just before serving for a bright, zesty finish.

How to Make Creamy Spaghetti with Spinach & Sun-Dried Tomatoes

This easy pasta dish is creamy, tangy, and full of flavor, thanks to the combination of sun-dried tomatoes, Parmesan, and fresh spinach. The addition of whole-wheat spaghetti adds a nutty depth, while the tangy cream sauce brings everything together for a satisfying meal.Why This Pasta Recipe Is Perfect for Busy Weeknights

This spaghetti recipe comes together in under 30 minutes, making it an ideal choice for busy evenings. Its simple ingredient list and quick preparation mean you can have a delicious meal on the table without much effort.FAQs

Can I use regular spaghetti instead of whole-wheat?

Yes, regular spaghetti can be used if preferred.

Is there a way to make this recipe gluten-free?

Yes, use gluten-free pasta and ensure the broth and Parmesan are also gluten-free.

Can I use Greek yogurt instead of sour cream?

Yes, Greek yogurt can be used as a substitute for sour cream, though it will add a slightly tangier flavor.

How can I make this dish spicier?

Increase the amount of crushed red pepper flakes or add a dash of hot sauce to the sauce.

Conclusion

Spaghetti with Spinach & Sun-Dried Tomato Cream Sauce is a delicious vegetarian pasta recipe that’s perfect for weeknight dinners. This Italian-inspired dish combines the freshness of spinach with the tangy flavor of sun-dried tomatoes, all coated in a creamy Parmesan sauce. The spaghetti is cooked to al dente and tossed with the sauce for a comforting meal that’s quick and easy to prepare. The dish is finished with extra grated Parmesan and optional garnishes like lemon juice or fresh herbs for an added burst of flavor.

Spaghetti with Spinach & Sun-Dried Tomato Cream Sauce

Serves: 4 Prep Time: 10 Minutes Cooking Time: 20 Minutes 20 Minutes
Nutrition facts: 200 calories 20 grams fat
Rating: 5.0/5
( 1 voted )
Pin
Print

Ingredients

4 cups fresh spinach leaves.
 8 oz whole-wheat spaghetti.
 1/2 cup sun-dried tomatoes, chopped.
 1 small red onion, finely chopped.
 2 cloves garlic, minced.
 1/2 tsp crushed red pepper flakes.
 Salt and pepper to taste.
 1 cup low-sodium vegetable or chicken broth.
 1/2 cup sour cream.
 1/2 cup grated Parmesan cheese.
 2 tbsp butter.

Instructions

Place 4 cups of spinach in a colander.

Boil 8 oz of whole-wheat spaghetti until al dente (8-10 minutes). Drain over spinach to wilt.

Heat 1 tbsp reserved oil from the sun-dried tomatoes in a skillet. Add onion and chopped sun-dried tomatoes; sauté for 3 minutes.

Stir in minced garlic, crushed red pepper flakes, salt, and pepper. Cook for 1 more minute.

Add broth to the skillet and simmer until reduced by half.

Stir in sour cream, grated Parmesan, and butter until the sauce is creamy.

Add the cooked spaghetti and wilted spinach to the skillet, tossing to coat evenly with the sauce.

Serve hot, garnished with extra Parmesan and optional lemon juice or herbs.

Notes

  1. This creamy spaghetti with spinach and sun-dried tomato cream sauce is a vegetarian delight, perfect for weeknight dinners.


Nutrition Facts (Per Serving)

It is important to consider this information as approximate and not to use it as definitive health advice.
  • Calories: ~
  • Total Fat: ~
  • Total Carbohydrate: ~
  • Protein: ~
0 comments
0 FacebookTwitterPinterestPocketEmail
30 Minute MealsBeef MealsMain DishesPopular Recipes

Peppercorn Steak with Creamy Sauce

by Clare Greco February 17, 2026
written by Clare Greco

This Peppercorn Steak with Creamy Sauce is a delicious, gourmet meal that brings the flavors of a fine-dining steakhouse to your home. The filet mignon is seared to perfection, creating a crust that’s rich in flavor while keeping the inside tender and juicy. The creamy sauce, infused with brandy, Dijon mustard, and Worcestershire sauce, adds depth and richness, making each bite unforgettable. This dish is perfect for a special dinner or date night and pairs beautifully with sides like mashed potatoes, roasted vegetables, or a crisp salad.

INGREDIENTS

  • Filet mignon steaks: 4, each about 1.5 inches thick, for a tender and juicy main protein.
  • Salt and freshly ground black pepper: To season the steaks before cooking.
  • Olive oil: 2 tbsp, for searing the steaks to a golden crust.
  • Whole peppercorns: 3 tbsp, crushed, for a bold, peppery flavor.
  • Brandy or cognac: ¼ cup, to deglaze the pan and add depth to the sauce.
  • Heavy cream: 1 cup, for a rich and creamy sauce.
  • Dijon mustard: 1 tbsp, for a tangy flavor boost in the sauce.
  • Worcestershire sauce: 1 tbsp, to add savory umami notes to the sauce.
  • Fresh parsley: Chopped, for garnish and a pop of color.

INSTRUCTIONS

Step 1: Generously season 4 filet mignon steaks with salt and crushed peppercorns, pressing the seasoning into the meat.

Step 2: Heat 2 tbsp olive oil in a heavy skillet over medium-high heat. Add the steaks and sear for 4-5 minutes per side for medium-rare, or adjust the cooking time to your desired doneness. Remove the steaks from the skillet and set aside.

Step 3: Carefully add ¼ cup brandy to the hot skillet, scraping up any browned bits from the bottom. Be cautious, as the brandy may flame briefly.

Step 4: Reduce the heat to medium and stir in 1 cup heavy cream, 1 tbsp Dijon mustard, and 1 tbsp Worcestershire sauce. Cook, stirring occasionally, until the sauce thickens slightly, about 5-6 minutes.

Step 5: Return the steaks to the skillet and coat them with the sauce, cooking for an additional minute to blend the flavors.

Step 6: Transfer the steaks to plates, spoon the sauce over them, and garnish with chopped fresh parsley. Serve immediately.Serving and Storage Tips

  • This dish is best served immediately while the sauce is hot and creamy. Pair it with sides like roasted potatoes, mashed potatoes, or green beans for a complete meal.
  • Store any leftover steak and sauce in an airtight container in the refrigerator for up to 2 days. Reheat gently on the stove to preserve the sauce’s creaminess.

Helpful Notes

  • For a thicker sauce, allow the cream to reduce slightly longer over medium heat.

Tips from Well-Known Chefs

  • Chef Thomas suggests using freshly cracked peppercorns for a bolder, more aromatic flavor in the sauce.

How to Cook the Perfect Filet Mignon

To achieve the perfect filet mignon, ensure the steaks are at room temperature before cooking. This allows for even searing and better retention of juices. Use a hot skillet to create a caramelized crust while keeping the inside tender. Let the steaks rest for a few minutes after cooking to redistribute the juices.FAQs

Can I use a different cut of steak?

Yes, you can use ribeye, sirloin, or New York strip steaks, but adjust the cooking time accordingly based on the thickness.

Can I substitute brandy with something else?

If you prefer not to use alcohol, you can substitute beef broth, though the flavor will be slightly different.

Conclusion

Peppercorn Steak with Creamy Sauce is a gourmet dish that features perfectly seared filet mignon topped with a rich, brandy-infused creamy sauce. This classic French-inspired recipe is perfect for steak lovers and brings a restaurant-quality meal to your dining table. The combination of the juicy steak and the luxurious sauce creates a flavorful, decadent dish that’s sure to impress. Serve with a side of roasted vegetables or mashed potatoes for a complete meal!

Peppercorn Steak with Creamy Sauce

Serves: 4 Prep Time: 5 Minutes Cooking Time: 20 Minutes 20 Minutes
Nutrition facts: 200 calories 20 grams fat
Rating: 5.0/5
( 1 voted )
Pin
Print

Ingredients

 4 filet mignon steaks (1.5 inches thick).
 Salt and freshly ground black pepper, to taste.
 2 tbsp olive oil.
 3 tbsp whole peppercorns, crushed.
 ¼ cup brandy or cognac.
 1 cup heavy cream.
 1 tbsp Dijon mustard.
 1 tbsp Worcestershire sauce.
 Fresh parsley, chopped (for garnish).

Instructions

Season steaks generously with salt and crushed peppercorns.

Heat olive oil in a heavy skillet over medium-high heat. Add steaks and sear for 4-5 minutes per side for medium-rare, or to your desired doneness. Remove steaks from the skillet and set aside.

Add brandy to the hot skillet, scraping up any browned bits from the bottom. Be cautious, as the brandy may flame.

Reduce heat to medium and stir in heavy cream, Dijon mustard, and Worcestershire sauce. Cook until the sauce thickens slightly, about 5-6 minutes.

Return the steaks to the skillet and coat them with the sauce, cooking for an additional minute.

Transfer steaks to plates, spoon sauce over, and garnish with chopped parsley.

Notes

  1. This Peppercorn Steak with Creamy Sauce is a luxurious dish featuring perfectly seared filet mignon topped with a rich, flavorful sauce.
  2. The addition of brandy adds depth to the sauce, while the Dijon mustard and Worcestershire sauce enhance its creaminess and flavor.


Nutrition Facts (Per Serving)

It is important to consider this information as approximate and not to use it as definitive health advice.
  • Calories: ~
  • Total Fat: ~
  • Total Carbohydrate: ~
  • Protein: ~
0 comments
0 FacebookTwitterPinterestPocketEmail
30 Minute MealsPastaPork Meals

Italian Drunken Noodles

by Clare Greco February 17, 2026
written by Clare Greco

Italian Drunken Noodles is a delicious and hearty dish that combines the richness of Italian sausage, the sweetness of bell peppers, and the depth of white wine and tomatoes. This savory pasta dish comes together in less than 30 minutes, making it perfect for busy weeknights.

INGREDIENTS

  • Egg noodles: 12 oz, cooked according to your liking
  • Italian sausage: 1 lb ground, brings savory richness to the dish
  • Bell peppers: 2, chopped, for sweetness and texture
  • Minced garlic: 3 tsp, adds a punch of flavor
  • Italian seasoning: 1 tsp, for an herbaceous blend of flavors
  • White cooking wine: ½ cup, for depth and richness
  • Diced tomatoes: 28 oz can (with juice), brings a tangy base to the sauce
  • Dried basil: 1 tbsp, for a touch of earthiness
  • Salt and pepper: to taste, for seasoning
  • Parmesan cheese: for garnish, adds a cheesy finish
  • Fresh chopped parsley: for garnish, adds a fresh touch

INSTRUCTIONS

Step 1: In a large saucepan or skillet with deep sides, cook the ground Italian sausage and chopped bell peppers over medium-high heat. Cook until the sausage is browned and the peppers begin to soften.

Step 2: Lower the heat to medium, then stir in the minced garlic and Italian seasoning. Sauté for an additional 30 seconds until fragrant.

Step 3: Pour in the white cooking wine and sauté until the liquid reduces by half.

Step 4: Stir in the diced tomatoes (with their juice), dried basil, and salt and pepper to taste. Mix everything together until well combined.

Step 5: Add the cooked egg noodles to the skillet and gently toss until everything is well combined and heated through.

Step 6: Top the dish with freshly grated Parmesan cheese and chopped parsley before serving.Serving and Storage Tips

  • Serve hot, topped with extra Parmesan cheese or fresh basil for added flavor.
  • Store leftovers in an airtight container in the refrigerator for up to 3 days. Reheat in a skillet or microwave until heated through.

Helpful Notes

  • If you prefer a spicier dish, add a pinch of red pepper flakes when sautéing the garlic and Italian seasoning.
  • You can substitute the white cooking wine with chicken broth for a lighter sauce.

Tips from Well-Known Chefs

  • Chef Giada De Laurentiis recommends using a combination of sweet and hot Italian sausage for a more complex flavor profile in dishes like this one.

Italian Drunken Noodles

Serves: 4 Prep Time: 10 Minutes Cooking Time: 20 Minutes 20 Minutes
Nutrition facts: 200 calories 20 grams fat
Rating: 5.0/5
( 1 voted )
Pin
Print

Ingredients

12 oz egg noodles (cooked to your liking).
 1 lb ground Italian sausage.
 2 bell peppers (chopped).
 3 tsp minced garlic.
 1 tsp Italian seasoning.
 ½ cup white cooking wine.
 28 oz can diced tomatoes (not drained).
 1 tbsp dried basil.
 Salt and pepper to taste.
 Parmesan cheese (for garnish).
 Fresh chopped parsley (for garnish).

Instructions

In a large saucepan or skillet with deep sides, cook the ground Italian sausage and chopped bell peppers over medium-high heat. Cook until the sausage is browned and the peppers begin to soften.

Lower the heat to medium, then stir in the minced garlic and Italian seasoning. Sauté for an additional 30 seconds until fragrant.

Pour in the white cooking wine and sauté until the liquid reduces by half.

Stir in the diced tomatoes (with their juice), dried basil, and salt and pepper to taste. Mix everything together until well combined.

Add the cooked egg noodles to the skillet and gently toss until everything is well combined and heated through.

Top the dish with freshly grated Parmesan cheese and chopped parsley before serving.

Notes

  1. Italian Drunken Noodles is a flavorful and easy weeknight dish combining tender egg noodles with savory Italian sausage, bell peppers, and a white wine tomato sauce.
  2. This dish is garnished with fresh Parmesan and parsley for an added burst of flavor.


Nutrition Facts (Per Serving)

It is important to consider this information as approximate and not to use it as definitive health advice.
  • Calories: ~
  • Total Fat: ~
  • Total Carbohydrate: ~
  • Protein: ~
0 comments
0 FacebookTwitterPinterestPocketEmail
30 Minute MealsBeef MealsCultural DishesPasta

Mongolian Ground Beef Noodles

by Clare Greco February 17, 2026
written by Clare Greco

Mongolian Ground Beef Noodles is a savory and satisfying dish perfect for busy weeknights. The recipe combines tender ground beef with a rich and flavorful sauce made from soy sauce, hoisin sauce, and brown sugar. Fresh ginger and garlic add depth to the dish, while a sprinkle of optional red pepper flakes brings a hint of heat. Tossed with cooked noodles, the result is a comforting meal that comes together in just 30 minutes. Garnish with green onions and sesame seeds for extra flavor and crunch. This dish is perfect for a quick family dinner or even meal prep for the week!

Mongolian Ground Beef Noodles bring together tender ground beef, noodles, and a savory, rich sauce in one quick, easy meal. This Asian-inspired dish is perfect for a busy weeknight when you need a comforting, flavorful dinner on the table fast.

INGREDIENTS

  • Ground beef: 1 lb, cooked and browned for the base of the dish
  • Noodles: 8 oz, lo mein or spaghetti work well
  • Soy sauce: 1/4 cup, adds savory umami flavor
  • Hoisin sauce: 1/4 cup, for sweetness and depth
  • Brown sugar: 2 tbsp, balances the savory flavors
  • Ginger: 1 tsp minced, adds warmth and spice
  • Garlic: 3 cloves minced, for aromatic flavor
  • Sesame oil: 1 tbsp, for rich, nutty flavor
  • Green onions: 1/4 cup chopped, adds freshness
  • Red pepper flakes (optional): 1/2 tsp, for heat
  • Sesame seeds: for garnish, adds texture

INSTRUCTIONS

Step 1: Cook the noodles according to package instructions. Drain and set aside.

Step 2: Heat sesame oil in a large skillet over medium heat. Add the ground beef and cook until browned, breaking it up as it cooks. Drain excess fat if necessary.

Step 3: Add the minced garlic, ginger, and optional red pepper flakes to the beef. Cook for 1-2 minutes until fragrant.

Step 4: Stir in soy sauce, hoisin sauce, and brown sugar. Simmer for 3-4 minutes until the sauce thickens slightly.

Step 5: Toss the cooked noodles into the skillet, coating them in the beef and sauce mixture until everything is well combined.

Step 6: Garnish with chopped green onions, additional red pepper flakes if desired, and sesame seeds. Serve hot and enjoy!

Serving and Storage Tips

  • Serve hot and garnish with extra green onions or sesame seeds for added flavor and texture.
  • Store leftovers in an airtight container in the refrigerator for up to 3 days. Reheat in a skillet or microwave until warmed through.

Helpful Notes

  • Feel free to swap the ground beef with ground turkey or chicken for a leaner option.
  • If you prefer a spicier dish, increase the amount of red pepper flakes or add sriracha to the sauce.

Tips from Well-Known Chefs

  • Chef David Chang recommends using fresh lo mein noodles for the best texture, but spaghetti can be a great substitute when you’re in a pinch.

Mongolian Ground Beef Noodles

Serves: 4 Prep Time: 10 Minutes Cooking Time: 20 Minutes 20 Minutes
Nutrition facts: 200 calories 20 grams fat
Rating: 5.0/5
( 1 voted )
Pin
Print

Ingredients

  • Ground beef: 1 lb, cooked and browned for the base of the dish
  • Noodles: 8 oz, lo mein or spaghetti work well
  • Soy sauce: 1/4 cup, adds savory umami flavor
  • Hoisin sauce: 1/4 cup, for sweetness and depth
  • Brown sugar: 2 tbsp, balances the savory flavors
  • Ginger: 1 tsp minced, adds warmth and spice
  • Garlic: 3 cloves minced, for aromatic flavor
  • Sesame oil: 1 tbsp, for rich, nutty flavor
  • Green onions: 1/4 cup chopped, adds freshness
  • Red pepper flakes (optional): 1/2 tsp, for heat
  • Sesame seeds: for garnish, adds texture

Instructions

Cook the noodles according to package instructions. Drain and set aside.

In a large skillet, heat sesame oil over medium heat. Add the ground beef and cook until browned, breaking it up as it cooks. Drain excess fat if necessary.

Add minced garlic, ginger, and optional red pepper flakes to the beef. Cook for 1-2 minutes until fragrant.

Stir in soy sauce, hoisin sauce, and brown sugar. Simmer for 3-4 minutes until the sauce thickens slightly.

Toss the cooked noodles into the skillet, coating them in the beef and sauce mixture until well combined.

Garnish with chopped green onions, additional red pepper flakes if desired, and sesame seeds. Serve hot and enjoy!.

Notes

  1. A quick and easy dish that brings the flavors of Mongolian beef into a weeknight noodle dinner.
  2. Red pepper flakes add a touch of heat, but they are optional if you prefer a milder dish.


Nutrition Facts (Per Serving)

It is important to consider this information as approximate and not to use it as definitive health advice.
  • Calories: ~
  • Total Fat: ~
  • Total Carbohydrate: ~
  • Protein: ~
0 comments
0 FacebookTwitterPinterestPocketEmail
  • 1
  • …
  • 3
  • 4
  • 5
  • 6
  • 7
  • …
  • 10

Search

Follow Us

279.4K Fans
twitter
instagram
pinterest

Recent Posts

  • Mexican Chicken With Cheese Sauce

    March 24, 2026
  • Chocolate Bread

    March 22, 2026
  • Bojangles Biscuits

    March 22, 2026
  • Braided Cherry Danish

    March 21, 2026
  • Strawberry Pop Tarts

    March 21, 2026
  • Creamy Cajun Chicken Pasta

    March 10, 2026
  • Sausage & Egg Burritos

    March 9, 2026

Categories

  • 30 Minute Meals (35)
  • Barbecue (2)
  • Beef Meals (11)
  • Breakfast & Pastries (15)
  • Casseroles (9)
  • Cheesesteak (2)
  • Chicken Meals (19)
  • Cultural Dishes (12)
  • Featured (8)
  • Fish Meals (6)
  • Fresh Baked Breads (2)
  • Main Dishes (7)
  • Other Meals (1)
  • Pasta (21)
  • Pizza (4)
  • Popular Recipes (9)
  • Pork Meals (8)
  • Seafood Meals (19)
  • Soups & Salads (13)
  • Turkey Meals (7)
  • Vegetarian (17)

Popular Posts

  • 1

    Buddha Bowl with Tofu

    October 22, 2024
  • 2

    Delicious Pasta Alla Norma

    October 20, 2021
  • 3

    Classic Spicy Barbecued Ribs

    October 20, 2021
  • 4

    Breakfast Zucchini Fritters

    October 20, 2021
  • 5

    Roasted Salmon with Herbs

    October 20, 2021

About Me

At MyPhillyConnection, we specialize in recipes for Philly favorites and lots of other popular dishes and cuisines.

Phone: (215) 554-7326
Email: info@myphillyconnection.com

Useful Links

  • Beef Meals
  • Chicken Meals
  • Fish Meals
  • Recipes
  • Recipe Submission

Breakfast Recipes

  • Mexican Chicken With Cheese Sauce

    March 24, 2026
  • Chocolate Bread

    March 22, 2026

Recent Posts

  • Mexican Chicken With Cheese Sauce

    March 24, 2026
  • Chocolate Bread

    March 22, 2026
  • Facebook
  • Twitter
  • Instagram
  • Pinterest
  • Linkedin
  • Tiktok

Copyright © 2026 - MyPhillyConnection / All Rights Reserved.

Philadelphia Food Network and Recipes
  • Home
    • Main Website
  • Recipes
  • Meals
    • 30 Minute Meals
    • Beef Meals
    • Breakfast & Pastries
    • Chicken Meals
    • Fish Meals
    • Pork Meals
    • Seafood Meals
    • Turkey Meals
    • Vegan & Vegetarian Meals
    • Other Meals
  • Categories
    • Barbecue
    • Casseroles
    • Cheesesteak
    • Cultural Dishes
    • Desserts & Treats
    • Featured
    • Fresh Baked Breads
    • Grilling
    • Pasta
    • Pizza
    • Popular Recipes
    • Side Dishes
    • Soul Food
    • Soups & Salads
  • About Us
  • Contact Us
  • Submit Your Recipe
Sign In

Keep me signed in until I sign out

Forgot your password?

Do not have an account ? Register here

Password Recovery

A new password will be emailed to you.

Have received a new password? Login here

Register New Account

I Agree to the Terms of Service and Privacy Policy

Have an account? Login here