Philadelphia Food Network and Recipes
  • Home
    • Main Website
  • Recipes
  • Meals
    • 30 Minute Meals
    • Beef Meals
    • Breakfast & Pastries
    • Chicken Meals
    • Fish Meals
    • Pork Meals
    • Seafood Meals
    • Turkey Meals
    • Vegan & Vegetarian Meals
    • Other Meals
  • Categories
    • Barbecue
    • Casseroles
    • Cheesesteak
    • Cultural Dishes
    • Desserts & Treats
    • Featured
    • Fresh Baked Breads
    • Grilling
    • Pasta
    • Pizza
    • Popular Recipes
    • Side Dishes
    • Soul Food
    • Soups & Salads
  • About Us
  • Contact Us
  • Submit Your Recipe
Top Posts
Asparagus & Cheese Stuffed Chicken
Asian Cabbage Stir Fry
High Protein Broccoli Cheddar Soup
Homemade Popeyes Cajun Fries
Immune Boosting Vegetable Soup
Creamy Crab Bisque
Garlic Parmesan Pizza
Green Bean Bundles
Cheesy Scalloped Potatoes
Garlic Parmesan Roasted Potatoes
Philadelphia Food Network and Recipes
  • Home
    • Main Website
  • Recipes
  • Meals
    • 30 Minute Meals
    • Beef Meals
    • Breakfast & Pastries
    • Chicken Meals
    • Fish Meals
    • Pork Meals
    • Seafood Meals
    • Turkey Meals
    • Vegan & Vegetarian Meals
    • Other Meals
  • Categories
    • Barbecue
    • Casseroles
    • Cheesesteak
    • Cultural Dishes
    • Desserts & Treats
    • Featured
    • Fresh Baked Breads
    • Grilling
    • Pasta
    • Pizza
    • Popular Recipes
    • Side Dishes
    • Soul Food
    • Soups & Salads
  • About Us
  • Contact Us
  • Submit Your Recipe
Copyright 2021 - All Right Reserved
Chicken MealsCultural DishesFeaturedPopular Recipes

Korean Fried Chicken Wings

by myphillyconnection February 16, 2026
written by myphillyconnection
A close-up of crispy, glazed chicken wings garnished with sesame seeds and chopped green onions on a piece of parchment paper.

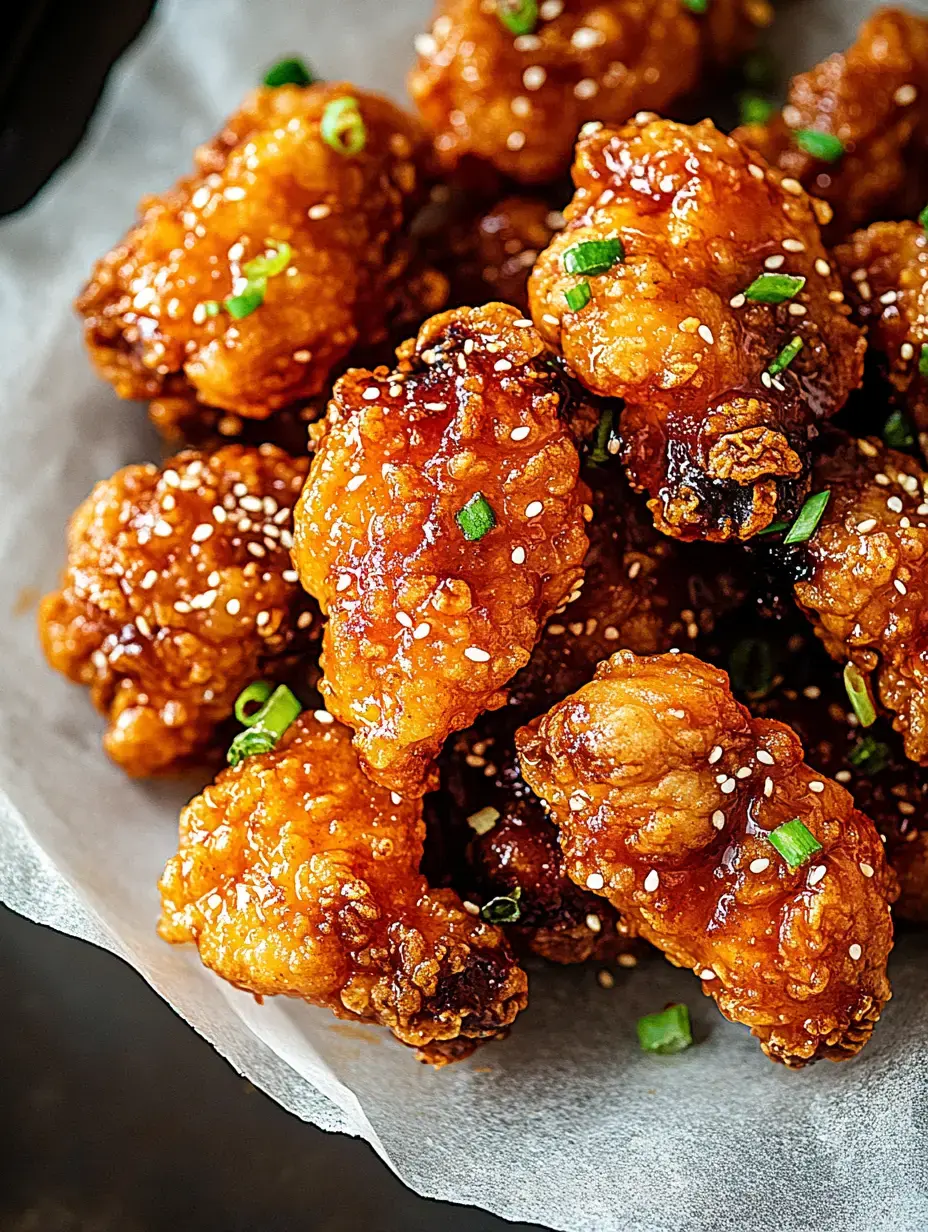
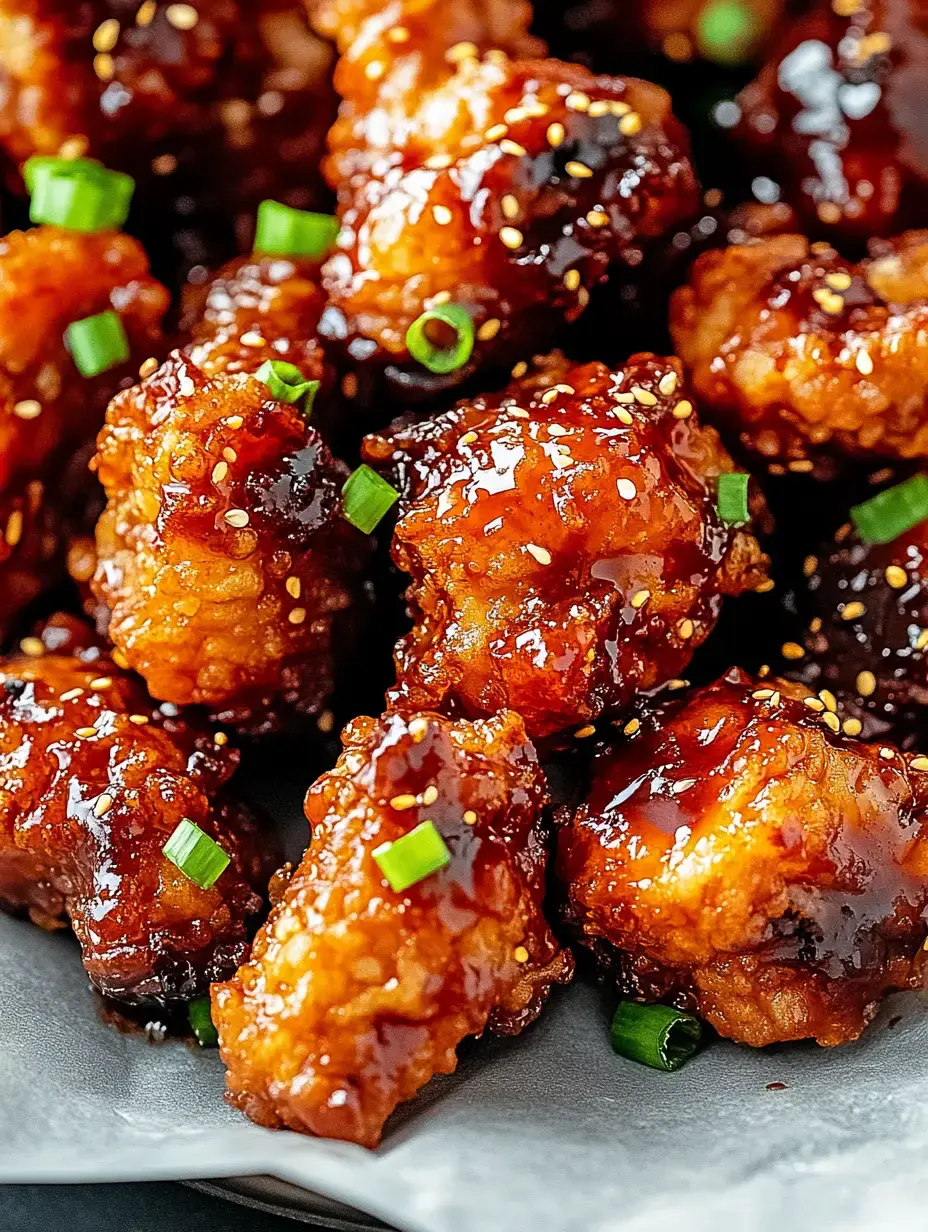
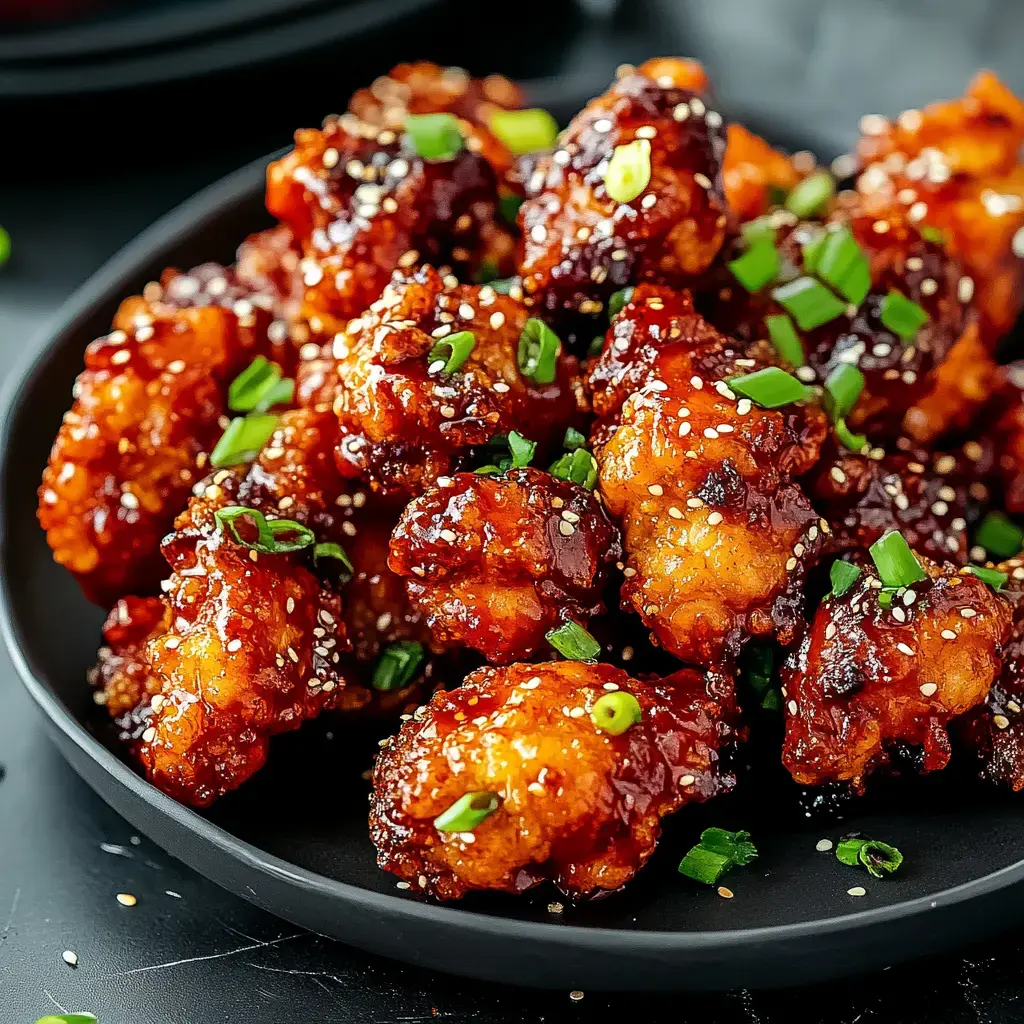
Let me share my favorite recipe for Korean Fried Chicken that’s stolen everyone’s heart at our family gatherings. I’ve spent years perfecting this sweet and spicy combination and now my kitchen becomes the neighborhood hotspot whenever I make it. The secret lies in that perfectly crispy coating and a sauce that’ll make your taste buds dance.

What Makes This Chicken Special

Trust me once you try this double fried chicken coated in my gochujang honey glaze you’ll be hooked. The outside stays incredibly crunchy while the inside stays juicy. My friends constantly beg me for this recipe especially after they try that sticky sweet and spicy sauce.

Your Chicken Shopping List

  • Chicken: 2 lbs, wings, thighs, or drumsticks.
  • Buttermilk: 1 cup, for marinating and tenderizing.
  • Flour: 1 cup, for the batter.
  • Cornstarch: 1/2 cup, for added crispiness.
  • Egg: 1, to bind the coating.
  • Salt and Pepper: To season.

Sauce Ingredients You Need

  • Gochujang: 3 tbsp, for a spicy kick.
  • Honey: 2 tbsp, for sweetness.
  • Soy Sauce: 2 tbsp, for depth of flavor.
  • Garlic: 3 cloves, minced.
  • Brown Sugar: 1 tbsp, to balance the spice.
  • Rice Vinegar: 1 tbsp, for tanginess.
  • Water: 2 tbsp, to adjust consistency.

Getting Your Chicken Ready

I always start by soaking my chicken in buttermilk overnight. It makes such a difference in tenderness. Next morning I mix my flour cornstarch and seasonings. Each piece gets a good coating then a dip in beaten egg and another roll in the flour mix. This creates that amazing crust we’re looking for.

A close-up image of glazed fried chicken pieces garnished with sesame seeds and green onions on a gray plate.

The Double Fry Magic

Here’s where the magic happens. First fry at 350°F until light golden then let them rest. Crank up the heat to 375°F and fry them again. This double fry technique I learned from my Korean neighbor gives you that incredible crunch that stays crispy even under the sauce.

Creating That Amazing Sauce

While your chicken rests between fries get your sauce going. I combine my gochujang honey soy sauce and other goodies in a pan. Let it bubble away stirring constantly until it gets thick and glossy. The smell is absolutely incredible.

Bringing It All Together

Once your chicken is done with its second fry toss it in that beautiful sauce. I love watching each piece get coated in that sticky glaze. Make sure every bit is covered you don’t want to miss out on any of that flavor.

Time to Dig In

In my house we love serving this with fluffy white rice and quick pickled radishes. Sometimes I make extra sauce for drizzling. A cold beer or sparkling lemonade helps cut through the heat perfectly.

Keeping It Fresh

If you somehow end up with leftovers pop them in the fridge for up to three days. A quick blast in the oven at 350°F brings back that crunch. I often make extra and freeze the uncoated pieces for busy nights.

Mix It Up Your Way

Sometimes I use boneless thighs for easier eating or adjust the spice levels for different crowds. My gluten sensitive friends love it with rice flour instead of regular flour. The recipe is super flexible just keep that double fry technique.

My Crunch Secrets

Two things I’ve learned make perfect crispy chicken. Never crowd your frying pan it drops the oil temperature. And always let the first fry rest before going in for round two. These little tricks make all the difference.

A close-up of crispy, glazed chicken pieces garnished with green onions and sesame seeds on a black plate.

All About Gochujang

This amazing red chili paste has become my secret weapon in the kitchen. It adds such depth to the sauce with its sweet spicy and slightly fermented flavor. Once you try it you’ll want to put it on everything.

No Deep Fryer No Problem

When I’m trying to keep things lighter I pop these in the oven at 400°F. They need about 30 minutes turning halfway. A quick broil at the end gives that golden color before coating in sauce.

Perfect Partners

My favorite sides for this dish are cold sesame noodles or quick cucumber kimchi. The cool crunch balances out the heat so well. For drinks nothing beats an ice cold lemonade or if you’re feeling fancy some sparkling soju cocktails.

Plan Ahead Tips

I often prep everything the day before a party. Chicken sits in its buttermilk bath sauce is ready to heat up. When guests arrive I just need to focus on the frying. It makes hosting so much easier.

What You’re Getting

Each serving gives you that perfect combo of protein rich chicken and bold flavors. Yes it’s a bit indulgent but so worth it. I save this recipe for special occasions when calories don’t count.

Loving Your Leftovers

Sometimes I slice up leftover pieces for the most amazing sandwiches. A bit of mayo some lettuce and that spicy chicken is lunch heaven. They’re great cold too perfect for picnics.

Quick Answers

My friends always ask these questions. Yes wings work great just watch your frying time. Serve right after saucing for maximum crunch. No gochujang? Try sriracha mixed with a bit of miso but honestly the real thing is worth hunting down.

A close-up of crispy, glazed chicken wings garnished with sesame seeds and chopped green onions on a piece of parchment paper.

Worth Every Minute

This chicken might take a bit of time but the reaction you get makes it all worthwhile. That moment when someone takes their first bite and their eyes light up that’s what cooking is all about.

Frequently Asked Questions

→ Why use cornstarch instead of flour? Cornstarch creates a lighter, crispier coating than flour. It also helps the chicken stay crispy longer after being sauced.

→ How spicy is gochujang? Gochujang provides medium heat with sweet and umami notes. Start with less and add more to taste if you’re unsure about spice tolerance.

→ Can I make these ahead of time? For best results, fry the chicken ahead and keep warm in a low oven. Make the sauce separately and toss just before serving to maintain crispiness.

→ What’s the best oil for frying? Use a neutral oil with a high smoke point like vegetable, canola, or peanut oil. These oils won’t interfere with the flavor.

→ Can I use other cuts of chicken? Yes, you can use drumsticks or boneless pieces. Just adjust cooking time accordingly and ensure internal temperature reaches 165°F.

Korean Fried Chicken Wings

Serves: 4 Prep Time: 30 Minutes Cooking Time: 20 Minutes 20 Minutes
Nutrition facts: 240 calories 45 grams fat
Rating: 5.0/5
( 1 voted )
Pin
Print

Ingredients

 1 kg chicken wings.
 Salt and pepper to taste.
 1 cup cornstarch.
 Oil for frying.
 1/4 cup soy sauce.
 1/4 cup honey.
 2 tbsp gochujang.
 1 tbsp minced garlic.
 1 tsp grated ginger.
 1 tbsp rice vinegar.
 1 tbsp sesame oil.
 Sesame seeds for garnish.
 Sliced green onions for garnish.

Instructions

Season chicken wings with salt and pepper. Coat evenly in cornstarch.

Heat oil to 350°F. Fry chicken in batches until golden, about 10 minutes. Drain on paper towels.

Combine sauce ingredients in saucepan. Simmer over medium heat until thickened, about 5 minutes.

Toss fried chicken in sauce until evenly coated.

Garnish with sesame seeds and green onions.

Notes

  1. Dry chicken well before coating.
  2. Adjust gochujang for spice level.
  3. Let sauce cool slightly before tossing.


Tools You'll Need

  • Deep fryer or large pot.
  • Saucepan.
  • Paper towels.

0 comments
0 FacebookTwitterPinterestLinkedin
Soups & Salads

Tuscan White Bean Soup

by myphillyconnection February 16, 2026
written by myphillyconnection
A hearty bowl of soup with ground meat, white beans, carrots, and leafy greens, served with a spoon and accompanied by bread in the background.

This Tuscan White Bean Soup started as my solution to a chilly weekend and quickly became our family’s favorite comfort meal. The combination of creamy beans Italian sausage and fresh spinach creates pure magic in every spoonful.

What Makes This Soup Special

It’s like a warm hug in a bowl. The sausage adds such rich flavor while those creamy beans make it perfectly filling. Plus it gets even better the next day when all those flavors have time to mingle.

Grab These Ingredients

  • Italian Sausage: Sweet or spicy both work great.
  • Italian Seasoning: My secret flavor booster.
  • Red Pepper Flakes: Just enough for warmth.
  • Good Broth: Makes all the difference.
  • White Beans: They get so creamy and delicious.
  • Fresh Spinach: Adds color and goodness.

Let’s Make Some Soup

Start with browning that sausage get it nice and golden. Those little browned bits are pure flavor. Then let those aromatics work their magic before everything else joins the party.

A close-up of a hearty soup featuring white beans, ground meat, carrots, and greens, garnished with parsley and served in a white bowl.

Time for Greens

I love watching the spinach wilt into the soup. It happens so quickly and adds such beautiful color. If you’re using frozen just squeeze out that extra water first.

Perfect Pairings

We always have crusty bread for dunking. Sometimes I’ll make quick garlic bread or grab some focaccia. It’s all about soaking up that delicious broth.

Save Some For Later

This soup keeps beautifully in the fridge. Just let it cool down before storing. I actually think it tastes even better the next day.

Freezer Friendly

I always make extra for the freezer. Just remember to leave some room in your container it expands a bit when frozen.

Mix It Up

Sometimes I use ground turkey instead of sausage or swap in different beans. The recipe is really flexible use what you have on hand.

A bowl of creamy soup with chunks of meat, beans, vegetables, and fresh herbs, accompanied by a slice of bread.

Meal Prep Magic

This is my go to for busy weeks. Make a big batch on Sunday and you’ve got lunch or dinner ready whenever you need it.

Make It Even Better

Try a splash of balsamic vinegar at the end or some fresh lemon juice. And don’t forget the Parmesan on top it’s like the cherry on a sundae.

Perfect for Company

This soup never fails to impress guests. It feels rustic and fancy at the same time. Plus it’s easy to serve a crowd.

Good For You Too

Those beans pack serious protein and fiber while the spinach adds iron and vitamins. It’s comfort food you can feel good about eating.

Warming It Up

Take it slow when reheating no need to rush. Add a splash of broth if it’s thickened up too much in the fridge.

Drink Pairings

A nice Pinot Grigio goes perfectly with this soup. For non alcoholic options try sparkling water with lemon it cuts through the richness beautifully.

Double It Up

The recipe doubles easily for big families or when you want lots of leftovers. Just make sure your pot is big enough.

A spoonful of hearty soup with sausage, beans, carrots, and greens in a black bowl.

Kid Friendly Version

My little ones love this especially with cheese toast for dipping. I go easy on the red pepper flakes and they gobble it up.

Quick Swaps

No spinach? Kale works great too. And those canned beans are such a time saver. This soup is all about easy substitutions.

Time Savers

Keep some precooked sausage in the freezer and canned beans in the pantry. You can have this soup ready in no time when you need it.

A hearty bowl of soup with ground meat, white beans, carrots, and leafy greens, served with a spoon and accompanied by bread in the background.

Pure Comfort

There’s just something about this soup that makes everything better. It’s like a warm hug from an Italian grandmother in a bowl.

Frequently Asked Questions

→ Can I use different beans? Yes, cannellini beans or navy beans work well in this recipe. Any white bean will provide similar texture and flavor.

→ How long does this soup keep? Store in an airtight container in the refrigerator for up to 4 days. The flavor actually improves after a day as ingredients meld together.

→ Can I freeze this soup? Yes, freeze for up to 3 months without the cream. Add cream when reheating. Cool completely before freezing and thaw overnight in refrigerator.

→ What can I substitute for heavy cream? Half and half or evaporated milk can work, though soup will be less creamy. For dairy-free option, use coconut cream.

→ Can I make this vegetarian? Skip the sausage and use vegetable broth. Add extra Italian seasoning and mushrooms for more flavor.

Tuscan White Bean Soup

Serves: 6 Prep Time: 15 Minutes Cooking Time: 30 Minutes 30 Minutes
Nutrition facts: 200 calories 20 grams fat
Rating: 5.0/5
( 2 voted )
Pin
Print

Ingredients

 1 pound mild Italian sausage.
 1 large yellow onion, diced.
 3 ribs celery, diced.
 2 large carrots, sliced.
 2 teaspoons minced garlic.
 1 tablespoon tomato paste.
 1 teaspoon Italian seasoning.
 ½ teaspoon crushed red pepper.
 ½ teaspoon black pepper.
 4 cups chicken broth.
 2 cans Great Northern beans, drained.
 2 cups fresh baby spinach.
 ½ cup heavy whipping cream.
 Chopped parsley for garnish.

Instructions

Brown sausage in Dutch oven over medium-high heat, breaking up meat, 10-15 minutes.

Add onions, celery, carrots and cook 3-5 minutes. Add garlic, cook 1 minute.

Stir in tomato paste, Italian seasoning, and peppers.

Add broth and beans. Simmer 6-7 minutes until vegetables are soft.

Stir in cream and spinach. Cook until spinach wilts, about 5 minutes. Garnish with parsley.

Notes

  1. Tastes better reheated next day.
  2. Good for meal prep.
  3. Can substitute beans with any white beans.


Tools You'll Need

  • Dutch oven.
  • Wooden spoon.
0 comments
0 FacebookTwitterPinterestLinkedin
Chicken MealsPizza

Mini Chicken Alfredo Pizzas

by myphillyconnection February 16, 2026
written by myphillyconnection
Mini Chicken Alfredo Pizza’s Recipe

Nothing brings me more joy than pulling these golden, cheese-stuffed mini pizzas from the oven. The aroma of garlic-infused Alfredo sauce swirling with melted cheese always draws my family to the kitchen, making the preparation time feel like a cherished ritual rather than a cooking task.

Why You’ll Love This Recipe

  • The cheese-stuffed crust creates an exciting surprise with every bite, making these more special than regular pizzas
  • Making your own dough brings a sense of accomplishment, and the texture is incomparably better than store-bought
  • These mini pizzas are perfect for both casual family dinners and entertaining friends who’ll be impressed by your homemade creation

Last weekend, I made these for my daughter’s sleepover party, and watching the girls’ faces light up as they pulled apart the cheesy crust made all the effort worthwhile. One mom even called the next day asking for the recipe!

Fresh Ingredient Selection

  • Active Dry Yeast: Look for fresh yeast that foams vigorously when activated
  • All-Purpose Flour: Unbleached flour creates the perfect texture and golden color
  • Heavy Cream: Full-fat cream ensures your Alfredo sauce is rich and silky
  • Unsalted Butter: High-quality butter makes a noticeable difference in sauce flavor
  • Fresh Garlic: Choose firm, heavy heads with tight cloves
  • Parmesan: Freshly grate it yourself for the best melting and flavor
  • Mozzarella: Whole-milk mozzarella offers superior stretch and taste
Mini Chicken Alfredo Pizza’s Homemade

Detailed Instructions

Sponge Beginning: Mix one tablespoon of yeast with sugar and warm water until it starts bubbling with life.

Flour Foundation: Incorporate flour gradually while the yeast mixture works its magic

Dough Development: Gently knead your dough until it becomes smooth and elastic, about 8-10 minutes

Rest Period: Let your dough relax under a warm towel, allowing the gluten to develop properly

Shape Creation: Divide your dough into eight equal portions, rolling each into a perfect circle

Crust Magic: Carefully fold cheese into the edges, creating pockets of melty goodness

Sauce Creation: Melt butter slowly with garlic until fragrant, then add cream and parmesan

Final Assembly: Layer your sauce, seasoned chicken, and generous amounts of cheese before baking

You Must Know

  • Fresh garlic transforms the Alfredo sauce into something extraordinary – I never use pre-minced
  • Let the dough rest properly – rushing this step leads to tough crust
  • Your cheese must be room temperature for the best melting results

Growing up, my grandmother always said the secret to perfect pizza was patience with the dough. She was right – I’ve learned that giving the dough proper rest time makes all the difference in texture and flavor.

Make It Your Own

Switch up the classic Alfredo base with basil pesto for a green twist. Try different cheeses in the crust – provolone adds a sharp kick, while fontina melts beautifully. For vegetarian guests, replace chicken with sautéed mushrooms and spinach.

Smart Storage Solutions

These beauties stay fresh in an airtight container at room temperature for two days. For longer storage, pop them in the fridge for up to a week. To reheat, avoid the microwave – a few minutes in a 350°F oven brings back the crispy crust.

Kitchen Success Tips

Keep your butter cold until the moment you need it. Pre-grate all your cheese before starting – it makes assembly smoother. Use parchment paper for easy cleanup and no sticking.

After countless pizza nights and family gatherings, these mini Alfredo pizzas have become my signature dish. They’re proof that sometimes the best recipes come from combining classic flavors in new ways. Every time I make them, I think about all the memories they’ve helped create around my kitchen table.

Time-Saving Tricks

Make the Alfredo sauce a day ahead – it actually gets better overnight. Double the dough recipe and freeze half for next time. Keep cubed cooked chicken in the freezer for quick assembly.

Family Favorites

My kids love helping roll out the dough and stuffing the crusts with cheese. It’s become our Sunday tradition, with everyone adding their own touch to their personal pizza. Even my picky eater can’t resist these.

Mini Chicken Alfredo Pizza’s Recipe

Chef’s Gold Secrets

  • A pinch of nutmeg in the Alfredo sauce adds subtle warmth
  • Brush the crust with garlic butter before adding cheese for extra flavor
  • Let pizzas rest for 3-5 minutes after baking – the cheese needs time to set

These mini pizzas have taught me that good food doesn’t need to be complicated. The joy comes from using simple, quality ingredients and sharing the results with people you love. Every time I make them, they remind me why I fell in love with cooking in the first place.

Frequently Asked Questions

→ Can I make the dough ahead? Yes, prepare through shaping then refrigerate overnight. Bring to room temperature before baking.

→ How much garlic should I use? Recipe is flexible – use between 3-20 cloves based on preference.

→ Can I freeze these? Freeze baked pizzas up to 3 months. Thaw and reheat in oven until hot.

→ Is a stand mixer required? No, dough can be kneaded by hand for 8-10 minutes instead.

→ How do I ensure crispy bottoms? Bake until bottom is golden brown, checking frequently after 15 minutes.

Mini Chicken Alfredo Pizzas

Serves: 8 Prep Time: 90 Minutes Cooking Time: 20 Minutes 20 Minutes
Nutrition facts: 200 calories 55 grams fat
Rating: 5.0/5
( 1 voted )
Pin
Print

Ingredients

→ Alfredo Sauce

 113g (8 tablespoons) unsalted butter
 10 cloves garlic, minced
 1 cup heavy cream
 4 oz freshly grated parmesan
 Salt to taste
 Black pepper to taste
 Garlic powder to taste
 

→ Sponge

 1 tablespoon active dry yeast
 2 tablespoons sugar
 1 cup warm water
 125g (1 cup) all-purpose flour
 

→ Dough

 188g (1 1/2 cups) all-purpose flour
 2 teaspoons salt
 1/4 cup olive oil
 

→ Toppings

 2 chicken breasts, cubed and seasoned
 20 oz (5 cups) freshly grated mozzarella
 Fresh parsley for garnish
 Red pepper flakes (optional)
 

→ Egg Wash

 1 egg
 2 tablespoons water

Instructions

Melt butter, sauté garlic until fragrant. Add cream and parmesan, season to taste.

Cook seasoned cubed chicken until done. Set aside.

Mix yeast, sugar, warm water, and flour. Cover with damp towel, rest 10 minutes.

Add remaining flour, salt, and oil to sponge. Knead 8-10 minutes until smooth. Rest 15 minutes.

Divide into 8 balls (70g each). Roll out, add mozzarella to edges and fold over to create stuffed crust.

Brush with egg wash, spread Alfredo sauce, add chicken and cheese. Bake at 425°F for 15-20 minutes until golden.

Notes

  1. Can adjust garlic amount from 3-20 cloves
  2. Dough can be kneaded by hand or machine
  3. Stores well at room temp or refrigerated


Tools You'll Need

  • Stand mixer (optional)
  • Baking sheet
  • Cheese grater
  • Rolling pin

0 comments
0 FacebookTwitterPinterestLinkedin
30 Minute MealsPasta

Ina Garten’s Summer Pasta

by Clare Greco February 15, 2026
written by Clare Greco
Ina Garten's Summer Garden Pasta

This vibrant summer garden pasta has been my go-to recipe for warm evenings when I want something light yet satisfying. Inspired by Ina Garten’s Mediterranean sensibilities, it combines the season’s best produce with bright lemon and herbs for a dish that tastes like sunshine on a plate.

Why You’ll Love This Recipe

  • Ready in just 20 minutes
  • Uses peak-season summer tomatoes and herbs
  • Versatile enough for a weeknight dinner or casual entertaining
  • Works warm or at room temperature

I first made this pasta for an impromptu garden party when friends stopped by unexpectedly. The simplicity and bright flavors had everyone asking for the recipe, and it’s now requested at every summer gathering I host.

Ingredients

  • Fusilli or penne pasta: creates the perfect nooks for capturing the flavorful sauce
  • Cherry tomatoes: bring sweet juicy bursts in every bite, choose the ripest ones available
  • Kalamata olives: add briny depth that balances the acidity, look for unpitted ones for best flavor
  • Red onion: provides a gentle bite that mellows when mixed with the warm pasta
  • Fresh garlic: is essential for aromatic foundation, use locally grown if possible
  • Lemon zest and juice: brighten the entire dish, always use fresh never bottled
  • Fresh basil and parsley: are non-negotiable, they provide the herbaceous heart of this dish
  • Parmesan cheese: adds the perfect umami finish, use Parmigiano-Reggiano for best results

Step-by-Step Instructions

Pasta Perfection: Cook your pasta in heavily salted water until just al dente, about 9 minutes for fusilli. Reserve half a cup of the starchy cooking water before draining; this is your secret ingredient for silky sauce texture. The pasta should have slight resistance when bitten as it will continue to absorb flavors.

Aromatic Base: Gently warm the olive oil in a large skillet over medium heat. Add the minced garlic and cook for just one minute until fragrant but not browned. Browning garlic creates bitterness that can overwhelm the fresh flavors. This garlic-infused oil becomes the foundation of your sauce.

Assembly Magic: In a large serving bowl combine the warm pasta with the garlic oil, ensuring every strand is glossy and coated. Add the halved cherry tomatoes, olives, sliced red onion, lemon zest and juice while the pasta is still warm. The residual heat will slightly soften the vegetables and release their flavors without fully cooking them.

Herbal Finish: Gently fold in the fresh chopped basil and parsley along with salt and freshly ground pepper. If the pasta seems dry, add splashes of the reserved pasta water until you reach your desired consistency. The starch in this water helps create a light cohesive sauce that clings to the pasta.

Ina Garten's Summer Garden Pasta

You Must Know

  • Customizable with any seasonal vegetables you have on hand
  • Perfect make-ahead dish that actually improves after sitting for a few hours
  • Excellent for lunch boxes as it tastes great at room temperature

The cherry tomatoes truly make this dish special. I grow several varieties in my garden each summer specifically for this pasta. There’s something magical about harvesting them still warm from the sun and adding them straight to the bowl, knowing their sweet juices will create the perfect light sauce.

Mediterranean Magic

This pasta embodies the essence of Mediterranean cooking, relying on high-quality simple ingredients rather than complicated techniques. The combination of olive oil, garlic, lemon and herbs creates what Italian cooks call an “aglio e olio” base that has been perfected over centuries. When you make this dish, you’re participating in a culinary tradition that celebrates seasonal abundance and minimal intervention.

Ina Garten's Summer Garden Pasta

Storage Solutions

This pasta actually improves with time as the flavors meld together, making it perfect for meal prep. Store leftovers in an airtight container in the refrigerator for up to three days. The pasta will absorb more of the dressing as it sits, so you might want to add a drizzle of olive oil and a squeeze of fresh lemon juice when serving leftovers. I often make a double batch specifically to have convenient lunches throughout the week.

Sensational Substitutions

While the original recipe is perfect as is, you can easily adapt it to what you have on hand. No fusilli? Any short pasta with ridges or curves works beautifully. Sun-dried tomatoes can replace fresh ones in winter months, though you’ll want to reduce the quantity and chop them finely. For a protein boost, add cannellini beans or chunks of fresh mozzarella. Vegans can skip the Parmesan or replace it with nutritional yeast for a similar umami quality.

Serving Suggestions

This versatile pasta shines as both a main dish and a sensational side. For a complete meal, serve alongside grilled fish or chicken brushed with the same lemon and herb flavors. It makes an exceptional contribution to potlucks and picnics since it doesn’t require reheating. I love setting it out family-style on a large platter garnished with extra fresh herbs, whole lemon slices and additional Parmesan for guests to help themselves.

Pro Tips

  • Slightly undercook the pasta as it will continue to absorb liquid from the sauce after mixing
  • Make extra of the garlic oil and store it in the refrigerator for up to a week to elevate other dishes
  • For maximum flavor toss the hot pasta with lemon zest first allowing the heat to release essential oils

Frequently Asked Questions

→ Can I use a different type of pasta?

Yes, you can use any pasta shape you prefer, such as spaghetti or rigatoni. Just adjust cooking times as needed.

→ How can I make this dish vegan?

To make it vegan, omit the Parmesan cheese or substitute it with a vegan cheese alternative. Ensure your pasta is egg-free as well.

→ What other vegetables can I include?

You can add vegetables like zucchini, bell peppers, or spinach to make the dish even more vibrant and nutritious.→ How far in advance can I prepare this?

You can prepare the dish a few hours in advance and serve it at room temperature. For best texture, add fresh herbs right before serving.

→ What can I use instead of Kalamata olives?

If you don’t have Kalamata olives, try using green olives, black olives, or capers for a similar tangy flavor.

Ina Garten’s Summer Pasta

Serves: 4 Prep Time: 10 Minutes Cooking Time: 15 Minutes 15 Minutes
Nutrition facts: 100 calories 10 grams fat
Rating: 5.0/5
( 1 voted )
Pin
Print

Ingredients

 1 lb fusilli or penne pasta
 1/4 cup olive oil
 3 cups cherry tomatoes, halved
 1 cup Kalamata olives, pitted and halved
 1/2 red onion, thinly sliced
 2 cloves garlic, minced
 1 tbsp lemon zest
 1/4 cup lemon juice
 1 cup fresh basil, chopped
 1/2 cup fresh parsley, chopped
 1 tsp salt
 1/2 tsp black pepper
 1/2 cup grated Parmesan cheese

Instructions

Cook the pasta until al dente according to the package instructions. Reserve 1/2 cup of the cooking water, then drain the pasta.

Heat olive oil in a pan. Sauté minced garlic for 1 minute until fragrant.

In a large bowl, toss the cooked pasta with the garlic oil, cherry tomatoes, Kalamata olives, red onion, lemon zest, and lemon juice.

Mix in fresh basil, parsley, salt, pepper, and reserved pasta water as needed to loosen the mixture.

Sprinkle the pasta with grated Parmesan cheese and serve warm or at room temperature.

Notes

  • Large saucepan
  • Sharp knife
  • Cutting board
  • Large mixing bowl
  • Wooden spoon or tongs
  • Grater

0 comments
0 FacebookTwitterPinterestLinkedin
30 Minute MealsChicken MealsCultural DishesFeaturedPopular Recipes

Crispy Cheesy Chicken Alfredo Calzones

by myphillyconnection February 15, 2026
written by myphillyconnection
Crispy Cheesy Chicken Alfredo Calzones

these chicken Alfredo calzones have seriously saved my sanity on busy weeknights! I stumbled on this recipe last year when I needed something fast that wouldn’t make my kitchen look like a tornado hit it. The first time I made them, my 15 year old son actually put down his phone and asked for seconds which basically never happens. There’s something magical about that contrast between the crunchy outside and the gooey, cheesy chicken inside that makes these impossible to resist. Plus, they only take about 20 minutes from start to finish in the air fryer, which feels like some kind of miracle on hectic weeknights.

Recipe Highlights

  • No wait time unlike traditional calzones that take forever to bake in the oven
  • Somehow fancy yet simple so they work for both regular Tuesday dinners and when friends drop by unexpectedly
  • Perfectly portable for those nights when everyone’s eating at different times between activities
  • Weirdly impressive to guests who think you spent hours in the kitchen (I never correct them)

Last month my sister visited with her picky 10 year old who normally survives on plain pasta and chicken nuggets. I was totally out of ideas until I remembered these calzones. I let her help assemble them just folding the dough over and crimping the edges and miracle of miracles, she not only ate an entire calzone but asked if we could make them again tomorrow. My sister texted me three times last week for the recipe because apparently that’s all her daughter will eat now. Sorry not sorry!

Ingredients

  • Store bought pizza dough: saves ridiculous amounts of time and actually works better than homemade for this recipe. The Pillsbury refrigerated kind in the tube works shockingly well, but the kind from the grocery store deli counter gives a more authentic chew.
  • Rotisserie chicken: might seem like cheating but it’s absolutely the smart move here. The slightly seasoned meat from the deli department adds depth without extra work, and the texture stays perfect in the filling.
  • Jarred Alfredo sauce: is my weeknight sanity saver. I accidentally discovered Classico brand tastes nearly identical to my grandmother’s recipe that takes forever to make. The jar in my fridge has saved countless dinners.
  • Three cheese combo: is non negotiable in my kitchen. I’ve tried simplifying to just mozzarella but the ricotta adds this amazing creaminess and the parmesan brings that savory punch that makes these taste restaurant quality.
  • Italian seasoning: from my embarrassingly ancient spice cabinet somehow pulls everything together. I know I should probably make my own blend, but honestly, the dusty McCormick bottle from who knows when works perfectly.

I used to feel slightly guilty about using pre made components until my cousin who actually went to culinary school confessed she uses jarred Alfredo for family meals too. Now I just embrace the shortcuts because nobody has ever complained about these calzones, and I’ve served them to some pretty food snobby friends who keep asking for the recipe like it’s complicated!

Crispy Cheesy Chicken Alfredo Calzones

Step-by-Step Instructions

Throw It All Together: Grab a big bowl and mix your shredded rotisserie chicken with the Alfredo sauce. Dump in all three cheeses, sprinkle the garlic powder and Italian seasoning, add a pinch of salt and pepper, then stir until everything’s combined. Sometimes I don’t even measure anymore and just eyeball it based on how many people I’m feeding.

Dough Wrangling: Pop open that tube of pizza dough the sound still makes me jump every time or unroll your deli dough on a floured counter. Cut it into four pieces and roll or stretch each one into roughly circle ish shapes. Don’t stress if they look more like amoebas than perfect circles.

Stuff Those Babies: Scoop generous piles of filling onto half of each dough circle. I usually eyeball about a heaping 1/3 cup per calzone but honestly just go with what feels right. Leave about half an inch around the edges so you can seal them properly.

Fold and Crimp: Fold the empty side of dough over your filling to make a half moon shape. Press the edges together with a fork to seal everything in. This part is weirdly satisfying, especially after a frustrating day at work.

Make Them Shine: Brush or rub some olive oil all over the outside. Don’t skip this part! It’s what gives them that gorgeous golden color and crispy texture. Poke a couple small holes in the top with a fork so they don’t explode in the air fryer.

The first time I made these, I baked them in the oven which took forever and made my kitchen feel like a sauna. Then my neighbor loaned me her air fryer during our block party after a couple glasses of wine I was complaining about my oven heating up the house, and I’ve never looked back. The air fryer makes the outside perfectly crispy while keeping the inside molten and delicious in less than half the time.

You Must Know

  • Don’t overstuff them or you’ll have a cheese volcano eruption in your air fryer that will make you want to cry during cleanup
  • Let them rest a few minutes before biting in unless you enjoy burning the roof of your mouth learned this the hard way
  • Work in batches if you’re feeding more than 2 3 people since overcrowding the air fryer just leads to sad, soggy spots

My kids have turned these calzones into our unofficial Friday tradition. My daughter even started inviting friends over specifically on calzone nights, which I pretend to be annoyed about but secretly love. Last weekend she had three teammates over after soccer practice, and they demolished eight calzones in what felt like seconds. One of the moms texted asking what restaurant I’d ordered from, which might be the best cooking compliment I’ve ever received.

Delightful Pairings

These golden pockets don’t really need anything else, but I usually throw together a quick side salad just so I can pretend we’re being somewhat nutritionally balanced. Just some mixed greens with whatever veggies are left in the produce drawer and a drizzle of balsamic vinaigrette. When I’m feeling extra, I’ll warm up some extra Alfredo sauce in a little bowl for dipping, which my husband thinks is completely unnecessary but does anyway.

For casual get togethers, I make mini versions using biscuit dough instead of pizza dough and serve them with marinara and pesto dipping sauces. They disappear embarrassingly fast, and people always think they took way more effort than they actually did. My sister in law still believes they’re some old family recipe I slave over, and I’ve never bothered correcting her.

Tasty Adaptations

Over time I’ve created so many variations of these that my family now requests them by name. The Dad special has spicy Italian sausage instead of chicken because my husband adds hot sauce to literally everything. My son’s basketball team goes crazy for the buffalo chicken version where I toss the shredded chicken in buffalo sauce before mixing with just a bit of ranch and blue cheese instead of Alfredo.

My personal favorite twist happened by accident when I was cleaning out the fridge and threw in some sun dried tomatoes, spinach, and feta with the chicken and a bit less Alfredo sauce. It turned into this Mediterranean inspired situation that I now make intentionally whenever I’m craving something slightly less indulgent but still satisfying.

Leftover Solutions

In the rare event you actually have leftovers, they keep surprisingly well in the fridge for a couple days. Just wrap them in foil and reheat in the air fryer for about 3 minutes at 350°F. The microwave works in a pinch but makes the crust kind of sad and chewy instead of crisp.

I’ve started making double batches and freezing the assembled but uncooked calzones individually wrapped in plastic wrap then aluminum foil. On particularly chaotic evenings, I just unwrap and pop them straight from freezer to air fryer, adding about 5 extra minutes to the cooking time. This discovery literally saved my sanity during basketball season when we had practices four nights a week and everyone was starving the second we walked in the door.

Chicken Alfredo Air Fryer Calzones

Kitchen Wisdom

  • Cold cheese is the enemy of smooth filling so let everything come to room temperature if you have time
  • Light hands make tender dough so don’t manhandle it too much when rolling or your calzones will be tough
  • Always make more than you think you’ll need because these things disappear faster than Halloween candy

I never imagined a simple weeknight dinner hack would become my signature dish, but these calzones have followed me to potlucks, team dinners, and even a neighborhood cookbook. They’ve earned me a reputation as someone who has their culinary life together, which couldn’t be further from the truth! But I’ll take the compliments while silently thanking my air fryer, rotisserie chicken, and pre made pizza dough for doing all the heavy lifting. Sometimes the best recipes aren’t about culinary skill but finding that perfect combination of shortcuts that somehow creates something greater than the sum of its parts.

Frequently Asked Questions

→ Can I make these calzones in a regular oven ?Yes! Bake at 425°F for 12-15 minutes until golden brown. The texture might be slightly different than air fried.

→ What can I use instead of store-bought dough? Homemade pizza dough works great. You can also try crescent roll dough or puff pastry for different textures.

→ Can I make these ahead of time? You can prepare the filling a day ahead. For best results, assemble and cook just before serving for maximum crispiness.

→ What sides go well with these calzones? A simple green salad, roasted vegetables, or garlic knots complement these calzones perfectly.

→ How do I store and reheat leftovers? Store in the fridge for up to 3 days. Reheat in the air fryer at 350°F for 3-4 minutes to restore crispiness.

Crispy Cheesy Chicken Alfredo Calzones

Serves: 4 Prep Time: 10 Minutes Cooking Time: 10 Minutes 10 Minutes
Nutrition facts: 100 calories 15 grams fat
Rating: 5.0/5
( 1 voted )
Pin
Print

Ingredients

1 pound shredded cooked chicken breast
 1/2 cup Alfredo sauce
 1 cup shredded mozzarella cheese
 1/2 cup ricotta cheese
 1/4 cup grated Parmesan cheese
 1/2 teaspoon garlic powder
 1/2 teaspoon Italian seasoning
 Salt and pepper to taste
 

→ For the Calzones

 2 store-bought pizza dough rounds
 1 tablespoon olive oil, for brushing
 

→ For Serving

 Extra Alfredo sauce for dipping

Instructions

Heat your air fryer to 375°F (190°C) for about 3 minutes.

In a large bowl, combine the shredded chicken, Alfredo sauce, mozzarella, ricotta, Parmesan, garlic powder, and Italian seasoning. Season with salt and pepper to taste, then mix everything until well combined.

Roll out each pizza dough round and cut each into 2 equal pieces so you have 4 pieces total.

Place a generous scoop of chicken mixture onto one half of each dough piece, leaving about 1/2 inch border around the edges. Fold the empty half over the filling to create a half-moon shape. Press and crimp the edges firmly with a fork to seal.

Lightly brush the tops of each calzone with olive oil. This will help them get that gorgeous golden color.

Place calzones in the air fryer basket, making sure they don't overlap (you'll likely need to cook in batches). Cook for 8-10 minutes until the crust is golden brown and crispy.

Let the calzones cool for a few minutes before serving. Serve with extra Alfredo sauce on the side for dipping.

Notes

  1. These calzones use pre-cooked chicken, so make sure your chicken is fully cooked before adding to the filling.
  2. Store-bought rotisserie chicken works great as a time-saver for this recipe.
  3. You can make your own Alfredo sauce or use jarred sauce from the store.


Tools You'll Need

  • Air fryer
  • Mixing bowl
  • Fork (for crimping edges)
  • Pastry brush (for olive oil)
0 comments
0 FacebookTwitterPinterestLinkedin
Beef Meals

Texas Toast Sloppy Joes

by myphillyconnection February 15, 2026
written by myphillyconnection
Texas Toast Sloppy Joes

When you need a dinner that’ll satisfy your hungriest eaters but don’t want to spend hours in the kitchen, these Texas Toast Sloppy Joes are your new best friend. I stumbled on this combo one night when I was out of hamburger buns but had Texas toast in the freezer. That happy accident turned into one of our family’s most requested meals – seriously, my teenage son asks for these at least twice a month.

Why You’ll Love This Recipe

  • Combines two comfort foods into one messy, delicious meal
  • Takes just 25 minutes from start to finish
  • Uses simple ingredients you probably already have
  • Creates that perfect combo of savory meat and garlic bread that’s impossible to resist

Last summer I made these for my brother’s family when they visited. My picky eater niece who “doesn’t eat red meat” had three helpings and then asked her mom why they never make these at home. Sometimes the simplest recipes get the biggest reactions!

Bridgerton’s Adjoa & Golda on their friendship

Simple Ingredients

  • Ground Beef: The foundation that soaks up all those saucy flavors—80/20 gives good flavor without excessive grease
  • Diced Tomatoes: Adds texture and brightness to balance the richness—don’t drain them, that juice adds moisture
  • BBQ Sauce: Brings that sweet smoky element that elevates these beyond basic sloppy joes—use your favorite brand
  • Garlic Texas Toast: The game changing base that puts these over the top—that buttery garlic flavor is unbeatable
  • Cheddar Cheese: Creates that melty, gooey finish that makes everything better—sharp or medium both work great

I discovered the magic of adding barbecue sauce to sloppy joes when I was running low on ketchup one night. That combination of tangy ketchup and smoky BBQ sauce created something that tasted like it had simmered for hours. Sometimes kitchen shortages lead to the best cooking discoveries!

Texas Toast Sloppy Joes

Step-by-Step Instructions

Proper Beef Browning: Take your time with the ground beef to develop flavor. Breaking it into small, even crumbles as it cooks creates better texture in the final dish. Draining the excess fat is crucial—skip this step and you’ll end up with greasy sloppy joes that make the Texas toast soggy.

Sauce Magic: The combination of diced tomatoes, ketchup, and BBQ sauce creates layers of flavor without any complicated ingredients. The Worcestershire adds that umami depth that makes people wonder what your secret ingredient is. That touch of sugar balances the acidity from the tomatoes and ketchup perfectly.

Simmer Time: Those 10 minutes of covered simmering aren’t just about heating everything through—they allow the flavors to meld and the sauce to thicken slightly. Resist the urge to rush this step, as it makes a noticeable difference in the final flavor. The sauce should be thick enough to mound on the toast without being runny.

Toast Technique: Follow the package directions for the Texas toast carefully—each brand can vary slightly. The goal is golden, crispy edges with a still soft interior that can stand up to the hearty topping. Some brands call for flipping halfway through baking, which helps achieve even browning on both sides.

Assembly Strategy: Spoon the sloppy joe mixture onto the toast immediately after it comes out of the oven. The warm bread slightly softens under the hot filling, creating that perfect texture contrast. Don’t skimp on the cheese—it not only adds flavor but helps hold the meat mixture in place when eating.

Melty Finish: If you want that restaurant style melted cheese effect, pop the assembled Texas Toast sloppy joes under the broiler for 1 2 minutes. Keep a close eye on them—the difference between perfectly melted cheese and burnt toast happens in seconds!

You Must Know

  • Don’t oversimmer the meat mixture or it will get too dry
  • The Texas toast needs to be cooked until golden for structural integrity
  • These are meant to be eaten with a knife and fork—embrace the mess

My first attempt at these was tasty but structurally unsound because I didn’t cook the Texas toast long enough. It collapsed under the weight of the sloppy joe mixture, creating a delicious but impossible to eat dinner. Now I make sure the toast has those crispy edges that provide necessary support.

Serving Suggestions

These hearty sloppy joes need simple sides that won’t compete for attention. A basic green salad adds freshness to balance the richness. Pickle spears provide that tangy contrast that cuts through the savory flavors. For casual gatherings, a bowl of potato chips offers satisfying crunch alongside these messy sandwiches. Cold beer for adults or chocolate milk for kids completes this classic comfort meal.

Creative Variations

Transform this basic recipe with simple switches that create new flavor experiences. Try ground turkey for a lighter version, adjusting seasonings accordingly. Add sautéed bell peppers and onions to the meat mixture for extra vegetables and texture. Spice lovers might appreciate a few dashes of hot sauce or diced jalapeños mixed in. For a twist, use pepper jack cheese instead of cheddar for a slight kick.

Quick Leftover Magic

If you have leftover sloppy joe mixture but no more Texas toast, it’s incredibly versatile. Use it to top baked potatoes for a quick dinner the next day. Wrap it in tortillas with additional cheese for sloppy joe quesadillas. Mix it with cooked pasta and more cheese for a skillet pasta bake. The mixture keeps well in the refrigerator for up to three days in an airtight container.

Texas Toast Sloppy Joes

Sloppy Joe Wisdom

  • Time Saving Tip: The meat mixture can be made ahead and reheated when ready to serve
  • Texture Trick: For thicker sloppy joes, simmer uncovered for the last few minutes
  • Flavor Boost: A tablespoon of yellow mustard adds tanginess that balances the sweet elements

I’ve been making some version of these texas toast sloppy joes for almost five years now, gradually refining the sauce proportions and cooking technique. What started as a desperate pantry meal has become one of our family’s most requested dinners—proof that sometimes the most straightforward recipes become the ones that create the strongest food memories. There’s something deeply satisfying about watching my family devour a meal that took minimal effort but delivers maximum enjoyment.

Frequently Asked Questions

→ Can I use ground turkey instead of beef? Yes! Ground turkey works great as a leaner option. You might want to add a little oil when cooking since turkey has less fat than beef.

→ How do I store leftovers? Store the meat mixture separately from the Texas toast. Refrigerate in covered containers for up to 3 days. Reheat the meat in a microwave and toast fresh bread for best results.

→ Can I make this ahead of time? The meat mixture can be made 1-2 days ahead and stored in the fridge. Just reheat on the stove and prepare fresh Texas toast when ready to serve.

→ What sides go well with Texas Toast Sloppy Joes? Try potato chips, french fries, coleslaw, or a simple green salad. Pickles on the side are also a classic addition that adds a nice tang.

→ Can I freeze the sloppy joe mixture? Yes! The meat mixture freezes well for up to 3 months. Thaw overnight in the fridge before reheating on the stove. Make fresh Texas toast when ready to serve.

→ Is there a vegetarian version? You can substitute the ground beef with plant-based ground meat alternatives, lentils, or crumbled tempeh for a vegetarian option.

Texas Toast Sloppy Joes

Serves: 6 Prep Time: 5 Minutes Cooking Time: 20 Minutes 20 Minutes
Nutrition facts: 215 calories 30 grams fat
Rating: 5.0/5
( 1 voted )
Pin
Print

Ingredients

 1 pound lean ground beef
 1 can (14.5 oz) diced tomatoes
 1 cup ketchup
 ½ cup your favorite BBQ sauce
 1 tablespoon Worcestershire sauce
 2 tablespoons granulated sugar
 

→ For Serving

 1 box (8 slices) frozen garlic Texas toast
 1 cup shredded sharp cheddar cheese (add more if you're a cheese lover!)

Instructions

Heat up a large skillet over medium-high heat. Add the ground beef and cook until nicely browned, breaking it up with a wooden spoon as it cooks. Drain off any excess grease when done.

Return the cooked beef to the skillet. Pour in the diced tomatoes (juice and all), ketchup, BBQ sauce, Worcestershire sauce, and sugar. Stir everything together until well combined. Cover the skillet and let it simmer on medium heat for about 10 minutes, letting all those flavors meld together.

While your sloppy joe mixture is simmering away, bake the frozen garlic Texas toast according to the package directions until golden and crispy.

Place your crispy Texas toast pieces on plates. Generously spoon the hot sloppy joe mixture over each piece of toast, then sprinkle with plenty of shredded cheddar cheese. For extra melty goodness, you can pop these under the broiler for a minute or two until the cheese gets bubbly and slightly browned.

Notes

  1. These hearty sloppy joes combine the classic BBQ-flavored beef with the buttery crunch of Texas toast for an easy weeknight dinner that's ready in under 30 minutes.
  2. This recipe is kid-friendly and perfect for busy weeknights when you need something quick but satisfying.
  3. Try using pepper jack cheese instead of cheddar for a spicy kick!


Tools You'll Need

  • Large skillet or frying pan
  • Baking sheet (for the Texas toast)
  • Wooden spoon or spatula
0 comments
0 FacebookTwitterPinterestLinkedin
CasserolesPastaPizza

Pizza-Pasta-Bake

by myphillyconnection February 15, 2026
written by myphillyconnection
Pizza Pasta Bake

I threw this together on a Tuesday night last fall when I had exactly zero energy for cooking but three hungry kids staring at me. The fridge was practically empty except for some cheese and half a package of pepperoni left from weekend pizza, and the pantry had the usual pasta and sauce. What started as desperate pantry diving has somehow become the meal my family requests most often. There’s something about that combination of crispy pepperoni edges and gooey cheese over pasta that hits differently than regular spaghetti night.

Why You’ll Love This Recipe

  • Takes about 10 minutes of actual work (the oven does the rest while you collapse on the couch)
  • Uses stuff you probably already have sitting in your kitchen
  • Makes everyone happy without creating a sink full of dishes

Last month my sister stopped by unannounced right as this was coming out of the oven. She claimed she was “just in the neighborhood” but somehow had perfect timing for dinner. After one bite, she actually took a picture of her plate and texted her husband that she was bringing this to their potluck that weekend. When someone who typically makes everything from scratch wants your four ingredient recipe, you know you’ve stumbled onto something good.

Ingredients

Penne holds up perfectly in the oven without turning to mush like thinner pasta shapes would. Those little ridges grab onto sauce in all the right ways.

Jarred marinara is my weeknight secret weapon. I usually grab Rao’s when it’s on sale or Classico in a pinch – nothing fancy, but definitely not the cheapest stuff either.

Pepperoni does double duty here – some gets mixed throughout for flavor while the top layer gets that perfect crispy edge during the final broil that makes it taste like actual pizza.

Mozzarella needs to cover everything completely. I’ve tried getting fancy with cheese blends, but honest to god, the standard pre shredded mozzarella bag works perfectly here.

Pizza Pasta Bake

Step-by-Step Instructions

Undercooking pasta slightly was something I learned the hard way. My first attempt followed package directions exactly, and everything turned to mush in the oven. Taking off those two minutes makes all the difference in the final texture. Mixing in the pot you cooked the pasta it seems like a small thing, but on nights when I’m making this, I’m usually too tired to wash an extra bowl. Every dish saved is a victory. Layering matters more than you’d think. I mixed everything together in one big mess. It tasted fine but looked awful. Keeping the pepperoni on top creates that pizza like appearance that makes everyone excited about dinner. Watching the broiler like a hawk is non-negotiable. I’ve ruined more than one dinner by walking away “just for a second” during broiling. The line between perfectly browned and completely charred is about 47 seconds. Letting it rest after baking gives the cheese time to set slightly so you don’t end up with molten lava burns in your mouth. Five minutes feels like forever when you’re hungry, but it’s worth the wait.

You Should Know

  • Different pasta shapes need different cook times – stick with penne or ziti if you’re not sure
  • The pasta will keep absorbing sauce while it bakes, so it might look a little too saucy when you first mix it
  • A metal baking dish creates better browning than glass, but either works fine

My biggest kitchen fail with this recipe happened when I tried to be “healthy” and use whole wheat pasta. My kids still bring it up as the night Mom ruined pizza pasta. Regular pasta just works better here – save the whole grain stuff for another dish. Another lesson learned: cheap marinara makes a huge difference in the final taste. It doesn’t need to be expensive, but those super bargain jars that are basically tomato water will leave you with sad, bland results.

Serving Ideas

Simple sides work best with something this hearty. I usually throw together a basic green salad while the pasta bakes – just pre washed greens with whatever veggies are in the crisper drawer and some bottled Italian dressing.

Garlic bread feels like overkill with pasta, but my kids disagree completely. Sometimes I’ll split a French bread loaf, spread it with butter mixed with garlic powder, and stick it in the oven for the last few minutes of baking.

For grown up dinners, a glass of cheap red wine makes this feel somehow fancy despite being essentially kid food. I’m not above that.

Change It Up

Supreme pizza version works beautifully with a handful of diced bell peppers, onions, and olives stirred in with the pasta. Just make sure they’re cut small enough to cook in the time the casserole bakes.

Italian sausage makes this even heartier when you brown about half a pound before adding it to the pasta mixture. My husband prefers this version, but it does dirty another pan.

White pizza spin uses alfredo instead of marinara and adds some spinach for color. It’s completely different but equally easy and satisfying when you need a change.

Buffalo chicken adaptation happens when I swap the pepperoni for diced rotisserie chicken tossed with buffalo sauce. Add some blue cheese crumbles if you’re feeling fancy.

Keep It Fresh

Leftovers actually taste better the next day once all the flavors have had time to get friendly. Just cover and refrigerate, then microwave individual portions for about two minutes.

Freezing works surprisingly well if you want to make a double batch. I portion single servings in those disposable foil containers, cover with foil, and freeze. They reheat from frozen at 375°F for about 30 minutes.

Meal prep potential makes this perfect for busy weeks. You can assemble everything up to the baking step, cover and refrigerate, then just add an extra 10 minutes to the baking time when you’re ready to cook it.

Pizza Pasta Bake

Real Talk

This is never going to win any gourmet cooking awards, but that’s not why I make it. It’s the dish that saves dinner when I can barely function but still need to feed people. The one that everyone eats without complaints. The recipe my kids will probably make in their first apartments someday because it reminds them of home.

Sometimes the best family favorites are born from desperation cooking rather than careful planning. This pizza pasta bake has gotten me through countless sports nights, homework meltdowns, and workday disasters. It might just save your dinner too.

Frequently Asked Questions

→ Can I use a different type of pasta? Yes! While penne works great for holding sauce, you can substitute rotini, ziti, farfalle, or any medium pasta shape you have on hand.

→ How do I store leftovers? Store leftovers in an airtight container in the refrigerator for up to 3 days. Reheat in the microwave or covered in the oven at 350°F until heated through.

→ Can I make this ahead of time? Absolutely! Assemble the casserole up to a day ahead, cover and refrigerate. When ready to bake, add an extra 10-15 minutes to the cooking time.

→ What can I add to this basic recipe? Try adding Italian sausage, mushrooms, bell peppers, onions, olives, or your favorite pizza toppings. You can also mix in some Italian seasoning or red pepper flakes for extra flavor.

→ Is there a way to make this vegetarian? Simply omit the pepperoni and add vegetable toppings like mushrooms, bell peppers, and olives. You could also use plant-based pepperoni alternatives.

Pizza-Pasta-Bake

Serves: 8 Prep Time: 10 Minutes Cooking Time: 40 Minutes 40 Minutes
Nutrition facts: 405 calories 75 grams fat
Rating: 5.0/5
( 1 voted )
Pin
Print

Ingredients

1 pound penne pasta, uncooked
 3 cups marinara sauce (24 oz jar)
 10 ounces pepperoni slices
 2 cups mozzarella cheese, shredded

Instructions

Preheat your oven to 375°F. Move the rack to the top third of the oven for best browning results.

Bring a large pot of water to a boil and add salt. Cook the penne for 2 minutes less than the package directions suggest (it will continue cooking in the oven). Drain when done.

Return the drained pasta to the pot. Add the marinara sauce and about 1/3 of the pepperoni slices. Stir everything together until the pasta is evenly coated.

Transfer the pasta mixture to a 9x13 inch baking dish, spreading it out in an even layer. Sprinkle the shredded mozzarella evenly over the top, then arrange the remaining pepperoni slices over the cheese.

Bake uncovered for 20 minutes until the cheese is melted and bubbly. Then switch to broil for 2-3 minutes to crisp up the pepperoni and cheese. Watch carefully to prevent burning!

Notes

  1. This recipe serves 6-8 people, perfect for family dinners.
  2. For a saucier dish, add an extra 1/2 to 1 cup of marinara sauce.
  3. Pepperoni comes in various package sizes, so you might need more than one package to get 10 ounces. A little less or more is fine.


Tools You'll Need

  • 9x13 inch baking dish
  • Large pot for boiling pasta
  • Colander
0 comments
0 FacebookTwitterPinterestLinkedin
Beef MealsCasseroles

Bacon Cheeseburger Grilled Cheese Casserole

by myphillyconnection February 15, 2026
written by myphillyconnection
Bacon Cheeseburger Grilled Cheese Casserole

This bacon cheeseburger grilled cheese casserole started as a desperate attempt to feed my family something they’d all actually eat without complaints. I was staring at ground beef, a loaf of bread, and some cheese, trying to figure out how to make dinner happen when my youngest piped up asking for grilled cheese. That’s when it hit me – why not make a giant grilled cheese sandwich with all the good burger stuff inside? The result was this amazing layered casserole that tastes like the best grilled cheese and cheeseburger had a delicious baby together.

Why You’ll Love This

  • Pure comfort food magic – Gets that crispy, buttery grilled cheese exterior with all the hearty satisfaction of a cheeseburger
  • Feeds everyone easily – One pan makes enough for the whole family plus leftovers for tomorrow’s lunch
  • Picky eater approved – My kids who usually pick apart everything ate this without a single complaint
  • Minimal cleanup required – Everything bakes in one dish, so you’re not washing a million pans afterward

The first time I pulled this out of the oven, my husband walked into the kitchen and asked what smelled so incredible. When I cut into it and he saw all those golden, crispy layers with melted cheese oozing out, he just stood there grinning. My daughter, who’s going through her “I don’t like anything” phase, actually asked for seconds. That’s when I knew I’d stumbled onto something special.

What You’ll Need

  • Lean ground beef: Go with 85/15 or 90/10 so you don’t end up with a greasy mess. The extra fat just makes everything soggy.
  • Real bacon bits: Don’t cheap out with the fake stuff. Real bacon bits give you that smoky crunch that makes all the difference.
  • Yellow onion: Adds sweetness and helps everything taste more like an actual burger. Chop it small so it cooks evenly.
  • Cheese blend: Mozzarella melts like a dream while cheddar brings the flavor. Together they’re perfect.
  • Regular sandwich bread: Nothing fancy needed here. Just good old white or wheat bread that can handle being buttered and baked.
  • Butter or margarine: This is what creates that golden, crispy grilled cheese magic on top and bottom.
Bacon Cheeseburger Grilled Cheese Casserole

How to Make It

Getting the Beef Ready: Heat up a big skillet over medium-high heat and toss in a little butter. Add your ground beef and start breaking it up with a wooden spoon while it cooks. You want small, even pieces that’ll spread nicely in the casserole. Keep stirring and breaking it up until there’s no pink left and everything’s nicely browned.

Dealing with the Grease: Once your beef is cooked through, you need to get rid of most of that grease or your casserole will be a soggy disaster. Carefully tilt the pan and spoon out the excess fat. Leave just a tiny bit for flavor, but don’t go overboard here.

Adding the Onions: Throw your diced onions right into the pan with the cooked beef and give everything a good stir. Let them cook for about 3-4 minutes, stirring now and then, until they start getting soft and see-through. They don’t need to be completely cooked since they’ll keep going in the oven.

Making It Taste Like a Burger: Take the pan off the heat and stir in your bacon bits, mayo, ketchup, mustard, salt, pepper, and onion powder. Mix everything really well so all the meat gets coated with the sauce. It should smell and taste like the inside of a really good cheeseburger.

Prepping the Bread: Take six slices of bread and spread them with about half your butter, then cut each slice in half. This makes them way easier to arrange in your baking dish and helps everything fit together like a puzzle. Don’t be stingy with the butter – that’s what makes it taste like grilled cheese.

Building the Bottom Layer: Arrange those buttered bread pieces butter-side down in a greased 9×13 baking dish. Try to cover the whole bottom without leaving big gaps. This is going to be your bottom grilled cheese layer that gets all golden and crispy.

Layering Everything Up: Sprinkle two cups of your cheese over the bread, making sure it gets everywhere. Then spoon your meat mixture on top and spread it around so every bite gets some. Top that with your remaining two cups of cheese.

Finishing the Top: Butter your last six bread slices and cut them in half just like before. Lay these pieces butter-side up over everything, again trying to cover the whole surface. This top layer is going to turn into that perfect golden grilled cheese crust.

Baking Time: Stick the whole thing in your 400-degree oven for 20-24 minutes. You’ll know it’s done when the top is golden brown and looks like perfect grilled cheese, and you can see cheese bubbling around the edges.

You Must Know

  • Don’t skip draining the grease – Seriously, this will make or break your casserole. Too much fat equals soggy bread
  • Cook those onions first – Raw onions are way too sharp and won’t blend with everything else
  • Butter matters – Both layers of bread need butter to get that authentic grilled cheese taste

I learned the grease lesson the hard way when my first attempt turned into this awful, oily mess that nobody wanted to eat. The bread never got crispy, and the whole thing just fell apart when I tried to serve it. Now I’m really careful about draining that fat properly, and the difference is night and day.

Getting the Beef Perfect

Break up that ground beef into small pieces while it cooks – nobody wants huge chunks in their casserole. Use your wooden spoon to really chop it up as it browns. Take your time with this part because good browning means better flavor in the final dish.

Onion Cooking Tips

Those few minutes of cooking the onions with the beef makes them sweet and mild instead of sharp and crunchy. Dice them pretty small so they cook quickly and spread evenly throughout the meat mixture. You want them soft but not mushy.

Sauce Magic

The combination of mayo, ketchup, and mustard is what makes this taste like an actual cheeseburger instead of just meat and cheese. Mix it in while the beef is still warm so everything coats nicely. Taste it and adjust if you want more of any particular flavor.

Bread Strategy

Regular sandwich bread is perfect for this – don’t overthink it. The thickness is just right, and it holds up well to all the butter and baking. Cutting the slices in half makes them so much easier to arrange and ensures you get good coverage.

Cheese Distribution

Using cheese on both sides of the meat mixture is key. The bottom layer helps everything stick together, while the top layer creates that gorgeous bubbly surface that looks so good when you pull it out of the oven.

Perfect Timing

That 400-degree temperature gets the bread nice and golden while melting all the cheese thoroughly. Keep an eye on it toward the end – you want golden brown, not burnt. The edges should be bubbling with melted cheese when it’s ready.

Serving Ideas

This thing is rich and filling enough to be dinner all by itself, but a simple salad or some dill pickles on the side really helps cut through all that cheese. Cut it into squares like you would lasagna, and have napkins ready because it can get a little messy.

Make-Ahead Magic

You can put this whole casserole together in the morning and just pop it in the oven when you’re ready for dinner. If you’re baking it straight from the fridge, add a few extra minutes to the cooking time. The flavors actually get better when everything sits together for a while.

Leftover Solutions

This reheats beautifully in the oven – just cover it with foil and warm it at 350 until it’s hot through. Don’t use the microwave if you can help it because it makes the bread all soggy. Leftovers keep in the fridge for about four days.

Ways to Mix It Up

While this version is amazing as-is, you can definitely play around with it. Some people love adding diced pickles to the meat mixture for extra burger flavor. Different cheeses work great too – try pepper jack if you want some heat, or go with all cheddar for that classic taste.

Bacon Cheeseburger Grilled Cheese Casserole

Chef Secrets

  • Let things cool a bit – If your meat mixture is too hot, it’ll make the bottom bread soggy before it can get crispy
  • Press gently – Give the top bread layer a light press to help everything stick together
  • Check underneath – Lift a corner with a spatula to make sure the bottom is getting golden too

This bacon cheeseburger grilled cheese casserole has become our family’s ultimate comfort food because it hits every single craving at once. It’s like having your favorite childhood grilled cheese sandwich and a satisfying dinner all rolled into one amazing dish. Every time I make it, I’m reminded that sometimes the best recipes come from just throwing together whatever you have and seeing what happens.

Frequently Asked Questions

→ Can I make this casserole ahead of time? Yes! Assemble the casserole and refrigerate for up to 4 hours before baking. You may need to add 5-10 extra minutes to the baking time.

→ What type of bread works best? Regular white or whole wheat sandwich bread works perfectly. Avoid thick artisan breads as they won’t layer as well.

→ Can I use fresh bacon instead of bacon bits? Absolutely! Cook 6-8 strips of bacon, crumble them up, and use instead of the bacon bits for even better flavor.

→ How do I prevent the casserole from being too greasy? Use lean ground beef and make sure to drain it well after cooking. This prevents excess grease from making the bread soggy.

→ What should I serve with this casserole? A simple green salad, steamed vegetables, or crispy fries complement this rich casserole perfectly.

Bacon Cheeseburger Grilled Cheese Casserole

Serves: 8 Prep Time: 20 Minutes Cooking Time: 24 Minutes 24 Minutes
Nutrition facts: 400 calories 55 grams fat
Rating: 5.0/5
( 1 voted )
Pin
Print

Ingredients

1 lb lean ground beef
 1 cup yellow onion, diced
 1/2 cup real bacon bits
 1/4 cup mayonnaise
 1/4 cup ketchup
 1 tbsp yellow mustard
 1/2 tsp salt
 1/2 tsp black pepper
 2 tsp onion powder
 

→ Casserole Assembly

 12 slices white or whole wheat bread
 1/2 cup margarine or butter, softened
 4 cups shredded mozzarella and cheddar cheese blend

Instructions

Preheat your oven to 400°F and grease a 9x13 inch baking dish. Heat a large skillet over medium-high heat and add the ground beef with a small dab of butter. Cook the beef, breaking it up into small crumbles as it browns - this takes about 6-8 minutes.

Once the beef is cooked through, drain any excess grease. Add the diced onions to the pan and cook for another 3-4 minutes, stirring occasionally, until the onions start to soften and become fragrant.

Remove the pan from heat and stir in the bacon bits, mayo, ketchup, mustard, salt, pepper, and onion powder. Mix everything together until well combined - this creates that classic cheeseburger flavor throughout the filling.

Spread 6 slices of bread with half the margarine, then cut each slice in half. Place these pieces margarine-side down in your greased baking dish, creating the bottom layer. Sprinkle 2 cups of the cheese mixture over the bread.

Spoon the beef mixture evenly over the cheese layer, spreading it out to cover the bread completely. Top with the remaining 2 cups of cheese - this creates those gooey, melty layers that make this casserole so amazing.

Spread the remaining 6 slices of bread with the rest of the margarine and cut them in half. Place these pieces margarine-side up on top of the casserole. Bake for 20-24 minutes until the top is golden brown and crispy.

Let the casserole rest for about 5 minutes before cutting - this helps it hold together better. Serve hot and watch everyone dig into this comfort food masterpiece!

Notes

  1. Using lean ground beef helps prevent the casserole from becoming too greasy
  2. Make sure to drain the beef well before adding other ingredients
  3. You can assemble this casserole a few hours ahead and refrigerate until ready to bake
  4. Leftovers reheat beautifully in the oven at 350°F for about 15 minutes


Tools You'll Need

  • Large skillet
  • 9x13 inch baking dish
  • Sharp knife
  • Wooden spoon or spatula
  • Cutting board
0 comments
0 FacebookTwitterPinterestLinkedin
Beef MealsCasserolesCheesesteakFeatured

Philly Cheesesteak Grilled Cheese Casserole

by myphillyconnection February 15, 2026
written by myphillyconnection

This Philly cheesesteak grilled cheese casserole happened when I was trying to figure out how to feed my Philly-obsessed husband something that tasted like his beloved cheesesteaks but could actually feed our whole family without ordering a dozen sandwiches. The combination of tender roast beef, sautéed peppers and onions, all that melted cheese, and crispy buttered bread creates this incredible comfort food hybrid that somehow manages to taste exactly like a cheesesteak but in casserole form. The first time I made it, my husband took one bite and said it was like eating his favorite sandwich but better because there was so much more of it.

Why You’ll Love This

  • All the cheesesteak flavors – Captures that authentic Philly taste with tender beef, peppers, onions, and loads of melted cheese
  • Feeds a crowd easily – One pan makes enough for the whole family instead of assembling individual sandwiches
  • Crispy bread perfection – Gets that golden, buttery grilled cheese exterior on both top and bottom
  • Make-ahead friendly – Can be assembled hours ahead and just popped in the oven when you’re ready

My kids, who usually complain about anything that isn’t chicken nuggets, actually fought over seconds of this casserole. My daughter said it tasted like “the best grilled cheese ever but with steak inside,” which is probably the most accurate description anyone’s given it. Now whenever we have family gatherings, someone always asks if I’m bringing “that amazing cheesesteak thing.”

Essential Ingredient Guide

  • Thinly sliced roast beef: Look for deli-style roast beef that’s sliced thin enough to break apart easily. The thin slices integrate better with the other ingredients.
  • Yellow onion: Provides that classic Philly sweetness when sautéed. Yellow onions work better than white because they caramelize more beautifully.
  • Green bell pepper: Essential for authentic cheesesteak flavor. Cut them into small, even pieces so they cook uniformly with the onions.
  • Brown gravy mix: Creates that rich, savory base that ties everything together and adds moisture to prevent the casserole from drying out.
  • Mozzarella cheese: Melts perfectly and provides that amazing cheese pull. Use freshly shredded for the best melting properties.
  • Regular sandwich bread: White or wheat bread works great. The key is using sturdy bread that won’t fall apart when buttered and baked.
Philly Cheese Steak Grilled Cheese Casserole

Complete Preparation Process

Roast Beef Preparation:Start by chopping your roast beef slices into small, bite-sized pieces. You don’t want huge chunks that are hard to distribute evenly, but don’t chop it so fine that it disappears. Pieces about the size of a quarter work perfectly for good distribution and texture.

Vegetable Sautéing: Heat a large skillet over medium-high heat and add a small amount of butter or margarine. Add the chopped roast beef pieces and let them warm through for about a minute. Then add your diced onions and green peppers to the pan and stir everything together.

Cooking Until Perfect: Continue cooking the mixture, stirring occasionally, until the onions become translucent and start to soften. This usually takes about 5-7 minutes. The peppers should still have a slight bite to them since they’ll continue cooking in the oven.

Gravy Integration: Add the brown gravy mix and water to the pan and stir until everything is well coated with the gravy. The mixture should look glossy and cohesive, with no dry spots. Remove the pan from heat and let it cool slightly while you prepare the bread layers.

Bottom Bread Layer: Spread about a quarter cup of margarine on six slices of bread, then cut each slice in half. Arrange these pieces margarine-side down in a single layer on the bottom of a greased 9×13 inch baking dish. Try to cover the entire bottom with minimal gaps.

Cheese and Filling Layers: Sprinkle two cups of shredded mozzarella evenly over the bread layer. Then spoon the roast beef mixture over the cheese, spreading it out carefully so every area gets some filling. The mixture should cover the cheese layer completely and evenly.

Top Cheese Layer: Sprinkle the remaining two cups of mozzarella over the roast beef mixture. This top cheese layer will help bind everything together and create that beautiful golden, bubbly surface when baked.Final

Bread Layer: Spread the remaining quarter cup of margarine on the last six slices of bread and cut them in half. Arrange these pieces margarine-side up over the cheese layer, again trying to cover the entire surface in a single layer.

Baking Process: Bake at 400 degrees for 26-30 minutes until the top bread layer is golden brown and the cheese is melted and bubbling around the edges. The top should look like perfectly toasted grilled cheese when it’s done.

You Must Know

  • Don’t overcook the vegetables – They’ll continue cooking in the oven, so stop when onions are just translucent
  • Let the filling cool slightly – Hot filling can make the bottom bread soggy before it has a chance to get crispy
  • Cover the surface completely – Gaps in the bread layers lead to uneven browning and texture

My first attempt was a mess because I cooked the vegetables too long and they turned mushy during baking. The texture was all wrong, and it didn’t have that nice bite that makes a good cheesesteak. Now I always undercook them slightly in the pan, knowing they’ll finish perfectly in the oven. The difference in texture is huge.

Roast Beef Selection

The quality and thickness of your roast beef really affects the final result. Look for deli-style roast beef that’s sliced thin but not paper-thin. It should be easy to break apart but substantial enough to provide good meaty texture in each bite. Avoid thick-cut roast beef that won’t integrate well with the other ingredients.

Vegetable Cooking Tips

Getting the peppers and onions just right is crucial for authentic cheesesteak flavor. Cook them until the onions are translucent and starting to soften, but the peppers should still have some firmness. They’ll continue cooking in the oven, so stopping at this point ensures they don’t turn mushy.

Gravy Mix Benefits

The brown gravy mix does more than just add flavor – it provides moisture that keeps the casserole from drying out and helps bind all the ingredients together. Make sure to stir it in thoroughly so every piece of meat and vegetable gets coated.

Bread Layer Strategy

Creating even layers of bread is important for consistent texture throughout the casserole. Cut the slices in half to make them easier to arrange and ensure better coverage. The margarine on both layers is what creates that authentic grilled cheese taste and golden color.

Cheese Distribution

Using cheese on both the bottom and top of the filling ensures every bite has plenty of melted cheese. The bottom layer helps everything stick together, while the top layer creates that gorgeous bubbly surface that looks so appealing when you serve it.

Temperature Control

The 400-degree temperature is perfect for getting the bread golden and crispy while thoroughly melting the cheese and heating everything through. Watch for that golden brown color on top – that’s your visual cue that it’s ready.

Perfect Serving Style

This casserole is best served immediately while the cheese is still molten and the bread is crispy. Cut it into squares like lasagna for easy serving. The combination of textures and flavors in each bite really does taste like eating a perfect cheesesteak.

Make-Ahead Benefits

You can assemble this entire casserole hours ahead and refrigerate until you’re ready to bake. Just add a few extra minutes to the baking time if you’re starting with a cold casserole. The flavors actually improve when the components have time to meld together.

Creative Variations

While this version captures classic Philly flavors perfectly, you can customize it in various ways. Some people love adding mushrooms to the vegetable mixture, or using a combination of cheeses like provolone and mozzarella for more complex flavor.

Storage and Reheating

Leftovers keep well in the refrigerator for up to four days and reheat beautifully in the oven. Cover with foil and warm at 350 degrees until heated through. The bread stays much crispier when reheated in the oven rather than the microwave.

Philly Cheese Steak Grilled Cheese Casserole

Professional Chef Secrets

  • Drain excess moisture – If your vegetable mixture seems watery, let it cool uncovered for a few minutes to evaporate excess liquid
  • Press gently – Lightly press the top bread layer to help everything adhere and bake evenly
  • Test doneness – The casserole is ready when a knife inserted in the center comes out hot

This Philly cheesesteak grilled cheese casserole has become our family’s ultimate comfort food because it combines all the flavors we love in a format that’s perfect for sharing. The technique creates something that tastes familiar yet special, turning a beloved sandwich into a satisfying meal that brings everyone to the table. Every time I make it, I’m reminded that sometimes the best recipes come from taking something you already love and figuring out how to make it even better.

Frequently Asked Questions

→ Can I use a different type of cheese? Yes! Provolone or American cheese are more traditional for Philly cheesesteaks, or you can use a blend of cheeses for extra flavor.

→ What if I can’t find roast beef? You can substitute with thinly sliced steak, deli turkey, or even leftover pot roast. Just make sure it’s sliced thin.

→ Can I add mushrooms to this recipe? Absolutely! Sauté 1 cup of sliced mushrooms with the onions and peppers for an even more authentic Philly flavor.

→ How do I store leftovers? Store covered in the refrigerator for up to 3 days. Reheat in the oven at 350°F for 15 minutes to restore the crispy top.

→ Can I make this ahead of time? Yes! Assemble the casserole and refrigerate up to 4 hours before baking. You may need to add 5-10 extra minutes to the baking time.

Philly Cheesesteak Grilled Cheese Casserole

Serves: 8 Prep Time: 15 Minutes Cooking Time: 30 Minutes 30 Minutes
Nutrition facts: 325 calories 50 grams fat
Rating: 5.0/5
( 1 voted )
Pin
Print

Ingredients

 9 oz thinly sliced roast beef
 1 cup yellow onion, diced
 1 cup green bell pepper, diced
 0.87 oz brown gravy mix packet
 1/2 cup water
 

→ Casserole Assembly

 12 slices white or whole wheat bread
 1/2 cup margarine or butter, softened
 4 cups shredded mozzarella cheese

Instructions

Preheat your oven to 400°F and grease a 9x13 inch baking dish. Chop the roast beef slices into bite-sized pieces - this makes it easier to eat and distributes the flavor better throughout the casserole.

Heat a large skillet over medium-high heat with a dab of butter or margarine. Add the chopped roast beef, diced onions, and green peppers. Cook everything together, stirring frequently, until the onions become translucent and the peppers start to soften - about 5-7 minutes.

Sprinkle the brown gravy mix over the beef and vegetables, then add the water. Stir everything together until the gravy coats all the ingredients evenly. This creates that rich, savory base that ties all the flavors together. Remove from heat and set aside.

Spread 1/4 cup of margarine on 6 slices of bread, then cut each slice in half. Place these pieces margarine-side down in a single layer in your greased baking dish. Sprinkle 2 cups of mozzarella cheese over the bread layer.

Spoon the roast beef mixture evenly over the cheese layer, spreading it out to cover the bread completely. Top with the remaining 2 cups of mozzarella cheese - this creates those amazing gooey, stretchy layers.

Spread margarine on the remaining 6 slices of bread and cut them in half. Place these pieces margarine-side up on top of the casserole in a single layer. Bake for 26-30 minutes until the top bread is golden brown and the cheese is bubbly.

Let the casserole rest for about 5 minutes before slicing - this helps it hold together better. Cut into squares and serve immediately while the cheese is still melted and gooey. This is comfort food at its finest!

Notes

  1. Using thinly sliced deli roast beef works best for authentic Philly flavors
  2. The gravy mix helps bind everything together and adds extra savory flavor
  3. You can substitute provolone or American cheese for a more traditional Philly taste
  4. This casserole reheats well in the oven at 350°F for about 15 minutes


Tools You'll Need

  • Large skillet
  • 9x13 inch baking dish
  • Sharp knife
  • Wooden spoon or spatula
  • Cutting board

0 comments
0 FacebookTwitterPinterestLinkedin
30 Minute MealsChicken Meals

Honey Sesame Chicken and Broccoli

by Clare Greco February 15, 2026
written by Clare Greco

This honey sesame chicken and broccoli became my go-to weeknight dinner when I got tired of ordering takeout but still craved those sweet, savory Chinese flavors. The light coating on the chicken creates this perfect crispy exterior that holds onto the glossy honey sesame sauce beautifully, while the tender-crisp broccoli adds that fresh contrast you need. What I love most is how the whole thing comes together in about 30 minutes, making it faster than delivery but so much better tasting. My kids actually eat the broccoli without complaining when it’s coated in this incredible sauce.

Why You’ll Love This

  • **Better than takeout** – All those familiar sweet and savory flavors but made fresh in your own kitchen
  • **Quick weeknight solution** – Ready in 30 minutes from start to finish, perfect for busy evenings
  • **One-pan simplicity** – Everything comes together in one skillet for easy cleanup
  • **Kid-approved vegetables** – Even picky eaters love broccoli when it’s covered in this amazing sauce

The first time I made this, my husband took one bite and asked if I’d secretly ordered Chinese food because it tasted so authentic. When he realized I’d made it myself, he immediately requested it for the following week’s meal plan. My daughter, who normally picks out every piece of broccoli from any dish, actually asked for extra vegetables because she loved how they tasted with the sauce.

Essential Ingredient Guide

  • **Boneless chicken breast:** Cut into uniform pieces for even cooking. The size matters for getting that perfect crispy coating.
  • **Fresh broccoli crowns:** Choose bright green florets that are firm and tight. Fresh broccoli holds its texture better than frozen.
  • **Sesame oil:** This is what gives the sauce its distinctive nutty flavor. Don’t substitute regular oil here.
  • **Real honey:** Provides natural sweetness and helps create that glossy sauce coating. Avoid artificial honey substitutes.
  • **Fresh ginger and garlic:** These aromatics are crucial for authentic flavor. Pre-minced versions don’t have the same impact.
  • **Sesame seeds:** Add texture and visual appeal while reinforcing the sesame flavor throughout the dish.
Honey Sesame Chicken and Broccoli

Complete Cooking Process

Broccoli Steaming: Start by filling a large pot with 2-3 inches of water and add the broccoli florets along with a teaspoon of salt. Cover and bring to a simmer, then reduce heat to low and steam for about 6 minutes until the broccoli is tender-crisp. You want it to still have some bite since it will get tossed with the hot sauce later. Drain and rinse with cold water to stop the cooking process.

Sauce Preparation: In a small bowl, whisk together the soy sauce, water, sesame oil, honey, rice vinegar, freshly grated ginger, minced garlic, cornstarch, and sesame seeds until completely smooth. The cornstarch needs to be fully dissolved or you’ll get lumps in your sauce. Set this aside until ready to use.

Chicken Coating: Cut the chicken breast into uniform 1-2 inch pieces so they cook evenly. Place them in a large plastic bag with the cornstarch, flour, salt, and pepper mixture. Seal the bag and shake vigorously until every piece is evenly coated. This light coating will create that perfect crispy exterior.

Chicken Cooking: Heat olive oil in a large skillet over medium heat until it’s shimmering but not smoking. Add the coated chicken pieces in a single layer, making sure not to overcrowd the pan. Let them cook undisturbed for 2-3 minutes until golden brown, then flip and continue cooking until all sides are golden and the chicken is cooked through with no pink in the center.

Sauce Integration: Once the chicken is perfectly browned and cooked through, reduce heat to medium-low and pour the prepared sauce over the chicken. Toss everything together and let the sauce come to a simmer. Stir constantly as the sauce thickens and becomes glossy, coating every piece of chicken beautifully.

Final Assembly: Add the steamed broccoli to the skillet with the sauced chicken and gently fold everything together until the broccoli is evenly coated with sauce. If your skillet isn’t large enough, transfer everything to a larger bowl for mixing. Sprinkle with chopped green onions and serve immediately while hot.

You Must Know

  • **Don’t overcook the broccoli** – Tender-crisp is perfect since it gets warmed through again with the sauce
  • **Let chicken brown undisturbed** – Moving it too early prevents proper browning and crispy coating
  • **Whisk sauce thoroughly** – Lumpy cornstarch creates an unappetizing texture in the final dish

My first attempt was disappointing because I kept moving the chicken around in the pan and never got that golden, crispy coating I wanted. I also overcooked the broccoli initially, so it turned mushy when mixed with the sauce. Now I let the chicken sit and brown properly, and I steam the broccoli just until tender-crisp. The texture difference is huge when you get these timing details right.

Chicken Coating Secrets

The combination of cornstarch and flour creates the perfect light coating that gets crispy but doesn’t overwhelm the chicken. The cornstarch gives crunch while the flour helps with browning. Don’t skip the seasoning in the coating – it adds flavor throughout, not just on the surface.

Broccoli Steaming Tips

Getting the broccoli texture right is crucial for the final dish. Steam it just until it’s **tender-crisp** – it should still have some bite because it will get warmed through again with the sauce. Rinsing with cold water stops the cooking process immediately.

Sauce Consistency

The sauce should thicken enough to coat the chicken and broccoli nicely but not be gloppy or too thick. If it seems too thin, let it simmer a bit longer. If too thick, add a tablespoon of water. The honey helps create that **glossy finish** that makes it look restaurant-quality.

Heat Management

Cooking the chicken over **medium heat** gives you the perfect balance of browning without burning. Too high and the coating burns before the chicken cooks through; too low and you won’t get that crispy texture. Listen for gentle sizzling – that’s your indicator.

Timing Coordination

Having the broccoli steamed and the sauce prepared before you start cooking the chicken makes the final assembly smooth and quick. Once the chicken is done, everything comes together in just a few minutes.

Perfect Serving Style

This dish is best served immediately while the sauce is still glossy and the chicken coating is crispy. Serve over steamed rice or noodles if you want to make it more substantial, or enjoy it as-is for a lighter meal.

Make-Ahead Options

You can steam the broccoli and prepare the sauce earlier in the day, but the chicken is best cooked fresh for optimal texture. Having the prep work done makes this an even quicker weeknight meal.

Creative Variations

While this combination is perfect, you can substitute other vegetables like snap peas, bell peppers, or carrots. The sauce also works great with shrimp or tofu if you want to change up the protein.

Storage and Reheating

Leftovers keep well in the refrigerator for up to three days. Reheat gently in the microwave or in a skillet over low heat. The coating won’t be quite as crispy reheated, but the flavors are still fantastic.

Honey Sesame Chicken and Broccoli

Professional Chef Secrets

  • **Room temperature chicken** – Let it sit out for 15 minutes before cooking for more even cooking
  • **Don’t crowd the pan** – Cook in batches if necessary to maintain proper browning
  • **Taste and adjust** – Add more honey for sweetness or soy sauce for saltiness to suit your preferences

This honey sesame chicken and broccoli proves that you don’t need to order takeout to get those satisfying Chinese restaurant flavors at home. The technique is straightforward, but attention to timing and texture creates results that rival any restaurant. Every time I make it, I’m reminded that the best comfort food is often the kind you make yourself with fresh ingredients and a little care.

Frequently Asked Questions

→ Can I use frozen broccoli instead of fresh? Yes! Just thaw and drain it well, then add it directly to the pan with the chicken since it’s already cooked.

→ How can I make this gluten-free? Replace the all-purpose flour with rice flour or additional cornstarch, and use tamari instead of soy sauce.

→ Can I substitute the honey? Yes! Maple syrup or brown sugar work well. For sugar-free, try monk fruit sweetener or stevia to taste.

→ What if my sauce doesn’t thicken? Make sure you mixed the cornstarch well into the sauce. If needed, simmer a bit longer or add another teaspoon of cornstarch mixed with water.

→ Can I meal prep this dish? Absolutely! Store in the fridge for up to 4 days. Reheat gently to avoid overcooking the broccoli.

Honey Sesame Chicken and Broccoli

Serves: 4 Prep Time: 15 Minutes Cooking Time: 15 Minutes 15 Minutes
Nutrition facts: 290 calories 20 grams fat
Rating: 5.0/5
( 1 voted )
Pin
Print

Ingredients

1/4 cup low sodium soy sauce
 2 tbsp water
 1 1/2 tbsp sesame oil
 3 tbsp honey
 1 tbsp rice vinegar
 1 tsp fresh ginger, finely grated
 2 cloves garlic, minced
 1 tbsp sesame seeds
 2 tsp cornstarch
 

→ Chicken and Vegetables

 1-1.5 lbs boneless skinless chicken breast, cut into 1-2 inch pieces
 2 tbsp cornstarch or arrowroot flour
 2 tbsp all-purpose flour
 1/2 tsp salt
 1/4 tsp black pepper
 2 tbsp olive oil
 6 cups broccoli florets (about 2 crowns)
 2 whole green onions, diced
 1 tsp salt for steaming broccoli

Instructions

Fill a large pot with 2-3 inches of water and add the broccoli florets with 1 teaspoon of salt. Cover and bring to a simmer, then reduce heat to low and steam for 6 minutes until the broccoli is tender-crisp. Drain in a colander and rinse with cold water to stop the cooking process - this keeps it bright green and perfectly tender.

In a small bowl, whisk together the soy sauce, water, sesame oil, honey, rice vinegar, grated ginger, minced garlic, cornstarch, and sesame seeds until smooth. This sauce is going to be absolutely delicious - the perfect balance of sweet, savory, and nutty!

Place the chicken pieces in a large plastic bag. In a small bowl, whisk together the cornstarch, flour, salt, and pepper. Add this mixture to the bag with the chicken, seal it up, and shake until every piece is evenly coated. This light coating will give you the perfect golden crust.

Heat olive oil in a large skillet over medium heat. Once the oil is shimmering, add the chicken pieces in a single layer - don't overcrowd! Let them cook undisturbed for 2-3 minutes until golden, then flip and cook until all sides are golden brown and the chicken is cooked through with no pink in the center.

Reduce heat to medium-low and pour the prepared sauce over the golden chicken. Toss to coat and let the sauce simmer until it thickens beautifully - this should take just a minute or two. The aroma will be incredible!

If your skillet is large enough, gently fold the steamed broccoli into the saucy chicken. If not, transfer everything to a large serving bowl and toss together. Sprinkle with diced green onions and serve immediately while hot. Every bite is pure comfort food perfection!

Notes

  1. For Whole30 compliance, substitute coconut aminos for soy sauce and arrowroot for cornstarch
  2. Don't overcrowd the chicken in the pan - cook in batches if needed for even browning
  3. Rinsing steamed broccoli with cold water stops the cooking and preserves the bright color
  4. The cornstarch in the sauce will thicken it to the perfect consistency


Tools You'll Need

  • Large pot with lid
  • 12-inch cast iron skillet
  • Colander strainer
  • Mixing bowls
  • Large plastic bag
  • Whisk

0 comments
0 FacebookTwitterPinterestLinkedin
  • 1
  • …
  • 6
  • 7
  • 8
  • 9
  • 10
  • 11

Search

Follow Us

facebook
twitter
instagram
pinterest

Recent Posts

  • Asparagus & Cheese Stuffed Chicken

    May 29, 2026
  • Asian Cabbage Stir Fry

    May 29, 2026
  • High Protein Broccoli Cheddar Soup

    May 29, 2026
  • Homemade Popeyes Cajun Fries

    May 28, 2026
  • Immune Boosting Vegetable Soup

    May 25, 2026
  • Creamy Crab Bisque

    May 25, 2026
  • Garlic Parmesan Pizza

    May 25, 2026

Categories

  • 30 Minute Meals (38)
  • Barbecue (2)
  • Beef Meals (11)
  • Breakfast & Pastries (15)
  • Casseroles (11)
  • Cheesesteak (2)
  • Chicken Meals (20)
  • Cultural Dishes (13)
  • Featured (8)
  • Featured Sides (5)
  • Fish Meals (6)
  • Fresh Baked Breads (2)
  • Main Dishes (7)
  • Other Meals (2)
  • Pasta (21)
  • Pizza (5)
  • Popular Recipes (9)
  • Pork Meals (8)
  • Seafood Meals (19)
  • Side Dishes (6)
  • Soups & Salads (15)
  • Turkey Meals (7)
  • Vegetarian (22)

Popular Posts

  • 1

    Creamy Tomato and Spinach Pasta

    February 15, 2026
  • 2

    Buddha Bowl with Tofu

    October 22, 2024
  • 3

    Chicken Garlic Parmesan Pasta

    February 16, 2026
  • 4

    Classic Spicy Barbecued Ribs

    October 20, 2021
  • 5

    Easy Creamy Garlic Shrimp

    February 15, 2026

About Me

At MyPhillyConnection, we specialize in recipes for Philly favorites and lots of other popular dishes and cuisines.

Phone: (215) 554-7326
Email: info@myphillyconnection.com

Useful Links

  • Beef Meals
  • Chicken Meals
  • Fish Meals
  • Recipes
  • Recipe Submission

Breakfast Recipes

  • Asparagus & Cheese Stuffed Chicken

    May 29, 2026
  • Asian Cabbage Stir Fry

    May 29, 2026

Recent Posts

  • Asparagus & Cheese Stuffed Chicken

    May 29, 2026
  • Asian Cabbage Stir Fry

    May 29, 2026
  • Facebook
  • Twitter
  • Instagram
  • Pinterest
  • Linkedin
  • Tiktok

Copyright © 2026 - MyPhillyConnection / All Rights Reserved.

Philadelphia Food Network and Recipes
  • Home
    • Main Website
  • Recipes
  • Meals
    • 30 Minute Meals
    • Beef Meals
    • Breakfast & Pastries
    • Chicken Meals
    • Fish Meals
    • Pork Meals
    • Seafood Meals
    • Turkey Meals
    • Vegan & Vegetarian Meals
    • Other Meals
  • Categories
    • Barbecue
    • Casseroles
    • Cheesesteak
    • Cultural Dishes
    • Desserts & Treats
    • Featured
    • Fresh Baked Breads
    • Grilling
    • Pasta
    • Pizza
    • Popular Recipes
    • Side Dishes
    • Soul Food
    • Soups & Salads
  • About Us
  • Contact Us
  • Submit Your Recipe
Sign In
or
Login with HostGator

Keep me signed in until I sign out

Forgot your password?

Do not have an account ? Register here

Password Recovery

A new password will be emailed to you.

Have received a new password? Login here

Register New Account

I Agree to the Terms of Service and Privacy Policy

Have an account? Login here