Philadelphia Food Network and Recipes
  • Home
    • Main Website
  • Recipes
  • Meals
    • 30 Minute Meals
    • Beef Meals
    • Breakfast & Pastries
    • Chicken Meals
    • Fish Meals
    • Pork Meals
    • Seafood Meals
    • Turkey Meals
    • Vegan & Vegetarian Meals
    • Other Meals
  • Categories
    • Barbecue
    • Casseroles
    • Cheesesteak
    • Cultural Dishes
    • Desserts & Treats
    • Featured
    • Fresh Baked Breads
    • Grilling
    • Pasta
    • Pizza
    • Popular Recipes
    • Side Dishes
    • Soul Food
    • Soups & Salads
  • About Us
  • Contact Us
  • Submit Your Recipe
Top Posts
Mexican Chicken With Cheese Sauce
Chocolate Bread
Bojangles Biscuits
Braided Cherry Danish
Strawberry Pop Tarts
Creamy Cajun Chicken Pasta
Sausage & Egg Burritos
Strawberry Cream Cheese Muffins
Blueberry Sausage Pancake Bake
School Breakfast Pizza
Philadelphia Food Network and Recipes
  • Home
    • Main Website
  • Recipes
  • Meals
    • 30 Minute Meals
    • Beef Meals
    • Breakfast & Pastries
    • Chicken Meals
    • Fish Meals
    • Pork Meals
    • Seafood Meals
    • Turkey Meals
    • Vegan & Vegetarian Meals
    • Other Meals
  • Categories
    • Barbecue
    • Casseroles
    • Cheesesteak
    • Cultural Dishes
    • Desserts & Treats
    • Featured
    • Fresh Baked Breads
    • Grilling
    • Pasta
    • Pizza
    • Popular Recipes
    • Side Dishes
    • Soul Food
    • Soups & Salads
  • About Us
  • Contact Us
  • Submit Your Recipe
Copyright 2021 - All Right Reserved
30 Minute MealsPastaSoups & Salads

Ina Garten’s Summer Pasta

by Clare Greco February 15, 2026
written by Clare Greco
Ina Garten's Summer Garden Pasta

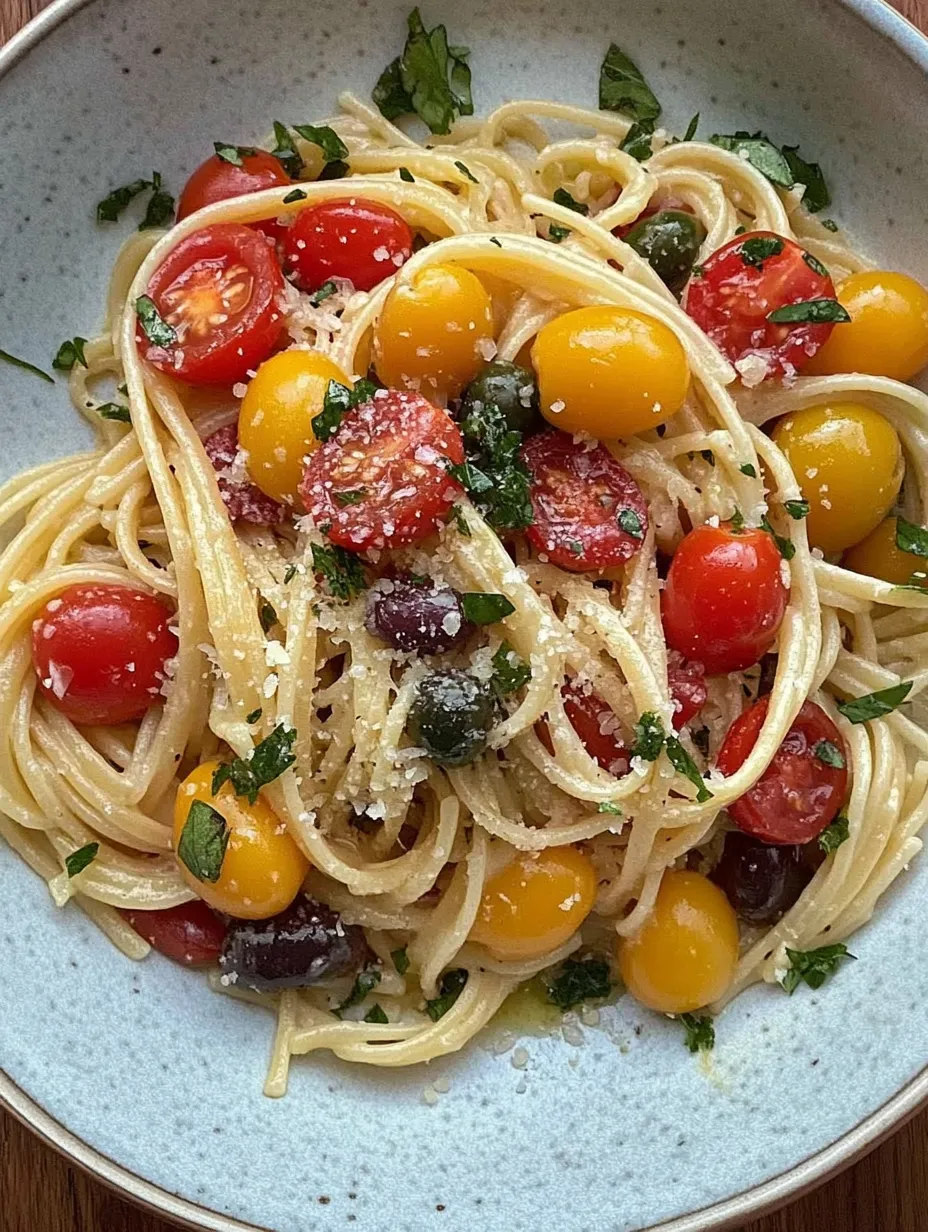
This vibrant summer garden pasta has been my go-to recipe for warm evenings when I want something light yet satisfying. Inspired by Ina Garten’s Mediterranean sensibilities, it combines the season’s best produce with bright lemon and herbs for a dish that tastes like sunshine on a plate.

Why You’ll Love This Recipe

  • Ready in just 20 minutes
  • Uses peak-season summer tomatoes and herbs
  • Versatile enough for a weeknight dinner or casual entertaining
  • Works warm or at room temperature

I first made this pasta for an impromptu garden party when friends stopped by unexpectedly. The simplicity and bright flavors had everyone asking for the recipe, and it’s now requested at every summer gathering I host.

Ingredients

  • Fusilli or penne pasta: creates the perfect nooks for capturing the flavorful sauce
  • Cherry tomatoes: bring sweet juicy bursts in every bite, choose the ripest ones available
  • Kalamata olives: add briny depth that balances the acidity, look for unpitted ones for best flavor
  • Red onion: provides a gentle bite that mellows when mixed with the warm pasta
  • Fresh garlic: is essential for aromatic foundation, use locally grown if possible
  • Lemon zest and juice: brighten the entire dish, always use fresh never bottled
  • Fresh basil and parsley: are non-negotiable, they provide the herbaceous heart of this dish
  • Parmesan cheese: adds the perfect umami finish, use Parmigiano-Reggiano for best results

Step-by-Step Instructions

Pasta Perfection: Cook your pasta in heavily salted water until just al dente, about 9 minutes for fusilli. Reserve half a cup of the starchy cooking water before draining; this is your secret ingredient for silky sauce texture. The pasta should have slight resistance when bitten as it will continue to absorb flavors.

Aromatic Base: Gently warm the olive oil in a large skillet over medium heat. Add the minced garlic and cook for just one minute until fragrant but not browned. Browning garlic creates bitterness that can overwhelm the fresh flavors. This garlic-infused oil becomes the foundation of your sauce.

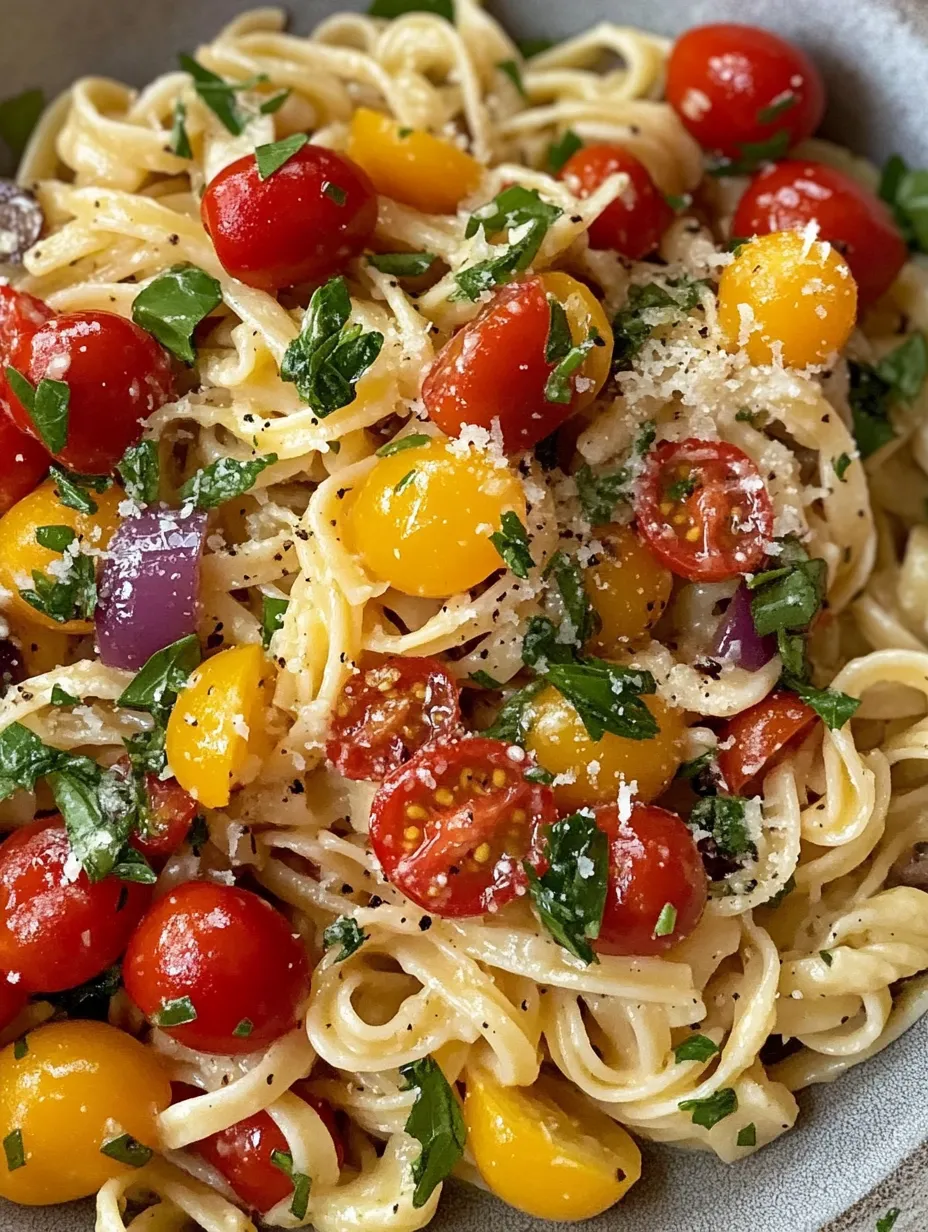
Assembly Magic: In a large serving bowl combine the warm pasta with the garlic oil, ensuring every strand is glossy and coated. Add the halved cherry tomatoes, olives, sliced red onion, lemon zest and juice while the pasta is still warm. The residual heat will slightly soften the vegetables and release their flavors without fully cooking them.

Herbal Finish: Gently fold in the fresh chopped basil and parsley along with salt and freshly ground pepper. If the pasta seems dry, add splashes of the reserved pasta water until you reach your desired consistency. The starch in this water helps create a light cohesive sauce that clings to the pasta.

Ina Garten's Summer Garden Pasta

You Must Know

  • Customizable with any seasonal vegetables you have on hand
  • Perfect make-ahead dish that actually improves after sitting for a few hours
  • Excellent for lunch boxes as it tastes great at room temperature

The cherry tomatoes truly make this dish special. I grow several varieties in my garden each summer specifically for this pasta. There’s something magical about harvesting them still warm from the sun and adding them straight to the bowl, knowing their sweet juices will create the perfect light sauce.

Mediterranean Magic

This pasta embodies the essence of Mediterranean cooking, relying on high-quality simple ingredients rather than complicated techniques. The combination of olive oil, garlic, lemon and herbs creates what Italian cooks call an “aglio e olio” base that has been perfected over centuries. When you make this dish, you’re participating in a culinary tradition that celebrates seasonal abundance and minimal intervention.

Ina Garten's Summer Garden Pasta

Storage Solutions

This pasta actually improves with time as the flavors meld together, making it perfect for meal prep. Store leftovers in an airtight container in the refrigerator for up to three days. The pasta will absorb more of the dressing as it sits, so you might want to add a drizzle of olive oil and a squeeze of fresh lemon juice when serving leftovers. I often make a double batch specifically to have convenient lunches throughout the week.

Sensational Substitutions

While the original recipe is perfect as is, you can easily adapt it to what you have on hand. No fusilli? Any short pasta with ridges or curves works beautifully. Sun-dried tomatoes can replace fresh ones in winter months, though you’ll want to reduce the quantity and chop them finely. For a protein boost, add cannellini beans or chunks of fresh mozzarella. Vegans can skip the Parmesan or replace it with nutritional yeast for a similar umami quality.

Serving Suggestions

This versatile pasta shines as both a main dish and a sensational side. For a complete meal, serve alongside grilled fish or chicken brushed with the same lemon and herb flavors. It makes an exceptional contribution to potlucks and picnics since it doesn’t require reheating. I love setting it out family-style on a large platter garnished with extra fresh herbs, whole lemon slices and additional Parmesan for guests to help themselves.

Pro Tips

  • Slightly undercook the pasta as it will continue to absorb liquid from the sauce after mixing
  • Make extra of the garlic oil and store it in the refrigerator for up to a week to elevate other dishes
  • For maximum flavor toss the hot pasta with lemon zest first allowing the heat to release essential oils

Frequently Asked Questions

→ Can I use a different type of pasta?

Yes, you can use any pasta shape you prefer, such as spaghetti or rigatoni. Just adjust cooking times as needed.

→ How can I make this dish vegan?

To make it vegan, omit the Parmesan cheese or substitute it with a vegan cheese alternative. Ensure your pasta is egg-free as well.

→ What other vegetables can I include?

You can add vegetables like zucchini, bell peppers, or spinach to make the dish even more vibrant and nutritious.→ How far in advance can I prepare this?

You can prepare the dish a few hours in advance and serve it at room temperature. For best texture, add fresh herbs right before serving.

→ What can I use instead of Kalamata olives?

If you don’t have Kalamata olives, try using green olives, black olives, or capers for a similar tangy flavor.

Ina Garten’s Summer Pasta

Serves: 4 Prep Time: 10 Minutes Cooking Time: 15 Minutes 15 Minutes
Nutrition facts: 100 calories 10 grams fat
Rating: 5.0/5
( 1 voted )
Pin
Print

Ingredients

 1 lb fusilli or penne pasta
 1/4 cup olive oil
 3 cups cherry tomatoes, halved
 1 cup Kalamata olives, pitted and halved
 1/2 red onion, thinly sliced
 2 cloves garlic, minced
 1 tbsp lemon zest
 1/4 cup lemon juice
 1 cup fresh basil, chopped
 1/2 cup fresh parsley, chopped
 1 tsp salt
 1/2 tsp black pepper
 1/2 cup grated Parmesan cheese

Instructions

Cook the pasta until al dente according to the package instructions. Reserve 1/2 cup of the cooking water, then drain the pasta.

Heat olive oil in a pan. Sauté minced garlic for 1 minute until fragrant.

In a large bowl, toss the cooked pasta with the garlic oil, cherry tomatoes, Kalamata olives, red onion, lemon zest, and lemon juice.

Mix in fresh basil, parsley, salt, pepper, and reserved pasta water as needed to loosen the mixture.

Sprinkle the pasta with grated Parmesan cheese and serve warm or at room temperature.

Notes

  • Large saucepan
  • Sharp knife
  • Cutting board
  • Large mixing bowl
  • Wooden spoon or tongs
  • Grater

0 comments
0 FacebookTwitterPinterestPocketEmail
30 Minute MealsChicken MealsCultural DishesFeaturedPopular Recipes

Crispy Cheesy Chicken Alfredo Calzones

by myphillyconnection February 15, 2026
written by myphillyconnection
Crispy Cheesy Chicken Alfredo Calzones

these chicken Alfredo calzones have seriously saved my sanity on busy weeknights! I stumbled on this recipe last year when I needed something fast that wouldn’t make my kitchen look like a tornado hit it. The first time I made them, my 15 year old son actually put down his phone and asked for seconds which basically never happens. There’s something magical about that contrast between the crunchy outside and the gooey, cheesy chicken inside that makes these impossible to resist. Plus, they only take about 20 minutes from start to finish in the air fryer, which feels like some kind of miracle on hectic weeknights.

Recipe Highlights

  • No wait time unlike traditional calzones that take forever to bake in the oven
  • Somehow fancy yet simple so they work for both regular Tuesday dinners and when friends drop by unexpectedly
  • Perfectly portable for those nights when everyone’s eating at different times between activities
  • Weirdly impressive to guests who think you spent hours in the kitchen (I never correct them)

Last month my sister visited with her picky 10 year old who normally survives on plain pasta and chicken nuggets. I was totally out of ideas until I remembered these calzones. I let her help assemble them just folding the dough over and crimping the edges and miracle of miracles, she not only ate an entire calzone but asked if we could make them again tomorrow. My sister texted me three times last week for the recipe because apparently that’s all her daughter will eat now. Sorry not sorry!

Ingredients

  • Store bought pizza dough: saves ridiculous amounts of time and actually works better than homemade for this recipe. The Pillsbury refrigerated kind in the tube works shockingly well, but the kind from the grocery store deli counter gives a more authentic chew.
  • Rotisserie chicken: might seem like cheating but it’s absolutely the smart move here. The slightly seasoned meat from the deli department adds depth without extra work, and the texture stays perfect in the filling.
  • Jarred Alfredo sauce: is my weeknight sanity saver. I accidentally discovered Classico brand tastes nearly identical to my grandmother’s recipe that takes forever to make. The jar in my fridge has saved countless dinners.
  • Three cheese combo: is non negotiable in my kitchen. I’ve tried simplifying to just mozzarella but the ricotta adds this amazing creaminess and the parmesan brings that savory punch that makes these taste restaurant quality.
  • Italian seasoning: from my embarrassingly ancient spice cabinet somehow pulls everything together. I know I should probably make my own blend, but honestly, the dusty McCormick bottle from who knows when works perfectly.

I used to feel slightly guilty about using pre made components until my cousin who actually went to culinary school confessed she uses jarred Alfredo for family meals too. Now I just embrace the shortcuts because nobody has ever complained about these calzones, and I’ve served them to some pretty food snobby friends who keep asking for the recipe like it’s complicated!

Crispy Cheesy Chicken Alfredo Calzones

Step-by-Step Instructions

Throw It All Together: Grab a big bowl and mix your shredded rotisserie chicken with the Alfredo sauce. Dump in all three cheeses, sprinkle the garlic powder and Italian seasoning, add a pinch of salt and pepper, then stir until everything’s combined. Sometimes I don’t even measure anymore and just eyeball it based on how many people I’m feeding.

Dough Wrangling: Pop open that tube of pizza dough the sound still makes me jump every time or unroll your deli dough on a floured counter. Cut it into four pieces and roll or stretch each one into roughly circle ish shapes. Don’t stress if they look more like amoebas than perfect circles.

Stuff Those Babies: Scoop generous piles of filling onto half of each dough circle. I usually eyeball about a heaping 1/3 cup per calzone but honestly just go with what feels right. Leave about half an inch around the edges so you can seal them properly.

Fold and Crimp: Fold the empty side of dough over your filling to make a half moon shape. Press the edges together with a fork to seal everything in. This part is weirdly satisfying, especially after a frustrating day at work.

Make Them Shine: Brush or rub some olive oil all over the outside. Don’t skip this part! It’s what gives them that gorgeous golden color and crispy texture. Poke a couple small holes in the top with a fork so they don’t explode in the air fryer.

The first time I made these, I baked them in the oven which took forever and made my kitchen feel like a sauna. Then my neighbor loaned me her air fryer during our block party after a couple glasses of wine I was complaining about my oven heating up the house, and I’ve never looked back. The air fryer makes the outside perfectly crispy while keeping the inside molten and delicious in less than half the time.

You Must Know

  • Don’t overstuff them or you’ll have a cheese volcano eruption in your air fryer that will make you want to cry during cleanup
  • Let them rest a few minutes before biting in unless you enjoy burning the roof of your mouth learned this the hard way
  • Work in batches if you’re feeding more than 2 3 people since overcrowding the air fryer just leads to sad, soggy spots

My kids have turned these calzones into our unofficial Friday tradition. My daughter even started inviting friends over specifically on calzone nights, which I pretend to be annoyed about but secretly love. Last weekend she had three teammates over after soccer practice, and they demolished eight calzones in what felt like seconds. One of the moms texted asking what restaurant I’d ordered from, which might be the best cooking compliment I’ve ever received.

Delightful Pairings

These golden pockets don’t really need anything else, but I usually throw together a quick side salad just so I can pretend we’re being somewhat nutritionally balanced. Just some mixed greens with whatever veggies are left in the produce drawer and a drizzle of balsamic vinaigrette. When I’m feeling extra, I’ll warm up some extra Alfredo sauce in a little bowl for dipping, which my husband thinks is completely unnecessary but does anyway.

For casual get togethers, I make mini versions using biscuit dough instead of pizza dough and serve them with marinara and pesto dipping sauces. They disappear embarrassingly fast, and people always think they took way more effort than they actually did. My sister in law still believes they’re some old family recipe I slave over, and I’ve never bothered correcting her.

Tasty Adaptations

Over time I’ve created so many variations of these that my family now requests them by name. The Dad special has spicy Italian sausage instead of chicken because my husband adds hot sauce to literally everything. My son’s basketball team goes crazy for the buffalo chicken version where I toss the shredded chicken in buffalo sauce before mixing with just a bit of ranch and blue cheese instead of Alfredo.

My personal favorite twist happened by accident when I was cleaning out the fridge and threw in some sun dried tomatoes, spinach, and feta with the chicken and a bit less Alfredo sauce. It turned into this Mediterranean inspired situation that I now make intentionally whenever I’m craving something slightly less indulgent but still satisfying.

Leftover Solutions

In the rare event you actually have leftovers, they keep surprisingly well in the fridge for a couple days. Just wrap them in foil and reheat in the air fryer for about 3 minutes at 350°F. The microwave works in a pinch but makes the crust kind of sad and chewy instead of crisp.

I’ve started making double batches and freezing the assembled but uncooked calzones individually wrapped in plastic wrap then aluminum foil. On particularly chaotic evenings, I just unwrap and pop them straight from freezer to air fryer, adding about 5 extra minutes to the cooking time. This discovery literally saved my sanity during basketball season when we had practices four nights a week and everyone was starving the second we walked in the door.

Chicken Alfredo Air Fryer Calzones

Kitchen Wisdom

  • Cold cheese is the enemy of smooth filling so let everything come to room temperature if you have time
  • Light hands make tender dough so don’t manhandle it too much when rolling or your calzones will be tough
  • Always make more than you think you’ll need because these things disappear faster than Halloween candy

I never imagined a simple weeknight dinner hack would become my signature dish, but these calzones have followed me to potlucks, team dinners, and even a neighborhood cookbook. They’ve earned me a reputation as someone who has their culinary life together, which couldn’t be further from the truth! But I’ll take the compliments while silently thanking my air fryer, rotisserie chicken, and pre made pizza dough for doing all the heavy lifting. Sometimes the best recipes aren’t about culinary skill but finding that perfect combination of shortcuts that somehow creates something greater than the sum of its parts.

Frequently Asked Questions

→ Can I make these calzones in a regular oven ?Yes! Bake at 425°F for 12-15 minutes until golden brown. The texture might be slightly different than air fried.

→ What can I use instead of store-bought dough? Homemade pizza dough works great. You can also try crescent roll dough or puff pastry for different textures.

→ Can I make these ahead of time? You can prepare the filling a day ahead. For best results, assemble and cook just before serving for maximum crispiness.

→ What sides go well with these calzones? A simple green salad, roasted vegetables, or garlic knots complement these calzones perfectly.

→ How do I store and reheat leftovers? Store in the fridge for up to 3 days. Reheat in the air fryer at 350°F for 3-4 minutes to restore crispiness.

Crispy Cheesy Chicken Alfredo Calzones

Serves: 4 Prep Time: 10 Minutes Cooking Time: 10 Minutes 10 Minutes
Nutrition facts: 100 calories 15 grams fat
Rating: 5.0/5
( 1 voted )
Pin
Print

Ingredients

1 pound shredded cooked chicken breast
 1/2 cup Alfredo sauce
 1 cup shredded mozzarella cheese
 1/2 cup ricotta cheese
 1/4 cup grated Parmesan cheese
 1/2 teaspoon garlic powder
 1/2 teaspoon Italian seasoning
 Salt and pepper to taste
 

→ For the Calzones

 2 store-bought pizza dough rounds
 1 tablespoon olive oil, for brushing
 

→ For Serving

 Extra Alfredo sauce for dipping

Instructions

Heat your air fryer to 375°F (190°C) for about 3 minutes.

In a large bowl, combine the shredded chicken, Alfredo sauce, mozzarella, ricotta, Parmesan, garlic powder, and Italian seasoning. Season with salt and pepper to taste, then mix everything until well combined.

Roll out each pizza dough round and cut each into 2 equal pieces so you have 4 pieces total.

Place a generous scoop of chicken mixture onto one half of each dough piece, leaving about 1/2 inch border around the edges. Fold the empty half over the filling to create a half-moon shape. Press and crimp the edges firmly with a fork to seal.

Lightly brush the tops of each calzone with olive oil. This will help them get that gorgeous golden color.

Place calzones in the air fryer basket, making sure they don't overlap (you'll likely need to cook in batches). Cook for 8-10 minutes until the crust is golden brown and crispy.

Let the calzones cool for a few minutes before serving. Serve with extra Alfredo sauce on the side for dipping.

Notes

  1. These calzones use pre-cooked chicken, so make sure your chicken is fully cooked before adding to the filling.
  2. Store-bought rotisserie chicken works great as a time-saver for this recipe.
  3. You can make your own Alfredo sauce or use jarred sauce from the store.


Tools You'll Need

  • Air fryer
  • Mixing bowl
  • Fork (for crimping edges)
  • Pastry brush (for olive oil)
0 comments
0 FacebookTwitterPinterestPocketEmail
Beef Meals

Texas Toast Sloppy Joes

by myphillyconnection February 15, 2026
written by myphillyconnection
Texas Toast Sloppy Joes

When you need a dinner that’ll satisfy your hungriest eaters but don’t want to spend hours in the kitchen, these Texas Toast Sloppy Joes are your new best friend. I stumbled on this combo one night when I was out of hamburger buns but had Texas toast in the freezer. That happy accident turned into one of our family’s most requested meals – seriously, my teenage son asks for these at least twice a month.

Why You’ll Love This Recipe

  • Combines two comfort foods into one messy, delicious meal
  • Takes just 25 minutes from start to finish
  • Uses simple ingredients you probably already have
  • Creates that perfect combo of savory meat and garlic bread that’s impossible to resist

Last summer I made these for my brother’s family when they visited. My picky eater niece who “doesn’t eat red meat” had three helpings and then asked her mom why they never make these at home. Sometimes the simplest recipes get the biggest reactions!

Bridgerton’s Adjoa & Golda on their friendship

Simple Ingredients

  • Ground Beef: The foundation that soaks up all those saucy flavors—80/20 gives good flavor without excessive grease
  • Diced Tomatoes: Adds texture and brightness to balance the richness—don’t drain them, that juice adds moisture
  • BBQ Sauce: Brings that sweet smoky element that elevates these beyond basic sloppy joes—use your favorite brand
  • Garlic Texas Toast: The game changing base that puts these over the top—that buttery garlic flavor is unbeatable
  • Cheddar Cheese: Creates that melty, gooey finish that makes everything better—sharp or medium both work great

I discovered the magic of adding barbecue sauce to sloppy joes when I was running low on ketchup one night. That combination of tangy ketchup and smoky BBQ sauce created something that tasted like it had simmered for hours. Sometimes kitchen shortages lead to the best cooking discoveries!

Texas Toast Sloppy Joes

Step-by-Step Instructions

Proper Beef Browning: Take your time with the ground beef to develop flavor. Breaking it into small, even crumbles as it cooks creates better texture in the final dish. Draining the excess fat is crucial—skip this step and you’ll end up with greasy sloppy joes that make the Texas toast soggy.

Sauce Magic: The combination of diced tomatoes, ketchup, and BBQ sauce creates layers of flavor without any complicated ingredients. The Worcestershire adds that umami depth that makes people wonder what your secret ingredient is. That touch of sugar balances the acidity from the tomatoes and ketchup perfectly.

Simmer Time: Those 10 minutes of covered simmering aren’t just about heating everything through—they allow the flavors to meld and the sauce to thicken slightly. Resist the urge to rush this step, as it makes a noticeable difference in the final flavor. The sauce should be thick enough to mound on the toast without being runny.

Toast Technique: Follow the package directions for the Texas toast carefully—each brand can vary slightly. The goal is golden, crispy edges with a still soft interior that can stand up to the hearty topping. Some brands call for flipping halfway through baking, which helps achieve even browning on both sides.

Assembly Strategy: Spoon the sloppy joe mixture onto the toast immediately after it comes out of the oven. The warm bread slightly softens under the hot filling, creating that perfect texture contrast. Don’t skimp on the cheese—it not only adds flavor but helps hold the meat mixture in place when eating.

Melty Finish: If you want that restaurant style melted cheese effect, pop the assembled Texas Toast sloppy joes under the broiler for 1 2 minutes. Keep a close eye on them—the difference between perfectly melted cheese and burnt toast happens in seconds!

You Must Know

  • Don’t oversimmer the meat mixture or it will get too dry
  • The Texas toast needs to be cooked until golden for structural integrity
  • These are meant to be eaten with a knife and fork—embrace the mess

My first attempt at these was tasty but structurally unsound because I didn’t cook the Texas toast long enough. It collapsed under the weight of the sloppy joe mixture, creating a delicious but impossible to eat dinner. Now I make sure the toast has those crispy edges that provide necessary support.

Serving Suggestions

These hearty sloppy joes need simple sides that won’t compete for attention. A basic green salad adds freshness to balance the richness. Pickle spears provide that tangy contrast that cuts through the savory flavors. For casual gatherings, a bowl of potato chips offers satisfying crunch alongside these messy sandwiches. Cold beer for adults or chocolate milk for kids completes this classic comfort meal.

Creative Variations

Transform this basic recipe with simple switches that create new flavor experiences. Try ground turkey for a lighter version, adjusting seasonings accordingly. Add sautéed bell peppers and onions to the meat mixture for extra vegetables and texture. Spice lovers might appreciate a few dashes of hot sauce or diced jalapeños mixed in. For a twist, use pepper jack cheese instead of cheddar for a slight kick.

Quick Leftover Magic

If you have leftover sloppy joe mixture but no more Texas toast, it’s incredibly versatile. Use it to top baked potatoes for a quick dinner the next day. Wrap it in tortillas with additional cheese for sloppy joe quesadillas. Mix it with cooked pasta and more cheese for a skillet pasta bake. The mixture keeps well in the refrigerator for up to three days in an airtight container.

Texas Toast Sloppy Joes

Sloppy Joe Wisdom

  • Time Saving Tip: The meat mixture can be made ahead and reheated when ready to serve
  • Texture Trick: For thicker sloppy joes, simmer uncovered for the last few minutes
  • Flavor Boost: A tablespoon of yellow mustard adds tanginess that balances the sweet elements

I’ve been making some version of these texas toast sloppy joes for almost five years now, gradually refining the sauce proportions and cooking technique. What started as a desperate pantry meal has become one of our family’s most requested dinners—proof that sometimes the most straightforward recipes become the ones that create the strongest food memories. There’s something deeply satisfying about watching my family devour a meal that took minimal effort but delivers maximum enjoyment.

Frequently Asked Questions

→ Can I use ground turkey instead of beef? Yes! Ground turkey works great as a leaner option. You might want to add a little oil when cooking since turkey has less fat than beef.

→ How do I store leftovers? Store the meat mixture separately from the Texas toast. Refrigerate in covered containers for up to 3 days. Reheat the meat in a microwave and toast fresh bread for best results.

→ Can I make this ahead of time? The meat mixture can be made 1-2 days ahead and stored in the fridge. Just reheat on the stove and prepare fresh Texas toast when ready to serve.

→ What sides go well with Texas Toast Sloppy Joes? Try potato chips, french fries, coleslaw, or a simple green salad. Pickles on the side are also a classic addition that adds a nice tang.

→ Can I freeze the sloppy joe mixture? Yes! The meat mixture freezes well for up to 3 months. Thaw overnight in the fridge before reheating on the stove. Make fresh Texas toast when ready to serve.

→ Is there a vegetarian version? You can substitute the ground beef with plant-based ground meat alternatives, lentils, or crumbled tempeh for a vegetarian option.

Texas Toast Sloppy Joes

Serves: 6 Prep Time: 5 Minutes Cooking Time: 20 Minutes 20 Minutes
Nutrition facts: 215 calories 30 grams fat
Rating: 5.0/5
( 1 voted )
Pin
Print

Ingredients

 1 pound lean ground beef
 1 can (14.5 oz) diced tomatoes
 1 cup ketchup
 ½ cup your favorite BBQ sauce
 1 tablespoon Worcestershire sauce
 2 tablespoons granulated sugar
 

→ For Serving

 1 box (8 slices) frozen garlic Texas toast
 1 cup shredded sharp cheddar cheese (add more if you're a cheese lover!)

Instructions

Heat up a large skillet over medium-high heat. Add the ground beef and cook until nicely browned, breaking it up with a wooden spoon as it cooks. Drain off any excess grease when done.

Return the cooked beef to the skillet. Pour in the diced tomatoes (juice and all), ketchup, BBQ sauce, Worcestershire sauce, and sugar. Stir everything together until well combined. Cover the skillet and let it simmer on medium heat for about 10 minutes, letting all those flavors meld together.

While your sloppy joe mixture is simmering away, bake the frozen garlic Texas toast according to the package directions until golden and crispy.

Place your crispy Texas toast pieces on plates. Generously spoon the hot sloppy joe mixture over each piece of toast, then sprinkle with plenty of shredded cheddar cheese. For extra melty goodness, you can pop these under the broiler for a minute or two until the cheese gets bubbly and slightly browned.

Notes

  1. These hearty sloppy joes combine the classic BBQ-flavored beef with the buttery crunch of Texas toast for an easy weeknight dinner that's ready in under 30 minutes.
  2. This recipe is kid-friendly and perfect for busy weeknights when you need something quick but satisfying.
  3. Try using pepper jack cheese instead of cheddar for a spicy kick!


Tools You'll Need

  • Large skillet or frying pan
  • Baking sheet (for the Texas toast)
  • Wooden spoon or spatula
0 comments
0 FacebookTwitterPinterestPocketEmail
CasserolesPastaPizza

Pizza-Pasta-Bake

by myphillyconnection February 15, 2026
written by myphillyconnection
Pizza Pasta Bake

I threw this together on a Tuesday night last fall when I had exactly zero energy for cooking but three hungry kids staring at me. The fridge was practically empty except for some cheese and half a package of pepperoni left from weekend pizza, and the pantry had the usual pasta and sauce. What started as desperate pantry diving has somehow become the meal my family requests most often. There’s something about that combination of crispy pepperoni edges and gooey cheese over pasta that hits differently than regular spaghetti night.

Why You’ll Love This Recipe

  • Takes about 10 minutes of actual work (the oven does the rest while you collapse on the couch)
  • Uses stuff you probably already have sitting in your kitchen
  • Makes everyone happy without creating a sink full of dishes

Last month my sister stopped by unannounced right as this was coming out of the oven. She claimed she was “just in the neighborhood” but somehow had perfect timing for dinner. After one bite, she actually took a picture of her plate and texted her husband that she was bringing this to their potluck that weekend. When someone who typically makes everything from scratch wants your four ingredient recipe, you know you’ve stumbled onto something good.

Ingredients

Penne holds up perfectly in the oven without turning to mush like thinner pasta shapes would. Those little ridges grab onto sauce in all the right ways.

Jarred marinara is my weeknight secret weapon. I usually grab Rao’s when it’s on sale or Classico in a pinch – nothing fancy, but definitely not the cheapest stuff either.

Pepperoni does double duty here – some gets mixed throughout for flavor while the top layer gets that perfect crispy edge during the final broil that makes it taste like actual pizza.

Mozzarella needs to cover everything completely. I’ve tried getting fancy with cheese blends, but honest to god, the standard pre shredded mozzarella bag works perfectly here.

Pizza Pasta Bake

Step-by-Step Instructions

Undercooking pasta slightly was something I learned the hard way. My first attempt followed package directions exactly, and everything turned to mush in the oven. Taking off those two minutes makes all the difference in the final texture. Mixing in the pot you cooked the pasta it seems like a small thing, but on nights when I’m making this, I’m usually too tired to wash an extra bowl. Every dish saved is a victory. Layering matters more than you’d think. I mixed everything together in one big mess. It tasted fine but looked awful. Keeping the pepperoni on top creates that pizza like appearance that makes everyone excited about dinner. Watching the broiler like a hawk is non-negotiable. I’ve ruined more than one dinner by walking away “just for a second” during broiling. The line between perfectly browned and completely charred is about 47 seconds. Letting it rest after baking gives the cheese time to set slightly so you don’t end up with molten lava burns in your mouth. Five minutes feels like forever when you’re hungry, but it’s worth the wait.

You Should Know

  • Different pasta shapes need different cook times – stick with penne or ziti if you’re not sure
  • The pasta will keep absorbing sauce while it bakes, so it might look a little too saucy when you first mix it
  • A metal baking dish creates better browning than glass, but either works fine

My biggest kitchen fail with this recipe happened when I tried to be “healthy” and use whole wheat pasta. My kids still bring it up as the night Mom ruined pizza pasta. Regular pasta just works better here – save the whole grain stuff for another dish. Another lesson learned: cheap marinara makes a huge difference in the final taste. It doesn’t need to be expensive, but those super bargain jars that are basically tomato water will leave you with sad, bland results.

Serving Ideas

Simple sides work best with something this hearty. I usually throw together a basic green salad while the pasta bakes – just pre washed greens with whatever veggies are in the crisper drawer and some bottled Italian dressing.

Garlic bread feels like overkill with pasta, but my kids disagree completely. Sometimes I’ll split a French bread loaf, spread it with butter mixed with garlic powder, and stick it in the oven for the last few minutes of baking.

For grown up dinners, a glass of cheap red wine makes this feel somehow fancy despite being essentially kid food. I’m not above that.

Change It Up

Supreme pizza version works beautifully with a handful of diced bell peppers, onions, and olives stirred in with the pasta. Just make sure they’re cut small enough to cook in the time the casserole bakes.

Italian sausage makes this even heartier when you brown about half a pound before adding it to the pasta mixture. My husband prefers this version, but it does dirty another pan.

White pizza spin uses alfredo instead of marinara and adds some spinach for color. It’s completely different but equally easy and satisfying when you need a change.

Buffalo chicken adaptation happens when I swap the pepperoni for diced rotisserie chicken tossed with buffalo sauce. Add some blue cheese crumbles if you’re feeling fancy.

Keep It Fresh

Leftovers actually taste better the next day once all the flavors have had time to get friendly. Just cover and refrigerate, then microwave individual portions for about two minutes.

Freezing works surprisingly well if you want to make a double batch. I portion single servings in those disposable foil containers, cover with foil, and freeze. They reheat from frozen at 375°F for about 30 minutes.

Meal prep potential makes this perfect for busy weeks. You can assemble everything up to the baking step, cover and refrigerate, then just add an extra 10 minutes to the baking time when you’re ready to cook it.

Pizza Pasta Bake

Real Talk

This is never going to win any gourmet cooking awards, but that’s not why I make it. It’s the dish that saves dinner when I can barely function but still need to feed people. The one that everyone eats without complaints. The recipe my kids will probably make in their first apartments someday because it reminds them of home.

Sometimes the best family favorites are born from desperation cooking rather than careful planning. This pizza pasta bake has gotten me through countless sports nights, homework meltdowns, and workday disasters. It might just save your dinner too.

Frequently Asked Questions

→ Can I use a different type of pasta? Yes! While penne works great for holding sauce, you can substitute rotini, ziti, farfalle, or any medium pasta shape you have on hand.

→ How do I store leftovers? Store leftovers in an airtight container in the refrigerator for up to 3 days. Reheat in the microwave or covered in the oven at 350°F until heated through.

→ Can I make this ahead of time? Absolutely! Assemble the casserole up to a day ahead, cover and refrigerate. When ready to bake, add an extra 10-15 minutes to the cooking time.

→ What can I add to this basic recipe? Try adding Italian sausage, mushrooms, bell peppers, onions, olives, or your favorite pizza toppings. You can also mix in some Italian seasoning or red pepper flakes for extra flavor.

→ Is there a way to make this vegetarian? Simply omit the pepperoni and add vegetable toppings like mushrooms, bell peppers, and olives. You could also use plant-based pepperoni alternatives.

Pizza-Pasta-Bake

Serves: 8 Prep Time: 10 Minutes Cooking Time: 40 Minutes 40 Minutes
Nutrition facts: 405 calories 75 grams fat
Rating: 5.0/5
( 1 voted )
Pin
Print

Ingredients

1 pound penne pasta, uncooked
 3 cups marinara sauce (24 oz jar)
 10 ounces pepperoni slices
 2 cups mozzarella cheese, shredded

Instructions

Preheat your oven to 375°F. Move the rack to the top third of the oven for best browning results.

Bring a large pot of water to a boil and add salt. Cook the penne for 2 minutes less than the package directions suggest (it will continue cooking in the oven). Drain when done.

Return the drained pasta to the pot. Add the marinara sauce and about 1/3 of the pepperoni slices. Stir everything together until the pasta is evenly coated.

Transfer the pasta mixture to a 9x13 inch baking dish, spreading it out in an even layer. Sprinkle the shredded mozzarella evenly over the top, then arrange the remaining pepperoni slices over the cheese.

Bake uncovered for 20 minutes until the cheese is melted and bubbly. Then switch to broil for 2-3 minutes to crisp up the pepperoni and cheese. Watch carefully to prevent burning!

Notes

  1. This recipe serves 6-8 people, perfect for family dinners.
  2. For a saucier dish, add an extra 1/2 to 1 cup of marinara sauce.
  3. Pepperoni comes in various package sizes, so you might need more than one package to get 10 ounces. A little less or more is fine.


Tools You'll Need

  • 9x13 inch baking dish
  • Large pot for boiling pasta
  • Colander
0 comments
0 FacebookTwitterPinterestPocketEmail
Beef MealsCasseroles

Bacon Cheeseburger Grilled Cheese Casserole

by myphillyconnection February 15, 2026
written by myphillyconnection
Bacon Cheeseburger Grilled Cheese Casserole

This bacon cheeseburger grilled cheese casserole started as a desperate attempt to feed my family something they’d all actually eat without complaints. I was staring at ground beef, a loaf of bread, and some cheese, trying to figure out how to make dinner happen when my youngest piped up asking for grilled cheese. That’s when it hit me – why not make a giant grilled cheese sandwich with all the good burger stuff inside? The result was this amazing layered casserole that tastes like the best grilled cheese and cheeseburger had a delicious baby together.

Why You’ll Love This

  • Pure comfort food magic – Gets that crispy, buttery grilled cheese exterior with all the hearty satisfaction of a cheeseburger
  • Feeds everyone easily – One pan makes enough for the whole family plus leftovers for tomorrow’s lunch
  • Picky eater approved – My kids who usually pick apart everything ate this without a single complaint
  • Minimal cleanup required – Everything bakes in one dish, so you’re not washing a million pans afterward

The first time I pulled this out of the oven, my husband walked into the kitchen and asked what smelled so incredible. When I cut into it and he saw all those golden, crispy layers with melted cheese oozing out, he just stood there grinning. My daughter, who’s going through her “I don’t like anything” phase, actually asked for seconds. That’s when I knew I’d stumbled onto something special.

What You’ll Need

  • Lean ground beef: Go with 85/15 or 90/10 so you don’t end up with a greasy mess. The extra fat just makes everything soggy.
  • Real bacon bits: Don’t cheap out with the fake stuff. Real bacon bits give you that smoky crunch that makes all the difference.
  • Yellow onion: Adds sweetness and helps everything taste more like an actual burger. Chop it small so it cooks evenly.
  • Cheese blend: Mozzarella melts like a dream while cheddar brings the flavor. Together they’re perfect.
  • Regular sandwich bread: Nothing fancy needed here. Just good old white or wheat bread that can handle being buttered and baked.
  • Butter or margarine: This is what creates that golden, crispy grilled cheese magic on top and bottom.
Bacon Cheeseburger Grilled Cheese Casserole

How to Make It

Getting the Beef Ready: Heat up a big skillet over medium-high heat and toss in a little butter. Add your ground beef and start breaking it up with a wooden spoon while it cooks. You want small, even pieces that’ll spread nicely in the casserole. Keep stirring and breaking it up until there’s no pink left and everything’s nicely browned.

Dealing with the Grease: Once your beef is cooked through, you need to get rid of most of that grease or your casserole will be a soggy disaster. Carefully tilt the pan and spoon out the excess fat. Leave just a tiny bit for flavor, but don’t go overboard here.

Adding the Onions: Throw your diced onions right into the pan with the cooked beef and give everything a good stir. Let them cook for about 3-4 minutes, stirring now and then, until they start getting soft and see-through. They don’t need to be completely cooked since they’ll keep going in the oven.

Making It Taste Like a Burger: Take the pan off the heat and stir in your bacon bits, mayo, ketchup, mustard, salt, pepper, and onion powder. Mix everything really well so all the meat gets coated with the sauce. It should smell and taste like the inside of a really good cheeseburger.

Prepping the Bread: Take six slices of bread and spread them with about half your butter, then cut each slice in half. This makes them way easier to arrange in your baking dish and helps everything fit together like a puzzle. Don’t be stingy with the butter – that’s what makes it taste like grilled cheese.

Building the Bottom Layer: Arrange those buttered bread pieces butter-side down in a greased 9×13 baking dish. Try to cover the whole bottom without leaving big gaps. This is going to be your bottom grilled cheese layer that gets all golden and crispy.

Layering Everything Up: Sprinkle two cups of your cheese over the bread, making sure it gets everywhere. Then spoon your meat mixture on top and spread it around so every bite gets some. Top that with your remaining two cups of cheese.

Finishing the Top: Butter your last six bread slices and cut them in half just like before. Lay these pieces butter-side up over everything, again trying to cover the whole surface. This top layer is going to turn into that perfect golden grilled cheese crust.

Baking Time: Stick the whole thing in your 400-degree oven for 20-24 minutes. You’ll know it’s done when the top is golden brown and looks like perfect grilled cheese, and you can see cheese bubbling around the edges.

You Must Know

  • Don’t skip draining the grease – Seriously, this will make or break your casserole. Too much fat equals soggy bread
  • Cook those onions first – Raw onions are way too sharp and won’t blend with everything else
  • Butter matters – Both layers of bread need butter to get that authentic grilled cheese taste

I learned the grease lesson the hard way when my first attempt turned into this awful, oily mess that nobody wanted to eat. The bread never got crispy, and the whole thing just fell apart when I tried to serve it. Now I’m really careful about draining that fat properly, and the difference is night and day.

Getting the Beef Perfect

Break up that ground beef into small pieces while it cooks – nobody wants huge chunks in their casserole. Use your wooden spoon to really chop it up as it browns. Take your time with this part because good browning means better flavor in the final dish.

Onion Cooking Tips

Those few minutes of cooking the onions with the beef makes them sweet and mild instead of sharp and crunchy. Dice them pretty small so they cook quickly and spread evenly throughout the meat mixture. You want them soft but not mushy.

Sauce Magic

The combination of mayo, ketchup, and mustard is what makes this taste like an actual cheeseburger instead of just meat and cheese. Mix it in while the beef is still warm so everything coats nicely. Taste it and adjust if you want more of any particular flavor.

Bread Strategy

Regular sandwich bread is perfect for this – don’t overthink it. The thickness is just right, and it holds up well to all the butter and baking. Cutting the slices in half makes them so much easier to arrange and ensures you get good coverage.

Cheese Distribution

Using cheese on both sides of the meat mixture is key. The bottom layer helps everything stick together, while the top layer creates that gorgeous bubbly surface that looks so good when you pull it out of the oven.

Perfect Timing

That 400-degree temperature gets the bread nice and golden while melting all the cheese thoroughly. Keep an eye on it toward the end – you want golden brown, not burnt. The edges should be bubbling with melted cheese when it’s ready.

Serving Ideas

This thing is rich and filling enough to be dinner all by itself, but a simple salad or some dill pickles on the side really helps cut through all that cheese. Cut it into squares like you would lasagna, and have napkins ready because it can get a little messy.

Make-Ahead Magic

You can put this whole casserole together in the morning and just pop it in the oven when you’re ready for dinner. If you’re baking it straight from the fridge, add a few extra minutes to the cooking time. The flavors actually get better when everything sits together for a while.

Leftover Solutions

This reheats beautifully in the oven – just cover it with foil and warm it at 350 until it’s hot through. Don’t use the microwave if you can help it because it makes the bread all soggy. Leftovers keep in the fridge for about four days.

Ways to Mix It Up

While this version is amazing as-is, you can definitely play around with it. Some people love adding diced pickles to the meat mixture for extra burger flavor. Different cheeses work great too – try pepper jack if you want some heat, or go with all cheddar for that classic taste.

Bacon Cheeseburger Grilled Cheese Casserole

Chef Secrets

  • Let things cool a bit – If your meat mixture is too hot, it’ll make the bottom bread soggy before it can get crispy
  • Press gently – Give the top bread layer a light press to help everything stick together
  • Check underneath – Lift a corner with a spatula to make sure the bottom is getting golden too

This bacon cheeseburger grilled cheese casserole has become our family’s ultimate comfort food because it hits every single craving at once. It’s like having your favorite childhood grilled cheese sandwich and a satisfying dinner all rolled into one amazing dish. Every time I make it, I’m reminded that sometimes the best recipes come from just throwing together whatever you have and seeing what happens.

Frequently Asked Questions

→ Can I make this casserole ahead of time? Yes! Assemble the casserole and refrigerate for up to 4 hours before baking. You may need to add 5-10 extra minutes to the baking time.

→ What type of bread works best? Regular white or whole wheat sandwich bread works perfectly. Avoid thick artisan breads as they won’t layer as well.

→ Can I use fresh bacon instead of bacon bits? Absolutely! Cook 6-8 strips of bacon, crumble them up, and use instead of the bacon bits for even better flavor.

→ How do I prevent the casserole from being too greasy? Use lean ground beef and make sure to drain it well after cooking. This prevents excess grease from making the bread soggy.

→ What should I serve with this casserole? A simple green salad, steamed vegetables, or crispy fries complement this rich casserole perfectly.

Bacon Cheeseburger Grilled Cheese Casserole

Serves: 8 Prep Time: 20 Minutes Cooking Time: 24 Minutes 24 Minutes
Nutrition facts: 400 calories 55 grams fat
Rating: 5.0/5
( 1 voted )
Pin
Print

Ingredients

1 lb lean ground beef
 1 cup yellow onion, diced
 1/2 cup real bacon bits
 1/4 cup mayonnaise
 1/4 cup ketchup
 1 tbsp yellow mustard
 1/2 tsp salt
 1/2 tsp black pepper
 2 tsp onion powder
 

→ Casserole Assembly

 12 slices white or whole wheat bread
 1/2 cup margarine or butter, softened
 4 cups shredded mozzarella and cheddar cheese blend

Instructions

Preheat your oven to 400°F and grease a 9x13 inch baking dish. Heat a large skillet over medium-high heat and add the ground beef with a small dab of butter. Cook the beef, breaking it up into small crumbles as it browns - this takes about 6-8 minutes.

Once the beef is cooked through, drain any excess grease. Add the diced onions to the pan and cook for another 3-4 minutes, stirring occasionally, until the onions start to soften and become fragrant.

Remove the pan from heat and stir in the bacon bits, mayo, ketchup, mustard, salt, pepper, and onion powder. Mix everything together until well combined - this creates that classic cheeseburger flavor throughout the filling.

Spread 6 slices of bread with half the margarine, then cut each slice in half. Place these pieces margarine-side down in your greased baking dish, creating the bottom layer. Sprinkle 2 cups of the cheese mixture over the bread.

Spoon the beef mixture evenly over the cheese layer, spreading it out to cover the bread completely. Top with the remaining 2 cups of cheese - this creates those gooey, melty layers that make this casserole so amazing.

Spread the remaining 6 slices of bread with the rest of the margarine and cut them in half. Place these pieces margarine-side up on top of the casserole. Bake for 20-24 minutes until the top is golden brown and crispy.

Let the casserole rest for about 5 minutes before cutting - this helps it hold together better. Serve hot and watch everyone dig into this comfort food masterpiece!

Notes

  1. Using lean ground beef helps prevent the casserole from becoming too greasy
  2. Make sure to drain the beef well before adding other ingredients
  3. You can assemble this casserole a few hours ahead and refrigerate until ready to bake
  4. Leftovers reheat beautifully in the oven at 350°F for about 15 minutes


Tools You'll Need

  • Large skillet
  • 9x13 inch baking dish
  • Sharp knife
  • Wooden spoon or spatula
  • Cutting board
0 comments
0 FacebookTwitterPinterestPocketEmail
Beef MealsCasserolesCheesesteakFeatured

Philly Cheesesteak Grilled Cheese Casserole

by myphillyconnection February 15, 2026
written by myphillyconnection

This Philly cheesesteak grilled cheese casserole happened when I was trying to figure out how to feed my Philly-obsessed husband something that tasted like his beloved cheesesteaks but could actually feed our whole family without ordering a dozen sandwiches. The combination of tender roast beef, sautéed peppers and onions, all that melted cheese, and crispy buttered bread creates this incredible comfort food hybrid that somehow manages to taste exactly like a cheesesteak but in casserole form. The first time I made it, my husband took one bite and said it was like eating his favorite sandwich but better because there was so much more of it.

Why You’ll Love This

  • All the cheesesteak flavors – Captures that authentic Philly taste with tender beef, peppers, onions, and loads of melted cheese
  • Feeds a crowd easily – One pan makes enough for the whole family instead of assembling individual sandwiches
  • Crispy bread perfection – Gets that golden, buttery grilled cheese exterior on both top and bottom
  • Make-ahead friendly – Can be assembled hours ahead and just popped in the oven when you’re ready

My kids, who usually complain about anything that isn’t chicken nuggets, actually fought over seconds of this casserole. My daughter said it tasted like “the best grilled cheese ever but with steak inside,” which is probably the most accurate description anyone’s given it. Now whenever we have family gatherings, someone always asks if I’m bringing “that amazing cheesesteak thing.”

Essential Ingredient Guide

  • Thinly sliced roast beef: Look for deli-style roast beef that’s sliced thin enough to break apart easily. The thin slices integrate better with the other ingredients.
  • Yellow onion: Provides that classic Philly sweetness when sautéed. Yellow onions work better than white because they caramelize more beautifully.
  • Green bell pepper: Essential for authentic cheesesteak flavor. Cut them into small, even pieces so they cook uniformly with the onions.
  • Brown gravy mix: Creates that rich, savory base that ties everything together and adds moisture to prevent the casserole from drying out.
  • Mozzarella cheese: Melts perfectly and provides that amazing cheese pull. Use freshly shredded for the best melting properties.
  • Regular sandwich bread: White or wheat bread works great. The key is using sturdy bread that won’t fall apart when buttered and baked.
Philly Cheese Steak Grilled Cheese Casserole

Complete Preparation Process

Roast Beef Preparation:Start by chopping your roast beef slices into small, bite-sized pieces. You don’t want huge chunks that are hard to distribute evenly, but don’t chop it so fine that it disappears. Pieces about the size of a quarter work perfectly for good distribution and texture.

Vegetable Sautéing: Heat a large skillet over medium-high heat and add a small amount of butter or margarine. Add the chopped roast beef pieces and let them warm through for about a minute. Then add your diced onions and green peppers to the pan and stir everything together.

Cooking Until Perfect: Continue cooking the mixture, stirring occasionally, until the onions become translucent and start to soften. This usually takes about 5-7 minutes. The peppers should still have a slight bite to them since they’ll continue cooking in the oven.

Gravy Integration: Add the brown gravy mix and water to the pan and stir until everything is well coated with the gravy. The mixture should look glossy and cohesive, with no dry spots. Remove the pan from heat and let it cool slightly while you prepare the bread layers.

Bottom Bread Layer: Spread about a quarter cup of margarine on six slices of bread, then cut each slice in half. Arrange these pieces margarine-side down in a single layer on the bottom of a greased 9×13 inch baking dish. Try to cover the entire bottom with minimal gaps.

Cheese and Filling Layers: Sprinkle two cups of shredded mozzarella evenly over the bread layer. Then spoon the roast beef mixture over the cheese, spreading it out carefully so every area gets some filling. The mixture should cover the cheese layer completely and evenly.

Top Cheese Layer: Sprinkle the remaining two cups of mozzarella over the roast beef mixture. This top cheese layer will help bind everything together and create that beautiful golden, bubbly surface when baked.Final

Bread Layer: Spread the remaining quarter cup of margarine on the last six slices of bread and cut them in half. Arrange these pieces margarine-side up over the cheese layer, again trying to cover the entire surface in a single layer.

Baking Process: Bake at 400 degrees for 26-30 minutes until the top bread layer is golden brown and the cheese is melted and bubbling around the edges. The top should look like perfectly toasted grilled cheese when it’s done.

You Must Know

  • Don’t overcook the vegetables – They’ll continue cooking in the oven, so stop when onions are just translucent
  • Let the filling cool slightly – Hot filling can make the bottom bread soggy before it has a chance to get crispy
  • Cover the surface completely – Gaps in the bread layers lead to uneven browning and texture

My first attempt was a mess because I cooked the vegetables too long and they turned mushy during baking. The texture was all wrong, and it didn’t have that nice bite that makes a good cheesesteak. Now I always undercook them slightly in the pan, knowing they’ll finish perfectly in the oven. The difference in texture is huge.

Roast Beef Selection

The quality and thickness of your roast beef really affects the final result. Look for deli-style roast beef that’s sliced thin but not paper-thin. It should be easy to break apart but substantial enough to provide good meaty texture in each bite. Avoid thick-cut roast beef that won’t integrate well with the other ingredients.

Vegetable Cooking Tips

Getting the peppers and onions just right is crucial for authentic cheesesteak flavor. Cook them until the onions are translucent and starting to soften, but the peppers should still have some firmness. They’ll continue cooking in the oven, so stopping at this point ensures they don’t turn mushy.

Gravy Mix Benefits

The brown gravy mix does more than just add flavor – it provides moisture that keeps the casserole from drying out and helps bind all the ingredients together. Make sure to stir it in thoroughly so every piece of meat and vegetable gets coated.

Bread Layer Strategy

Creating even layers of bread is important for consistent texture throughout the casserole. Cut the slices in half to make them easier to arrange and ensure better coverage. The margarine on both layers is what creates that authentic grilled cheese taste and golden color.

Cheese Distribution

Using cheese on both the bottom and top of the filling ensures every bite has plenty of melted cheese. The bottom layer helps everything stick together, while the top layer creates that gorgeous bubbly surface that looks so appealing when you serve it.

Temperature Control

The 400-degree temperature is perfect for getting the bread golden and crispy while thoroughly melting the cheese and heating everything through. Watch for that golden brown color on top – that’s your visual cue that it’s ready.

Perfect Serving Style

This casserole is best served immediately while the cheese is still molten and the bread is crispy. Cut it into squares like lasagna for easy serving. The combination of textures and flavors in each bite really does taste like eating a perfect cheesesteak.

Make-Ahead Benefits

You can assemble this entire casserole hours ahead and refrigerate until you’re ready to bake. Just add a few extra minutes to the baking time if you’re starting with a cold casserole. The flavors actually improve when the components have time to meld together.

Creative Variations

While this version captures classic Philly flavors perfectly, you can customize it in various ways. Some people love adding mushrooms to the vegetable mixture, or using a combination of cheeses like provolone and mozzarella for more complex flavor.

Storage and Reheating

Leftovers keep well in the refrigerator for up to four days and reheat beautifully in the oven. Cover with foil and warm at 350 degrees until heated through. The bread stays much crispier when reheated in the oven rather than the microwave.

Philly Cheese Steak Grilled Cheese Casserole

Professional Chef Secrets

  • Drain excess moisture – If your vegetable mixture seems watery, let it cool uncovered for a few minutes to evaporate excess liquid
  • Press gently – Lightly press the top bread layer to help everything adhere and bake evenly
  • Test doneness – The casserole is ready when a knife inserted in the center comes out hot

This Philly cheesesteak grilled cheese casserole has become our family’s ultimate comfort food because it combines all the flavors we love in a format that’s perfect for sharing. The technique creates something that tastes familiar yet special, turning a beloved sandwich into a satisfying meal that brings everyone to the table. Every time I make it, I’m reminded that sometimes the best recipes come from taking something you already love and figuring out how to make it even better.

Frequently Asked Questions

→ Can I use a different type of cheese? Yes! Provolone or American cheese are more traditional for Philly cheesesteaks, or you can use a blend of cheeses for extra flavor.

→ What if I can’t find roast beef? You can substitute with thinly sliced steak, deli turkey, or even leftover pot roast. Just make sure it’s sliced thin.

→ Can I add mushrooms to this recipe? Absolutely! Sauté 1 cup of sliced mushrooms with the onions and peppers for an even more authentic Philly flavor.

→ How do I store leftovers? Store covered in the refrigerator for up to 3 days. Reheat in the oven at 350°F for 15 minutes to restore the crispy top.

→ Can I make this ahead of time? Yes! Assemble the casserole and refrigerate up to 4 hours before baking. You may need to add 5-10 extra minutes to the baking time.

Philly Cheesesteak Grilled Cheese Casserole

Serves: 8 Prep Time: 15 Minutes Cooking Time: 30 Minutes 30 Minutes
Nutrition facts: 325 calories 50 grams fat
Rating: 5.0/5
( 1 voted )
Pin
Print

Ingredients

 9 oz thinly sliced roast beef
 1 cup yellow onion, diced
 1 cup green bell pepper, diced
 0.87 oz brown gravy mix packet
 1/2 cup water
 

→ Casserole Assembly

 12 slices white or whole wheat bread
 1/2 cup margarine or butter, softened
 4 cups shredded mozzarella cheese

Instructions

Preheat your oven to 400°F and grease a 9x13 inch baking dish. Chop the roast beef slices into bite-sized pieces - this makes it easier to eat and distributes the flavor better throughout the casserole.

Heat a large skillet over medium-high heat with a dab of butter or margarine. Add the chopped roast beef, diced onions, and green peppers. Cook everything together, stirring frequently, until the onions become translucent and the peppers start to soften - about 5-7 minutes.

Sprinkle the brown gravy mix over the beef and vegetables, then add the water. Stir everything together until the gravy coats all the ingredients evenly. This creates that rich, savory base that ties all the flavors together. Remove from heat and set aside.

Spread 1/4 cup of margarine on 6 slices of bread, then cut each slice in half. Place these pieces margarine-side down in a single layer in your greased baking dish. Sprinkle 2 cups of mozzarella cheese over the bread layer.

Spoon the roast beef mixture evenly over the cheese layer, spreading it out to cover the bread completely. Top with the remaining 2 cups of mozzarella cheese - this creates those amazing gooey, stretchy layers.

Spread margarine on the remaining 6 slices of bread and cut them in half. Place these pieces margarine-side up on top of the casserole in a single layer. Bake for 26-30 minutes until the top bread is golden brown and the cheese is bubbly.

Let the casserole rest for about 5 minutes before slicing - this helps it hold together better. Cut into squares and serve immediately while the cheese is still melted and gooey. This is comfort food at its finest!

Notes

  1. Using thinly sliced deli roast beef works best for authentic Philly flavors
  2. The gravy mix helps bind everything together and adds extra savory flavor
  3. You can substitute provolone or American cheese for a more traditional Philly taste
  4. This casserole reheats well in the oven at 350°F for about 15 minutes


Tools You'll Need

  • Large skillet
  • 9x13 inch baking dish
  • Sharp knife
  • Wooden spoon or spatula
  • Cutting board

0 comments
0 FacebookTwitterPinterestPocketEmail
30 Minute MealsChicken Meals

Honey Sesame Chicken and Broccoli

by Clare Greco February 15, 2026
written by Clare Greco

This honey sesame chicken and broccoli became my go-to weeknight dinner when I got tired of ordering takeout but still craved those sweet, savory Chinese flavors. The light coating on the chicken creates this perfect crispy exterior that holds onto the glossy honey sesame sauce beautifully, while the tender-crisp broccoli adds that fresh contrast you need. What I love most is how the whole thing comes together in about 30 minutes, making it faster than delivery but so much better tasting. My kids actually eat the broccoli without complaining when it’s coated in this incredible sauce.

Why You’ll Love This

  • **Better than takeout** – All those familiar sweet and savory flavors but made fresh in your own kitchen
  • **Quick weeknight solution** – Ready in 30 minutes from start to finish, perfect for busy evenings
  • **One-pan simplicity** – Everything comes together in one skillet for easy cleanup
  • **Kid-approved vegetables** – Even picky eaters love broccoli when it’s covered in this amazing sauce

The first time I made this, my husband took one bite and asked if I’d secretly ordered Chinese food because it tasted so authentic. When he realized I’d made it myself, he immediately requested it for the following week’s meal plan. My daughter, who normally picks out every piece of broccoli from any dish, actually asked for extra vegetables because she loved how they tasted with the sauce.

Essential Ingredient Guide

  • **Boneless chicken breast:** Cut into uniform pieces for even cooking. The size matters for getting that perfect crispy coating.
  • **Fresh broccoli crowns:** Choose bright green florets that are firm and tight. Fresh broccoli holds its texture better than frozen.
  • **Sesame oil:** This is what gives the sauce its distinctive nutty flavor. Don’t substitute regular oil here.
  • **Real honey:** Provides natural sweetness and helps create that glossy sauce coating. Avoid artificial honey substitutes.
  • **Fresh ginger and garlic:** These aromatics are crucial for authentic flavor. Pre-minced versions don’t have the same impact.
  • **Sesame seeds:** Add texture and visual appeal while reinforcing the sesame flavor throughout the dish.
Honey Sesame Chicken and Broccoli

Complete Cooking Process

Broccoli Steaming: Start by filling a large pot with 2-3 inches of water and add the broccoli florets along with a teaspoon of salt. Cover and bring to a simmer, then reduce heat to low and steam for about 6 minutes until the broccoli is tender-crisp. You want it to still have some bite since it will get tossed with the hot sauce later. Drain and rinse with cold water to stop the cooking process.

Sauce Preparation: In a small bowl, whisk together the soy sauce, water, sesame oil, honey, rice vinegar, freshly grated ginger, minced garlic, cornstarch, and sesame seeds until completely smooth. The cornstarch needs to be fully dissolved or you’ll get lumps in your sauce. Set this aside until ready to use.

Chicken Coating: Cut the chicken breast into uniform 1-2 inch pieces so they cook evenly. Place them in a large plastic bag with the cornstarch, flour, salt, and pepper mixture. Seal the bag and shake vigorously until every piece is evenly coated. This light coating will create that perfect crispy exterior.

Chicken Cooking: Heat olive oil in a large skillet over medium heat until it’s shimmering but not smoking. Add the coated chicken pieces in a single layer, making sure not to overcrowd the pan. Let them cook undisturbed for 2-3 minutes until golden brown, then flip and continue cooking until all sides are golden and the chicken is cooked through with no pink in the center.

Sauce Integration: Once the chicken is perfectly browned and cooked through, reduce heat to medium-low and pour the prepared sauce over the chicken. Toss everything together and let the sauce come to a simmer. Stir constantly as the sauce thickens and becomes glossy, coating every piece of chicken beautifully.

Final Assembly: Add the steamed broccoli to the skillet with the sauced chicken and gently fold everything together until the broccoli is evenly coated with sauce. If your skillet isn’t large enough, transfer everything to a larger bowl for mixing. Sprinkle with chopped green onions and serve immediately while hot.

You Must Know

  • **Don’t overcook the broccoli** – Tender-crisp is perfect since it gets warmed through again with the sauce
  • **Let chicken brown undisturbed** – Moving it too early prevents proper browning and crispy coating
  • **Whisk sauce thoroughly** – Lumpy cornstarch creates an unappetizing texture in the final dish

My first attempt was disappointing because I kept moving the chicken around in the pan and never got that golden, crispy coating I wanted. I also overcooked the broccoli initially, so it turned mushy when mixed with the sauce. Now I let the chicken sit and brown properly, and I steam the broccoli just until tender-crisp. The texture difference is huge when you get these timing details right.

Chicken Coating Secrets

The combination of cornstarch and flour creates the perfect light coating that gets crispy but doesn’t overwhelm the chicken. The cornstarch gives crunch while the flour helps with browning. Don’t skip the seasoning in the coating – it adds flavor throughout, not just on the surface.

Broccoli Steaming Tips

Getting the broccoli texture right is crucial for the final dish. Steam it just until it’s **tender-crisp** – it should still have some bite because it will get warmed through again with the sauce. Rinsing with cold water stops the cooking process immediately.

Sauce Consistency

The sauce should thicken enough to coat the chicken and broccoli nicely but not be gloppy or too thick. If it seems too thin, let it simmer a bit longer. If too thick, add a tablespoon of water. The honey helps create that **glossy finish** that makes it look restaurant-quality.

Heat Management

Cooking the chicken over **medium heat** gives you the perfect balance of browning without burning. Too high and the coating burns before the chicken cooks through; too low and you won’t get that crispy texture. Listen for gentle sizzling – that’s your indicator.

Timing Coordination

Having the broccoli steamed and the sauce prepared before you start cooking the chicken makes the final assembly smooth and quick. Once the chicken is done, everything comes together in just a few minutes.

Perfect Serving Style

This dish is best served immediately while the sauce is still glossy and the chicken coating is crispy. Serve over steamed rice or noodles if you want to make it more substantial, or enjoy it as-is for a lighter meal.

Make-Ahead Options

You can steam the broccoli and prepare the sauce earlier in the day, but the chicken is best cooked fresh for optimal texture. Having the prep work done makes this an even quicker weeknight meal.

Creative Variations

While this combination is perfect, you can substitute other vegetables like snap peas, bell peppers, or carrots. The sauce also works great with shrimp or tofu if you want to change up the protein.

Storage and Reheating

Leftovers keep well in the refrigerator for up to three days. Reheat gently in the microwave or in a skillet over low heat. The coating won’t be quite as crispy reheated, but the flavors are still fantastic.

Honey Sesame Chicken and Broccoli

Professional Chef Secrets

  • **Room temperature chicken** – Let it sit out for 15 minutes before cooking for more even cooking
  • **Don’t crowd the pan** – Cook in batches if necessary to maintain proper browning
  • **Taste and adjust** – Add more honey for sweetness or soy sauce for saltiness to suit your preferences

This honey sesame chicken and broccoli proves that you don’t need to order takeout to get those satisfying Chinese restaurant flavors at home. The technique is straightforward, but attention to timing and texture creates results that rival any restaurant. Every time I make it, I’m reminded that the best comfort food is often the kind you make yourself with fresh ingredients and a little care.

Frequently Asked Questions

→ Can I use frozen broccoli instead of fresh? Yes! Just thaw and drain it well, then add it directly to the pan with the chicken since it’s already cooked.

→ How can I make this gluten-free? Replace the all-purpose flour with rice flour or additional cornstarch, and use tamari instead of soy sauce.

→ Can I substitute the honey? Yes! Maple syrup or brown sugar work well. For sugar-free, try monk fruit sweetener or stevia to taste.

→ What if my sauce doesn’t thicken? Make sure you mixed the cornstarch well into the sauce. If needed, simmer a bit longer or add another teaspoon of cornstarch mixed with water.

→ Can I meal prep this dish? Absolutely! Store in the fridge for up to 4 days. Reheat gently to avoid overcooking the broccoli.

Honey Sesame Chicken and Broccoli

Serves: 4 Prep Time: 15 Minutes Cooking Time: 15 Minutes 15 Minutes
Nutrition facts: 290 calories 20 grams fat
Rating: 5.0/5
( 1 voted )
Pin
Print

Ingredients

1/4 cup low sodium soy sauce
 2 tbsp water
 1 1/2 tbsp sesame oil
 3 tbsp honey
 1 tbsp rice vinegar
 1 tsp fresh ginger, finely grated
 2 cloves garlic, minced
 1 tbsp sesame seeds
 2 tsp cornstarch
 

→ Chicken and Vegetables

 1-1.5 lbs boneless skinless chicken breast, cut into 1-2 inch pieces
 2 tbsp cornstarch or arrowroot flour
 2 tbsp all-purpose flour
 1/2 tsp salt
 1/4 tsp black pepper
 2 tbsp olive oil
 6 cups broccoli florets (about 2 crowns)
 2 whole green onions, diced
 1 tsp salt for steaming broccoli

Instructions

Fill a large pot with 2-3 inches of water and add the broccoli florets with 1 teaspoon of salt. Cover and bring to a simmer, then reduce heat to low and steam for 6 minutes until the broccoli is tender-crisp. Drain in a colander and rinse with cold water to stop the cooking process - this keeps it bright green and perfectly tender.

In a small bowl, whisk together the soy sauce, water, sesame oil, honey, rice vinegar, grated ginger, minced garlic, cornstarch, and sesame seeds until smooth. This sauce is going to be absolutely delicious - the perfect balance of sweet, savory, and nutty!

Place the chicken pieces in a large plastic bag. In a small bowl, whisk together the cornstarch, flour, salt, and pepper. Add this mixture to the bag with the chicken, seal it up, and shake until every piece is evenly coated. This light coating will give you the perfect golden crust.

Heat olive oil in a large skillet over medium heat. Once the oil is shimmering, add the chicken pieces in a single layer - don't overcrowd! Let them cook undisturbed for 2-3 minutes until golden, then flip and cook until all sides are golden brown and the chicken is cooked through with no pink in the center.

Reduce heat to medium-low and pour the prepared sauce over the golden chicken. Toss to coat and let the sauce simmer until it thickens beautifully - this should take just a minute or two. The aroma will be incredible!

If your skillet is large enough, gently fold the steamed broccoli into the saucy chicken. If not, transfer everything to a large serving bowl and toss together. Sprinkle with diced green onions and serve immediately while hot. Every bite is pure comfort food perfection!

Notes

  1. For Whole30 compliance, substitute coconut aminos for soy sauce and arrowroot for cornstarch
  2. Don't overcrowd the chicken in the pan - cook in batches if needed for even browning
  3. Rinsing steamed broccoli with cold water stops the cooking and preserves the bright color
  4. The cornstarch in the sauce will thicken it to the perfect consistency


Tools You'll Need

  • Large pot with lid
  • 12-inch cast iron skillet
  • Colander strainer
  • Mixing bowls
  • Large plastic bag
  • Whisk

0 comments
0 FacebookTwitterPinterestPocketEmail
30 Minute MealsChicken Meals

Apple and Brie Stuffed Chicken

by myphillyconnection February 15, 2026
written by myphillyconnection
Apple and Brie Stuffed Chicken

This apple and brie stuffed chicken has become my go-to elegant dinner when I want to impress guests without spending hours in the kitchen or using complicated techniques. I discovered this combination one fall evening when I had leftover brie from a cheese board and some crisp green apples sitting on my counter, and the idea struck me that their flavors would be incredible melted together inside tender chicken breast. The contrast of tart apple slices with creamy, mild brie creates this perfect sweet-savory balance, while the Dijon mustard crust adds tangy sharpness that ties everything together and creates a beautiful golden exterior that looks like it came from a fancy restaurant.

Love This Recipe

  • Restaurant-quality presentation with a surprisingly simple technique.
  • Ready in 30 minutes, perfect for weeknight dinners.
  • Features excellent Fall flavors: apples, brie, and thyme.
  • One skillet cooking means minimal cleanup.
  • Sophisticated but approachable ingredients easily found at any grocery store.

My mother-in-law, who’s an excellent cook and usually quite critical of my attempts at fancy food, actually asked for seconds when I served this at a family dinner last Thanksgiving. She kept commenting on how the brie stayed perfectly melted inside without leaking out all over the pan, and she loved the way the apple slices provided little bursts of tartness that cut through the richness of the cheese. Now she requests that I make this every time we have family gatherings, which feels like the ultimate compliment from someone who’s been cooking for fifty years.

Essential Ingredients Breakdown

  • Boneless, skinless chicken breasts: Use pieces around 6 ounces each for even cooking; butterfly carefully.
  • Kosher salt and black pepper: Season the chicken from the inside out for flavor throughout.
  • Dried thyme: Adds earthy, classic herb flavor that pairs well with apple and brie (use fresh if available).
  • Baby spinach or arugula: Creates a colorful, nutritious layer to prevent the cheese from sticking (arugula is more peppery).
  • Green apple: Delivers tartness and crisp texture that holds up during cooking (Granny Smith is ideal).
  • Brie cheese: Provides luxurious, creamy richness; slice while cold and leave the rind on.
  • Dijon and coarse ground mustard: Creates a tangy, flavorful coating that helps develop a beautiful golden crust.
  • Extra-virgin olive oil: Needed for searing and developing a uniform crust.
Apple and Brie Stuffed Chicken

Creating Perfect Chicken

Butterflying the breasts:Place a chicken breast flat. Using a sharp knife, slice horizontally into the thickest side, cutting almost all the way through to create a hinge (like opening a book). Repeat for all breasts.Seasoning and layering:Open each breast and season the inside generously with salt, pepper, and dried thyme. Layer one side with spinach/arugula, 3 thin apple slices, and 3 slices of cold brie.Folding and securing:Fold the empty half over the filling, pressing gently to seal. Avoid overstuffing. Secure with toothpicks if necessary, but handle gently.Applying mustard coating:Mix Dijon and coarse ground mustard. Brush half of the mixture over the tops of the stuffed breasts.Searing the first side:Heat olive oil in a large skillet over medium-high heat until shimmering. Place chicken in the skillet, mustard-side down. Brush the remaining mustard on the now upward-facing sides. Sear undisturbed for 3–4 minutes until a golden-brown crust forms.Flipping carefully:Flip the chicken gently and sear the second side for another 3–4 minutes until crusted.Finishing the cooking:Reduce heat to just under medium, cover the skillet, and cook for 5–8 minutes until an instant-read thermometer registers **165°F** in the thickest part.Plating and serving:Transfer chicken to a platter and rest for 2 minutes. Spoon the flavorful pan juices over each breast (or deglaze the pan with wine/broth for a richer sauce).

You Must Know

  • Don’t cut all the way through when butterflying (leave a hinge).
  • Slice brie while cold for neat slices.
  • Use a sharp knife for clean cuts.
  • Don’t overstuff or the filling will leak out during cooking.
  • Let the chicken rest briefly after cooking to redistribute juices.

I’ve learned through making this chicken many times that the butterflying step becomes much easier with practice and a truly sharp knife. My first attempts were messy with uneven cuts and occasionally cutting completely through the breast, but now I can butterfly four breasts in just a few minutes. I also discovered that using slightly less filling than you think you need actually works better because overstuffed chicken breasts are impossible to close properly and always leak during cooking. The one time I tried to cram extra brie and apple slices into each breast, they all burst open during searing and left me with a pan full of melted cheese instead of beautifully stuffed chicken.

Apple Variety Choices

  • Recommended: Green apples (Granny Smith) for tartness and firm flesh that holds up during cooking.
  • Good Substitutes: Honeycrisp or Pink Lady for a balance of sweet and tart.
  • Avoid: Soft apples like Red Delicious or McIntosh, which turn to mush when cooked.

Brie Selection Tips

Use brie that is ripe but not overripe. Slice it while cold, and leave the rind on, as it is edible and helps the cheese maintain its shape during cooking.

Pan Sauce Possibilities

The pan drippings make a delicious simple sauce. For a more refined sauce, remove the chicken, add ¼ cup of **white wine** to the hot skillet, scrape up the browned bits, and reduce by half. Stir in 1 tablespoon of butter and a splash of cream, then season.

Delicious Flavor Variations

  • Pear & Gorgonzola: Use thinly sliced pears and creamy gorgonzola instead of apple and brie.
  • Mediterranean: Stuff with sun-dried tomatoes, fresh mozzarella, and basil; coat with pesto instead of mustard.
  • Cranberry & Goat Cheese: Use dried cranberries and tangy goat cheese for a holiday flavor.
  • Bacon & Cheddar: Add crispy bacon and sharp cheddar with the apple slices for a casual, family-friendly option.

Keeping It Fresh

  • Best enjoyed fresh when the brie is melty.
  • Leftovers keep in the refrigerator for up to 3 days.
  • Reheat gently in a covered skillet or microwave at reduced power.
  • Can be served cold, sliced over a salad.
Apple and Brie Stuffed Chicken

Professional Kitchen Wisdom

  • Use an **instant-read thermometer** to check for 165°F doneness.
  • **Dry the chicken** thoroughly before seasoning.
  • Don’t crowd the pan when searing.
  • **Save those pan drippings** for sauce.
  • Slice the stuffed breasts **crosswise** to show off the beautiful layers.

I’ve made this apple and brie stuffed chicken for countless dinner parties, romantic date nights, and special family meals, and it never fails to impress everyone who tries it. There’s something magical about cutting into what looks like a simple seared chicken breast and discovering those gorgeous layers of melted brie, tender apple, and fresh greens inside. The combination of flavors tastes elegant and sophisticated while the technique is actually quite approachable for home cooks once you master the butterflying step. It’s become one of those recipes I can make without even looking at the instructions anymore, and every time I serve it, people assume I spent hours on this complicated dish when in reality it took less than thirty minutes from start to finish!

Frequently Asked Questions

→ Can I use a different type of apple?Green apples work best because their tartness balances the rich brie. Granny Smith apples are a great choice.

→ What if I’ve never butterflied chicken before? Just use a sharp knife and cut horizontally through the thickest part, stopping before you cut all the way through so it opens like a book.

→ Do I need to use toothpicks? Not necessary if you’re careful when flipping. The chicken usually stays closed on its own, but toothpicks help if you’re worried about it opening.

→ Can I substitute a different cheese? Brie is ideal because it melts beautifully, but camembert or soft goat cheese could work. Avoid hard cheeses.

→ How do I know when the chicken is done? The internal temperature should reach 165 degrees. The chicken should be firm to the touch and the juices should run clear.

→ What should I serve with this? This pairs wonderfully with mashed potatoes, roasted vegetables, rice, or a simple green salad.

Apple and Brie Stuffed Chicken

Serves: 4 Prep Time: 15 Minutes Cooking Time: 15 Minutes 15 Minutes
Nutrition facts: 300 calories 30 grams fat
Rating: 5.0/5
( 1 voted )
Pin
Print

Ingredients

 4 boneless, skinless chicken breasts (6 oz each)
 Heaping ½ teaspoon kosher salt
 ⅓ teaspoon black pepper
 ½ teaspoon dried thyme (or 2 teaspoons fresh thyme)
 Handful of baby spinach or arugula (optional)
 ½ green apple, thinly sliced (about 12 slices)
 ½ wheel brie cheese, cut into slices (about 12 slices)
 2 tablespoons Dijon mustard
 1 heaping tablespoon coarse ground mustard
 1 tablespoon extra-virgin olive oil

Instructions

Cut each chicken breast horizontally so it opens up like a book, staying connected on one side.

Sprinkle the insides with salt, pepper, and thyme. Layer a few pieces of spinach or arugula on one side of each breast. Top with about 3 apple slices and 3 brie slices per chicken breast.

Fold each chicken breast over to close it up. You can use toothpicks to secure them if you want, but it's not necessary.

Mix both mustards together in a small bowl. Brush half of the mixture on top of the closed chicken breasts.

Heat the olive oil in a large skillet over medium-high heat. Place the chicken breasts mustard-side down in the pan. Brush the other side with the remaining mustard mixture.

Sear for 3 to 4 minutes on each side until nicely browned. Flip carefully so the filling stays inside.

After both sides are browned, cover the pan and reduce heat to just under medium. Cook for 5 to 8 minutes more, depending on thickness, until the chicken is cooked through.

Plate the chicken breasts and spoon the pan sauce over the top. Serve hot.

Notes

  1. The tart green apple balances perfectly with the creamy brie
  2. Don't skip the mustard coating - it adds amazing flavor
  3. The pan sauce is delicious spooned over mashed potatoes or rice
  4. Make sure not to overcook or the chicken will dry out
  5. Perfect for fall dinners or special occasions


Tools You'll Need

  • Sharp knife for butterflying
  • Large skillet with lid
  • Small bowl for mustard
  • Pastry brush
  • Toothpicks (optional)
0 comments
0 FacebookTwitterPinterestPocketEmail
30 Minute MealsChicken MealsPasta

White Chicken Enchiladas

by Clare Greco February 15, 2026
written by Clare Greco

White chicken enchiladas are basically what happens when you take regular enchiladas and decide to make them creamy and mild instead of spicy and tomato-based, which automatically makes them more appealing to kids and people who claim they can’t handle any heat whatsoever. You fill flour tortillas with rotisserie chicken and cheese, roll them up like little burritos, cover everything with a sour cream sauce made with green chiles, top with more cheese, and bake until bubbly. The whole thing takes thirty minutes from start to finish, which means you can have dinner on the table faster than ordering takeout and waiting for delivery. I started making these when my daughter went through a phase where red sauce was “scary looking” and she refused to eat anything covered in tomatoes. Turns out, white sauce counted as acceptable, and suddenly enchiladas were back on the approved foods list. Now my whole family requests these more than regular enchiladas, which saves me from buying multiple cans of enchilada sauce and pretending I enjoy the cleanup involved with red sauce splattered everywhere.

Why These Enchiladas Rock

  • Using rotisserie chicken eliminates the step of cooking chicken specifically for this recipe, saving you at least thirty minutes and one dirty pan while still providing juicy, flavorful meat
  • The sour cream sauce is mild enough for kids and picky eaters while still having enough flavor from the green chiles that adults don’t feel like they’re eating baby food
  • Making the sauce from scratch with a simple roux takes maybe five minutes and tastes way better than jarred white sauce that costs more money and has a weird artificial flavor
  • Everything bakes in one dish which means less cleanup than traditional enchiladas that sometimes require multiple pans for cooking filling separately

My friend Michelle is one of those people who acts like cooking dinner is this huge complicated ordeal that requires hours of prep and planning. She came over for dinner once when I made these, ate two servings, then asked what time I’d started cooking. When I told her I’d started when she texted saying she was on her way, which was like thirty-five minutes earlier, she accused me of lying and claimed I must have prepped everything the night before. I had to pull up my grocery receipt showing I’d bought the rotisserie chicken that same day to convince her these really were that fast. Now she makes them every week and has stopped complaining about how hard it is to cook dinner, which her husband says has significantly improved their household vibe and his dinner satisfaction.

What Goes Into Them

  • Flour tortillas: Eight to ten small ones wrap around the chicken filling, staying soft and pliable after baking instead of getting crispy. You can use corn tortillas if you prefer, but they’re more prone to cracking when you roll them.
  • Rotisserie chicken: Three cups shredded provides the main protein without requiring you to cook raw chicken, saving time and energy. Just pull the meat off the bones and shred it with your hands or two forks.
  • Monterey Jack cheese: Three cups shredded and divided between filling and topping melts beautifully and has mild, creamy flavor that doesn’t overpower the chicken or sauce.
  • Butter: Three tablespoons create the base for your roux, which is what thickens the sauce and gives it body instead of being watery.
  • All-purpose flour: Three tablespoons combine with the butter to make that roux, creating a thickening agent that turns your broth and sour cream into actual sauce.
  • Chicken broth: Two cups provide the liquid base for the sauce, adding savory flavor and creating the right consistency when combined with the roux.
  • Sour cream: One cup adds tanginess and creaminess to the sauce, creating that signature white enchilada flavor everyone recognizes and loves.
  • Diced green chiles: One 4-ounce can adds mild heat and that distinctive southwestern flavor without being so spicy it burns your mouth or makes kids cry.
White Chicken Enchiladas Skillet

Making These Enchiladas

Getting everything ready: Turn your oven to 350 degrees and let it heat while you assemble everything. Get out a 9×13 inch baking dish and spray the entire inside really well with cooking spray so nothing sticks when you’re scooping out servings later. Have this dish ready nearby where you can easily reach it when you start rolling enchiladas.

Preparing the filling: In a medium-sized mixing bowl, combine your three cups of shredded rotisserie chicken with one cup of your shredded Monterey Jack cheese, saving the other two cups for later. Use a spoon or your hands to mix the chicken and cheese together so they’re relatively evenly distributed, creating a uniform filling where every tortilla will have both chicken and cheese instead of some being mostly chicken while others are mostly cheese.

Rolling the enchiladas: Take one flour tortilla and lay it flat on your work surface or cutting board. Scoop about a quarter to a third cup of your chicken and cheese mixture and place it in a line down the center of the tortilla, going lengthwise from one end to the other. Don’t overfill or you won’t be able to roll it properly and filling will squish out everywhere. Fold one side of the tortilla over the filling, then roll it tightly like you’re making a burrito, tucking as you go to keep everything contained. Place the rolled enchilada seam-side down in your prepared baking dish so it doesn’t unroll during baking. Repeat this process with all remaining tortillas and filling, arranging them snugly next to each other in the dish. They should fit relatively tightly with all the enchiladas touching each other, which helps them stay rolled and keeps them moist during baking.

Making the white sauce: Set a medium skillet or saucepan over medium-low heat and add your three tablespoons of butter. Let it melt completely, swirling the pan to coat the bottom evenly. Sprinkle your three tablespoons of flour over the melted butter and immediately start whisking vigorously to combine them into a paste. Keep whisking constantly for about one minute while this roux cooks, getting rid of that raw flour taste without letting it brown or burn. Turn your heat down to low and slowly pour in your two cups of chicken broth while continuing to whisk constantly. The mixture will thicken as you add the broth, transforming from a paste into a smooth, flowing sauce. Keep cooking and whisking until the sauce starts bubbling and looks thick enough to coat the back of a spoon, which takes about 2 to 3 minutes. Take the pan completely off the heat and set it aside to cool for 3 to 5 minutes until it reaches room temperature. You can speed this up by stirring occasionally to release heat. Once the sauce has cooled down and isn’t steaming anymore, add your cup of sour cream and 4-ounce can of diced green chiles including all the liquid in the can. Stir everything together vigorously until the sour cream dissolves completely into the sauce and you have a smooth, creamy mixture with visible green chile pieces throughout but no streaks of white sour cream remaining.

Assembling and baking: Pour your finished white sauce evenly over all the rolled enchiladas in the baking dish, using a spoon to spread it around if needed so every enchilada gets coated. Some sauce will pool in the gaps between enchiladas and around the edges, which is perfect and exactly what you want. Sprinkle the remaining two cups of shredded Monterey Jack cheese evenly across the top of the sauce-covered enchiladas, creating a uniform cheese layer that will melt and get slightly golden in the oven. Slide the assembled dish into your preheated oven and set a timer for 20 minutes. Check it at 20 minutes to see if the cheese on top is melted and bubbly with maybe some golden spots starting to form. If everything looks hot and bubbly with melted cheese, take it out. If the cheese hasn’t fully melted or the sauce isn’t bubbling around the edges yet, give it another 5 minutes. When it’s done, let the dish sit for about 5 minutes before serving so people don’t burn their mouths on molten cheese and boiling sauce.

Things Worth Knowing

Cooling the sauce to room temperature before adding sour cream is crucial because if you add cold sour cream to hot sauce it’ll curdle and separate into weird lumpy bits instead of creating smooth creamy sauce. Placing the enchiladas seam-side down in the dish keeps them from unrolling during baking, which would create a mess with filling escaping everywhere. Making the roux and cooking it for that full minute gets rid of the raw flour taste that would make your sauce taste pasty and weird if you skipped this step.

The first time I made these, I was impatient and added the sour cream to the hot sauce straight off the stove without cooling it first. The sour cream immediately curdled into these gross-looking lumpy white bits floating in thin sauce instead of creating the smooth creamy texture I wanted. The enchiladas still tasted okay but looked terrible with separated sauce that wasn’t appetizing. Now I always let the sauce cool completely before adding sour cream, which takes an extra few minutes but prevents that whole disaster.

I placed enchiladas seam-side up once because I wasn’t paying attention, and several of them unrolled during baking as the tortillas softened from the sauce. The filling leaked out into the dish and I ended up with partially empty tortillas sitting in a puddle of chicken and cheese. Seam-side down is the only way to do this if you want enchiladas that stay rolled and look presentable when you serve them.

The roux cooking time seemed like unnecessary fussiness when I first read this recipe, and I tried whisking the flour into butter for only like ten seconds before adding broth. The finished sauce had this weird pasty, raw flour taste underneath the sour cream that made everything taste slightly off. Cooking it for that full minute really does matter for developing proper flavor and getting rid of that unpleasant raw flour taste.

I used low-fat sour cream once thinking I’d make these healthier, and the sauce came out thin and slightly separated with less creamy flavor than full-fat sour cream provides. The fat content in regular sour cream is what makes the sauce rich and stable, so using reduced-fat versions compromises the texture and taste. If you’re worried about calories, just eat smaller portions rather than trying to lighten up the sauce.

The green chiles are what give these their distinctive flavor, so don’t skip them thinking the sauce will be fine without. I forgot them once and the sauce was bland and boring, tasting like just sour cream and chicken broth without any character. Those chiles add subtle heat and southwestern flavor that makes these taste like actual enchiladas instead of just chicken rolls with white sauce.

Serving These Enchiladas

Use a large spatula to scoop out individual enchiladas onto plates while everything is still hot from the oven, making sure each serving gets plenty of that creamy sauce and melted cheese on top. Set out toppings like chopped cilantro, diced tomatoes, sliced avocado, extra sour cream, salsa, or jalapeño slices so people can customize their plates. This feeds about eight people as a main course with one enchilada per person, though teenagers and really hungry adults might eat two. Serve with Spanish rice and refried beans on the side for a complete Mexican dinner, or with a simple green salad if you want something lighter. Tortilla chips and salsa make a good appetizer while you’re waiting for the enchiladas to bake.

These work perfectly for weeknight dinners when you need something fast that the whole family will actually eat without complaints. The mild flavor appeals to kids and picky eaters while still being flavorful enough that adults don’t feel like they’re eating boring food. Everyone can add their own heat level with hot sauce or jalapeños at the table instead of making the whole dish spicy and dealing with people complaining.

The creamy white sauce is what makes these different from regular enchiladas, creating comfort food vibes without the acidity and heat of traditional red enchilada sauce. Each bite gives you tender chicken, gooey cheese, soft tortilla, and creamy sauce all together in perfect proportion. The green chiles add just enough flavor without overwhelming everything or making your mouth burn.

Leftovers actually taste better the next day after all the flavors have had time to blend together overnight in the fridge. The tortillas absorb more sauce and everything tastes more cohesive and flavorful. I usually prefer eating these as leftovers because the flavors are more developed.

Different Ways to Make Them

  • Add black beans or pinto beans to the chicken and cheese filling for extra protein and substance.
  • Use pepper jack cheese instead of Monterey Jack if you want more heat throughout without adding separate spicy ingredients.
  • Mix some cooked spinach into the filling for vegetables and extra nutrition.
  • Try cream of chicken soup mixed with sour cream instead of making the roux-based sauce if you want to save time.
  • Add corn to the filling for sweetness and texture that kids especially love.
  • Use a combination of chicken and shrimp for surf and turf enchiladas with more complex flavor.
  • Top with crushed tortilla chips before baking for extra crunch on top.
  • Add some cream cheese to the filling for even more creaminess throughout.

Keeping Them Fresh

Leftover enchiladas keep in the refrigerator for up to 3 to 4 days stored in an airtight container or with the baking dish covered tightly with foil. Reheat individual servings in the microwave for about 2 minutes until heated through, or reheat the whole dish covered with foil in a 350-degree oven for about 20 minutes. These don’t freeze particularly well because the sour cream sauce separates and gets grainy when thawed, and the tortillas turn mushy and weird. For best results, just make what you’ll eat within a few days and enjoy them fresh rather than trying to freeze portions for later.

White Chicken Enchiladas Skillet

Kitchen Secrets

  • Don’t overfill the tortillas or they’ll be impossible to roll without filling squishing out everywhere, and they might burst open during baking
  • If your tortillas keep cracking when you try to roll them, warm them slightly in the microwave for 10 to 15 seconds to make them more pliable
  • Add a splash more chicken broth to the sauce if it seems too thick after adding the sour cream, since everyone has different preferences for how saucy they like their enchiladas

I’ve made these white chicken enchiladas countless times over the past few years since discovering how fast and easy they are for weeknight dinners when I don’t have energy for complicated cooking. There’s something really satisfying about a meal that comes together this quickly but still tastes like you put in actual effort instead of just reheating frozen food or ordering takeout. The creamy white sauce coating tender chicken-filled tortillas with melted cheese on top creates that perfect comfort food experience without being as heavy or spicy as traditional enchiladas. My kids genuinely request these for dinner, which almost never happens with meals that involve actual cooking beyond boiling pasta. I love that using rotisserie chicken makes this feasible on busy weeknights when the idea of cooking raw chicken would make me order pizza instead. This has earned its permanent spot in my regular dinner rotation, joining that small group of meals I make constantly because they’re foolproof, fast, and consistently make everyone happy without requiring me to be a genius in the kitchen or spend hours cooking!

Frequently Asked Questions

→ Can I make these ahead of time? Yes! Assemble everything, cover with foil, and refrigerate for up to 24 hours. Just add 10 minutes to the bake time since it’ll be cold from the fridge.

→ Can I freeze white chicken enchiladas? Absolutely. Assemble them but don’t bake. Wrap really tight and freeze for up to 3 months. Thaw overnight in the fridge before baking as directed.

→ What can I use instead of rotisserie chicken? Any cooked chicken works – leftover grilled chicken, poached chicken breasts, or even canned chicken in a pinch. You need about 3 cups shredded.

→ Why did my sauce get lumpy? The sauce was probably too hot when you added the sour cream. Always let it cool for a few minutes first. If it does get lumpy, whisk it hard or blend it smooth.

→ Can I use a different cheese? Sure! Try pepper jack for spice, or a Mexican cheese blend. White cheddar or mozzarella work too. Just avoid pre-shredded if you can since it doesn’t melt as smoothly.

→ How do I make these spicier? Use hot green chiles instead of mild, add diced jalapeños to the filling, or mix some hot sauce into the white sauce. You could also top with sliced jalapeños before baking.

0 comments
0 FacebookTwitterPinterestPocketEmail
30 Minute MealsChicken MealsPizza

Hawaiian BBQ Chicken Flatbread Pizza

by Clare Greco February 15, 2026
written by Clare Greco

Hawaiian BBQ chicken flatbread pizza is basically what happens when you take the controversial pineapple-on-pizza debate and add BBQ sauce to make it even more divisive, which somehow creates this sweet-tangy-savory combination that works way better than it has any right to. You brush flatbread with olive oil and pre-bake it until crispy, spread on BBQ sauce, pile on shredded rotisserie chicken, pineapple chunks, red onion, and Colby Jack cheese, then bake until everything melts together into this quick weeknight dinner that tastes like you tried harder than you actually did. The whole thing takes about twenty minutes from start to finish, which is faster than ordering delivery and costs about a quarter of what restaurants charge for flatbread pizzas that are mostly just bread with minimal toppings. I started making this when my son announced he was bringing his girlfriend home for dinner with approximately two hours notice. I threw together what I had in the fridge, and when she asked for the recipe, I realized I’d accidentally created something worth repeating. Now my son specifically requests “that pizza thing” whenever he’s bringing someone over, which has made me look like a much better cook than I actually am to a series of girlfriends who probably think I make fancy flatbreads regularly.

Why This Pizza Works

  • Pre-baking the flatbread with olive oil creates a crispy base that doesn’t get soggy under the weight of wet toppings
  • Using rotisserie chicken eliminates the need to cook raw meat, making this a true 20-minute meal
  • The sweet and tangy BBQ sauce serves as the perfect bridge between the salty chicken and the sweet pineapple
  • Colby Jack cheese has a mild flavor and a superior melt factor, ensuring a gooey topping that doesn’t overwhelm the other ingredients

My neighbor Linda is extremely vocal about how pineapple on pizza is “an abomination,” acting like fruit on savory food personally offends her. She came to a casual dinner party where I served this, saw the pineapple, and made her usual dramatic comments. I watched her sneak two pieces when she thought nobody was looking, then later claim she was “just trying it to confirm it was terrible.” Her husband texted me the next day asking for the recipe because apparently she’d made him stop at the store on the way home to buy ingredients to recreate it. Now she makes this regularly at home, though she still won’t admit publicly that she likes it.

What Goes Into It

  • Rectangular flatbread: One large piece provides a thin, crispy alternative to traditional pizza dough
  • Olive oil: One tablespoon to brush on the base for a golden, crunchy texture
  • BBQ sauce: Half a cup divided—some for the base and some for a final artistic drizzle
  • Colby Jack cheese: One and a quarter cups, hand-shredded for the best possible melt
  • Rotisserie chicken: One cup, shredded or cubed, for a quick and savory protein boost
  • Red onion: A quarter cup, sliced paper-thin to provide a sharp, colorful bite
  • Pineapple: A quarter cup, diced small to provide those essential sweet bursts
  • Garlic powder: One tablespoon to season the chicken and add savory depth
  • Green onions: Two tablespoons, chopped, for a fresh herbal finish
Hawaiian BBQ Chicken Flatbread Pizza

Assembling the Flatbread

The Pre-Bake: Heat your oven to 400°F. Brush your flatbread with olive oil and bake on a parchment-lined sheet for 5 minutes. This creates a barrier so the sauce doesn’t soak into the bread.

The Sauce and Cheese: Spread a quarter cup of BBQ sauce over the pre-baked flatbread, leaving a small border for the “crust.” Sprinkle on one cup of your shredded Colby Jack cheese.

The Seasoned Chicken: In a small bowl, toss your shredded chicken with salt, pepper, and garlic powder. Scatter this evenly over the cheese, then top with the remaining quarter cup of cheese to lock the chicken in place.

The Final Toppings: Distribute the red onion and pineapple chunks across the top. Finish with a drizzle of the remaining BBQ sauce in a zigzag pattern for extra flavor and visual appeal.

The Final Bake: Bake for 10 to 15 minutes until the cheese is bubbly and the edges are golden-brown. Garnish with fresh green onions immediately after removing from the oven.

You Must Know

  • Dry the pineapple: Pat your pineapple chunks with a paper towel before adding them to keep excess juice from making the pizza soggy
  • Shred your own cheese: Pre-bagged cheese contains anti-caking agents that prevent it from melting into a smooth, gooey layer
  • Slice onions thin: If the onions are too thick, they won’t mellow out in the short baking time and will taste unpleasantly raw
  • Season the meat: Don’t rely on the BBQ sauce alone to flavor the chicken; that extra pinch of garlic powder and salt makes every bite consistent

I’ve learned the hard way that skipping the pre-bake is the fastest way to ruin a flatbread. Without those first five minutes in the oven, you’ll end up with a floppy center that can’t support the weight of the chicken and pineapple. It’s a tiny step that makes the difference between a “homemade pizza” and a restaurant-quality flatbread.

Creative Variations

  • Add Heat: Swap the Colby Jack for Pepper Jack and add fresh jalapeño slices for a sweet-and-spicy kick
  • Smoky Richness: Add crumbled bacon alongside the chicken for extra texture and a campfire flavor
  • The Herb Finish: Swap the green onions for fresh cilantro to give it a brighter, more aromatic Mexican-fusion vibe
  • Naan Alternative: If you can’t find flatbread, a large piece of Naan makes an excellent, slightly chewier substitute

Storage and Reheating

Leftovers keep in the fridge for up to 3 days. To restore the crunch, avoid the microwave and pop the slices back into a 350°F oven or an air fryer for about 5 minutes. This doesn’t freeze well because the fruit and flatbread both suffer during the thawing process, but since it’s so fast to make, there’s rarely a need for freezing!

Hawaiian BBQ Chicken Flatbread Pizza

Chef’s Wisdom

  • If you want an even crispier bottom, bake the flatbread directly on the oven rack (place a baking sheet on the rack below to catch any stray drips)
  • Use a honey-based BBQ sauce if you want to lean into the sweetness, or a vinegar-based sauce to cut through the richness of the cheese
  • Let the pizza sit for 2 minutes before slicing so the cheese has a chance to set, giving you much cleaner cuts

Ultimately, this Hawaiian BBQ chicken flatbread is a testament to the idea that some of the best meals come from desperate kitchen experiments. It’s the perfect solution for busy weeknights or impromptu guests, proving that even a “divisive” topping like pineapple can win over the harshest critics—even if they, like Linda, only admit it behind closed doors.

Frequently Asked Questions

→ Can I use a different type of cheese? Sure! Mozzarella, cheddar, or a Mexican cheese blend all work great. Use whatever melts well and you have on hand.

→ What if I don’t have flatbread? Naan bread works perfectly, or you could use pita bread, English muffins, or even a pre-made pizza crust. Just adjust the cooking time if needed.

→ Can I use canned pineapple? Absolutely! Just make sure to drain it really well and pat the chunks dry with a paper towel so they don’t make the pizza soggy.

→ How do I store leftovers? Keep leftover slices in an airtight container in the fridge for up to 3 days. Reheat in a 350°F oven for about 10 minutes to crisp it back up.

→ Can I prep this ahead of time? You can assemble everything up to the final baking step and keep it covered in the fridge for a few hours. Just bake when you’re ready to eat.

→ Is this good for a party? Yes! Make several flatbreads, cut them into small squares, and serve as appetizers. You can even set up a topping bar and let people customize their own.

Hawaiian BBQ Chicken Flatbread Pizza

Serves: 4 Prep Time: 10 Minutes Cooking Time: 20 Minutes 20 Minutes
Nutrition facts: 200 calories 20 grams fat
Rating: 5.0/5
( 1 voted )
Pin
Print

Ingredients

 1 rectangular flatbread
 1 tbsp olive oil
 

→ For the Toppings

 ½ cup BBQ sauce, divided
 1¼ cups hand-shredded Colby Jack cheese
 1 cup rotisserie chicken, shredded or cubed
 ¼ cup red onion, thinly sliced
 ¼ cup fresh pineapple, diced small
 1 tbsp garlic powder
 Salt and pepper to taste
 

→ For Garnish

 2 tbsp green onion, chopped

Instructions

Turn your oven to 400 degrees. Line a baking sheet with parchment paper.

Brush olive oil all over the top of your flatbread and place it on the lined baking sheet. Pop it in the center of the oven for 5 minutes until it starts getting a little crispy around the edges.

Take the flatbread out of the oven and spread a quarter cup of BBQ sauce evenly across the surface.

Sprinkle 1 cup of the shredded Colby Jack cheese over the BBQ sauce.

In a small bowl, toss your chicken pieces with the garlic powder, salt, and pepper. Spread the seasoned chicken evenly over the cheese layer.

Sprinkle the remaining quarter cup of cheese on top of the chicken.

Scatter the sliced red onion over everything, then distribute the pineapple chunks across the top.

Drizzle the rest of the BBQ sauce over the whole pizza. Put it back in the oven on the center rack and bake for 10 to 15 minutes until the cheese is melted and bubbly.

Take it out and sprinkle the chopped green onions on top. Slice it up and serve while it's hot.

Notes

  1. Using rotisserie chicken makes this super quick and easy.
  2. Fresh pineapple tastes best, but canned pineapple chunks work fine if you drain them well.
  3. Hand-shredded cheese melts better than pre-shredded because it doesn't have anti-caking agents.
  4. Toasting the flatbread first keeps it from getting soggy under all the toppings.
  5. You can use naan bread or even a store-bought pizza crust if you don't have flatbread.
  6. This is great for game day, quick dinners, or as an appetizer cut into smaller pieces.
0 comments
0 FacebookTwitterPinterestPocketEmail
  • 1
  • …
  • 5
  • 6
  • 7
  • 8
  • 9
  • 10

Search

Follow Us

279.4K Fans
twitter
instagram
pinterest

Recent Posts

  • Mexican Chicken With Cheese Sauce

    March 24, 2026
  • Chocolate Bread

    March 22, 2026
  • Bojangles Biscuits

    March 22, 2026
  • Braided Cherry Danish

    March 21, 2026
  • Strawberry Pop Tarts

    March 21, 2026
  • Creamy Cajun Chicken Pasta

    March 10, 2026
  • Sausage & Egg Burritos

    March 9, 2026

Categories

  • 30 Minute Meals (35)
  • Barbecue (2)
  • Beef Meals (11)
  • Breakfast & Pastries (15)
  • Casseroles (9)
  • Cheesesteak (2)
  • Chicken Meals (19)
  • Cultural Dishes (12)
  • Featured (8)
  • Fish Meals (6)
  • Fresh Baked Breads (2)
  • Main Dishes (7)
  • Other Meals (1)
  • Pasta (21)
  • Pizza (4)
  • Popular Recipes (9)
  • Pork Meals (8)
  • Seafood Meals (19)
  • Soups & Salads (13)
  • Turkey Meals (7)
  • Vegetarian (17)

Popular Posts

  • 1

    Buddha Bowl with Tofu

    October 22, 2024
  • 2

    Delicious Pasta Alla Norma

    October 20, 2021
  • 3

    Classic Spicy Barbecued Ribs

    October 20, 2021
  • 4

    Breakfast Zucchini Fritters

    October 20, 2021
  • 5

    Roasted Salmon with Herbs

    October 20, 2021

About Me

At MyPhillyConnection, we specialize in recipes for Philly favorites and lots of other popular dishes and cuisines.

Phone: (215) 554-7326
Email: info@myphillyconnection.com

Useful Links

  • Beef Meals
  • Chicken Meals
  • Fish Meals
  • Recipes
  • Recipe Submission

Breakfast Recipes

  • Mexican Chicken With Cheese Sauce

    March 24, 2026
  • Chocolate Bread

    March 22, 2026

Recent Posts

  • Mexican Chicken With Cheese Sauce

    March 24, 2026
  • Chocolate Bread

    March 22, 2026
  • Facebook
  • Twitter
  • Instagram
  • Pinterest
  • Linkedin
  • Tiktok

Copyright © 2026 - MyPhillyConnection / All Rights Reserved.

Philadelphia Food Network and Recipes
  • Home
    • Main Website
  • Recipes
  • Meals
    • 30 Minute Meals
    • Beef Meals
    • Breakfast & Pastries
    • Chicken Meals
    • Fish Meals
    • Pork Meals
    • Seafood Meals
    • Turkey Meals
    • Vegan & Vegetarian Meals
    • Other Meals
  • Categories
    • Barbecue
    • Casseroles
    • Cheesesteak
    • Cultural Dishes
    • Desserts & Treats
    • Featured
    • Fresh Baked Breads
    • Grilling
    • Pasta
    • Pizza
    • Popular Recipes
    • Side Dishes
    • Soul Food
    • Soups & Salads
  • About Us
  • Contact Us
  • Submit Your Recipe
Sign In

Keep me signed in until I sign out

Forgot your password?

Do not have an account ? Register here

Password Recovery

A new password will be emailed to you.

Have received a new password? Login here

Register New Account

I Agree to the Terms of Service and Privacy Policy

Have an account? Login here